Node.js Basics
Click ★ if you like the project. Your contributions are heartily ♡ welcome.
Related Topics
- HTML Basics
- CSS Basics
- JavaScript Basics
- SQL-Server Basics
- MongoDB Basics
- Node.js APIs
- Node.js Commands
- Node.js Multiple Choice Questions
- Node.js Coding Practice
- Design Patterns
- Data Structures and Algorithms
Table of Contents
- Fundamentals & Core Concepts
- Core Modules & System Operations
- Web Development & APIs
- Reliability & Maintenance
- Advanced Optimization & Security
# 1. INTRODUCTION
Q. What is Node.js?
Node.js is an open-source server side runtime environment built on Chrome's V8 JavaScript engine. It provides an event driven, non-blocking (asynchronous) I/O and cross-platform runtime environment for building highly scalable server-side applications using JavaScript.
Q. What is Node.js Process Model?
The Node.js Process Model is a single-threaded, event-driven architecture designed to handle many concurrent client requests efficiently. Unlike traditional web servers that create a new thread for every request, Node.js uses a Single-Threaded Event Loop to manage all non-blocking operations
Features:
- Runs in a single process with a single thread, requiring fewer resources than multi-threaded platforms
- All incoming requests are handled by that one thread
- Blocking I/O (file system, database, network) is handed off asynchronously — the thread doesn't wait for it to complete
- When async work finishes, a callback is queued and executed, and the response is sent back to the client
Flow:
- Client requests arrive and are placed in the Event Queue
- The Event Loop picks them up one by one
- If a request needs blocking I/O → it's assigned to a thread pool (libuv) in the background
- The main thread moves on to the next request immediately
- When the I/O completes, the callback fires and the response is returned
This is why Node.js is highly scalable for I/O-bound workloads — it never blocks waiting, unlike traditional thread-per-request servers.
Q. What are the key features of Node.js?
-
Asynchronous and Event driven – All APIs of Node.js are asynchronous. This feature means that if a Node receives a request for some Input/Output operation, it will execute that operation in the background and continue with the processing of other requests. Thus it will not wait for the response from the previous requests.
-
Fast in Code execution – Node.js uses the V8 JavaScript Runtime engine, the one which is used by Google Chrome. Node has a wrapper over the JavaScript engine which makes the runtime engine much faster and hence processing of requests within Node.js also become faster.
-
Single Threaded but Highly Scalable – Node.js uses a single thread model for event looping. The response from these events may or may not reach the server immediately. However, this does not block other operations. Thus making Node.js highly scalable. Traditional servers create limited threads to handle requests while Node.js creates a single thread that provides service to much larger numbers of such requests.
-
Node.js library uses JavaScript – This is another important aspect of Node.js from the developer's point of view. The majority of developers are already well-versed in JavaScript. Hence, development in Node.js becomes easier for a developer who knows JavaScript.
-
There is an Active and vibrant community for the Node.js framework – The active community always keeps the framework updated with the latest trends in the web development.
-
No Buffering – Node.js applications never buffer any data. They simply output the data in chunks.
Q. How does Node.js work?
Node.js is completely event-driven and processes everything on a single thread using a non-blocking I/O model.
Node.js works asynchronously by using the event loop and callback functions, to handle multiple requests coming in parallel. An Event Loop is a functionality which handles and processes all your external events and just converts them to a callback function. It invokes all the event handlers at a proper time. Thus, lots of work is done on the back-end, while processing a single request, so that the new incoming request doesn't have to wait if the processing is not complete.
While processing a request, Node.js attaches a callback function to it and moves it to the back-end. Now, whenever its response is ready, an event is called which triggers the associated callback function to send this response.
Core Components:
| Component | Role |
|---|---|
| V8 Engine | Executes JavaScript on the server (same engine as Chrome) |
| libuv | C library that handles async I/O, thread pool, event loop |
| Event Queue | Holds incoming requests/events in FIFO order |
| Event Loop | Continuously polls the queue and dispatches callbacks |
| Thread Pool | Background workers (libuv) for blocking operations (file, DNS, crypto) |
Request Lifecycle:
- A request arrives → placed in the Event Queue
- The Event Loop picks it up (call stack must be empty)
- No blocking I/O? → Process immediately, send response
- Blocking I/O needed? → Offload to a thread pool worker, register a callback, free the main thread
- Worker completes → fires an event → callback executes → response sent
Key Design Principles:
- Single-threaded JS execution — no thread management overhead
- Non-blocking by default — APIs are async with callbacks/promises
- Observer pattern — events trigger registered listeners
- Concurrency without threads — achieved via the event loop + callbacks, not parallel execution
What it’s great at: High-concurrency I/O-bound workloads (APIs, real-time apps, microservices)
What it’s not ideal for: CPU-intensive tasks (use worker_threads or child_process for those)
Q. What is difference between process and threads in Node.js?
In Node.js, the main difference between a process (using the child_process or cluster modules) and a thread (using the worker_threads module) lies in how they handle memory and isolation.
Process
A process is an independent program instance with its own memory space.
- Created via
child_process.fork()— spawns a new V8 instance - Isolated memory — no sharing between processes
- Communicates via IPC (message passing)
- If it crashes, only that process is affected
- Higher creation overhead
Thread
A thread is a unit of execution within a process.
- Created via
worker_threadsmodule - Shared memory within the same process (via
SharedArrayBuffer) - Communicates via
postMessageor shared memory - A crash can affect the entire process
- Lower creation overhead
Comparison Table
| Process | Thread | |
|---|---|---|
| Memory | Isolated | Shared within process |
| Creation cost | Higher (new V8 instance) | Lower |
| Communication | IPC (message passing) | SharedArrayBuffer / postMessage |
| Crash impact | Only that process | Can crash entire process |
| Use case | Separate Node.js apps, external commands | CPU-intensive JS tasks |
When to use which?
- Use
child_process.fork()— when you need full isolation (separate scripts, different environments) - Use
worker_threads— for CPU-heavy JS tasks (image processing, parsing, crypto) where you want low overhead and optional memory sharing
Node.js's main event loop always runs on a single thread — neither approach blocks it when used correctly.
# 2. NODE.JS ARCHITECTURE
Q. How does Node.js works?
Node.js is single-threaded and event-driven, using a non-blocking I/O model to handle many concurrent operations efficiently.

Core Components
| Component | Role |
|---|---|
| V8 Engine | Executes JavaScript (same engine as Chrome) |
| libuv | C library handling async I/O, thread pool, and event loop |
| Event Queue | Holds incoming requests/events in FIFO order |
| Event Loop | Continuously polls the queue and dispatches callbacks |
| Thread Pool | Background workers for blocking operations (file, DNS, crypto) |
Request Lifecycle
- Request arrives → placed in the Event Queue
- Event Loop picks it up (only when the call stack is empty)
- No blocking I/O? → Process immediately, send response
- Blocking I/O needed? → Offload to a thread pool worker, register a callback, free the main thread
- Worker completes → fires an event → callback executes → response sent
Client Requests
      ↓
  Event Queue
      ↓
  Event Loop (single thread)
    ├── Non-blocking? → Process & respond immediately
    └── Blocking I/O? → Thread Pool (libuv)
                              ↓
                         Callback fired → response sent
Key Design Principles
- Single-threaded JS execution — no thread management overhead
- Non-blocking by default — APIs are async with callbacks/promises
- Observer pattern — events trigger registered listeners
- Concurrency without threads — achieved via event loop + callbacks, not parallel execution
Q. What are the core modules of Node.js?
Node.js has a set of core modules that are part of the platform and come with the Node.js installation. These modules can be loaded into the program by using the require function.
The following table lists some of the important core modules in Node.js.
| Name | Description |
|---|---|
assert |
It is used by Node.js for testing itself. |
buffer |
Handle raw binary data outside the V8 heap |
child_process |
Spawn child processes (exec, spawn, fork) |
cluster |
This module is used by Node.js to take advantage of multi-core systems, so that it can handle more load. |
console |
It is used to write data to console. Node.js has a Console object which contains functions to write data to console. |
crypto |
Cryptographic functions — hashing, encryption, HMAC |
http/https |
Create HTTP/HTTPS servers and make requests |
url |
It includes methods for URL resolution and parsing. |
querystring |
It includes methods to deal with query string. |
path |
Utilities for working with file and directory paths |
fs |
File system — read, write, update, delete, rename files. |
stream |
Readable, Writable, Duplex, and Transform streams |
worker_threads |
Run CPU-intensive JS in background threads |
util |
It includes utility functions useful for programmers. |
zlib |
It is used to compress and decompress data. |
Example:
const http   = require('http');
const fs     = require('fs');
const path   = require('path');
const crypto = require('crypto');

// HTTP server
http.createServer((req, res) => {
  res.writeHead(200, { 'Content-Type': 'text/plain' });
  res.end('Hello World');
}).listen(3000);

// File path
const filePath = path.join(__dirname, 'data', 'file.txt');

// Read file
fs.readFile(filePath, 'utf8', (err, data) => {
  if (err) throw err;
  console.log(data);
});

// Hash a string
const hash = crypto.createHash('sha256').update('secret').digest('hex');
console.log(hash);
Q. What do you understand by Reactor Pattern in Node.js?
Reactor Pattern is used to avoid the blocking of the Input/Output operations. It provides us with a handler that is associated with I/O operations. When the I/O requests are to be generated, they get submitted to a de-multiplexer, which handles concurrency in avoiding the blocking of the I/O mode and collects the requests in form of an event and queues those events.
Types of Input/Output operations
1. Blocking I/O (Synchronous): Application will make a function call and pause its execution at a point until the data is received.
2. Non-Blocking I/O (Asynchronous): Application will make a function call, and, without waiting for the results it continues its execution. Node.js uses non-blocking I/O exclusively.
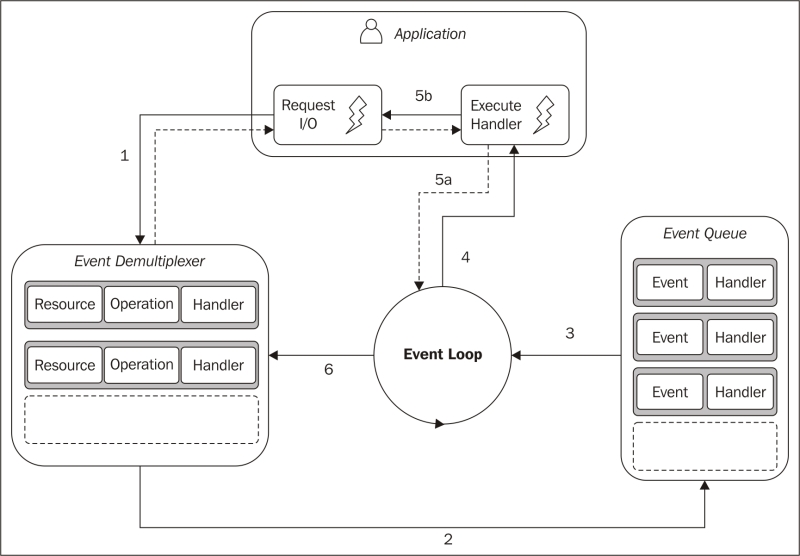
Reactor Pattern comprises of:
1. Resources: They are shared by multiple applications for I/O operations, generally slower in executions.
2. Synchronous Event De-multiplexer/Event Notifier: This uses Event Loop for blocking on all resources. When a set of I/O operations completes, the Event De-multiplexer pushes the new events into the Event Queue.
3. Event Loop and Event Queue: Event Queue queues up the new events that occurred along with its event-handler, pair.
4. Request Handler/Application: This is, generally, the application that provides the handler to be executed for registered events on resources.
Q. What are the global objects of Node.js?
Node.js Global Objects are the objects that are available in all modules. Global Objects are built-in objects that are part of the JavaScript and can be used directly in the application without importing any particular module.
Global Objects
| Object | Description |
|---|---|
global |
The global namespace object (equivalent to window in browsers) |
process |
Info and control over the current Node.js process |
console |
Write to stdout/stderr |
Buffer |
Handle raw binary data |
__dirname |
Absolute path of the current module’s directory |
__filename |
Absolute path of the current module’s file |
setTimeout / clearTimeout |
Schedule a one-time callback |
setInterval / clearInterval |
Schedule a repeating callback |
setImmediate / clearImmediate |
Execute after current event loop iteration |
queueMicrotask |
Queue a microtask |
URL / URLSearchParams |
Web-compatible URL API |
fetch |
HTTP client (available since Node.js v18) |
crypto |
Web Crypto API (available since Node.js v19) |
Examples:
// __dirname and __filename
console.log(__dirname);   // D:\projects\myapp
console.log(__filename);  // D:\projects\myapp\index.js

// process — runtime info
console.log(process.version);       // v20.x.x
console.log(process.platform);      // 'win32' / 'linux'
console.log(process.env.NODE_ENV);  // 'development'
console.log(process.pid);           // process ID
process.exit(0);                    // exit with code 0

// global — set a truly global variable (avoid in practice)
global.appName = 'MyApp';
console.log(appName); // 'MyApp' — accessible anywhere

// Buffer
const buf = Buffer.from('hello');
console.log(buf.toString('hex')); // 68656c6c6f

// Timers
const timer = setTimeout(() => console.log('done'), 1000);
clearTimeout(timer); // cancel it
__dirnameand__filenameare not available in ES Modules — useimport.meta.urlwithfileURLToPath()instead. Theglobalobject in Node.js v21+ is also aliased asglobalThis(the standard cross-environment global).
Q. What is chrome v8 engine?
V8 is an open-source, high-performance JavaScript and WebAssembly engine written in C++, developed by Google. It was originally designed for Google Chrome and Chromium-based browsers ( such as Brave ) in 2008, but it was later utilized to create Node.js for server-side coding.
V8 is the JavaScript engine i.e. it parses and executes JavaScript code. The DOM, and the other Web Platform APIs ( they all makeup runtime environment ) are provided by the browser.
V8 is known to be a JavaScript engine because it takes JavaScript code and executes it while browsing in Chrome. It provides a runtime environment for the execution of JavaScript code. The best part is that the JavaScript engine is completely independent of the browser in which it runs.
Just-In-Time (JIT) compilation:
V8 uses two compilers working together:
- Ignition — baseline interpreter that converts JS to bytecode quickly, collects profiling data
- TurboFan — optimizing compiler that re-compiles “hot” (frequently run) code into highly optimized machine code
V8 Key Optimizations
- Hidden classes — optimizes property access on objects
- Inline caching — caches results of repeated operations
- Garbage collection — generational GC (Scavenger + Mark-Compact) with minimal pause times
Q. Why is LIBUV needed in Node JS?
libuv is a cross-platform C library that gives Node.js its ability to perform non-blocking, asynchronous I/O — the core of everything Node.js does efficiently. It provides the following features:
- It allows the CPU and other resources to be used simultaneously while still performing I/O operations, thereby resulting in efficient use of resources and network.
- It facilitates an event-driven approach wherein I/O and other activities are performed using callback-based notifications.
- It provides mechanisms to handle file system, DNS, network, child processes, pipes, signal handling, polling and streaming
- It also includes a thread pool for offloading work for some things that can't be done asynchronously at the operating system level.
Example: Thread Pool
Some operations can't be made async at the OS level (e.g., some file system calls, DNS lookups, crypto). libuv offloads these to a pool of worker threads:
const fs = require('fs');
const crypto = require('crypto');

// These are offloaded to libuv\'s thread pool — main thread never blocks
fs.readFile('large-file.txt', (err, data) => {
  console.log('File read complete');
});

crypto.pbkdf2('password', 'salt', 100000, 64, 'sha512', (err, key) => {
  console.log('Hash complete');
});

console.log('Main thread continues immediately'); // prints first
Q. How V8 compiles JavaScript code?
Compilation is the process of converting human-readable code to machine code. There are two ways to compile the code
- Using an Interpreter: The interpreter scans the code line by line and converts it into byte code.
- Using a Compiler: The Compiler scans the entire document and compiles it into highly optimized byte code.
The V8 engine uses both a compiler and an interpreter and follows just-in-time (JIT) compilation to speed up the execution. JIT compiling works by compiling small portions of code that are just about to be executed. This prevents long compilation time and the code being compiles is only that which is highly likely to run.
Compilation Pipeline
JavaScript Source
       ↓
   Parser
       ↓ generates
Abstract Syntax Tree (AST)
       ↓
   Ignition (Interpreter)
       ↓ produces
   Bytecode  ←──────────────────────┐
       ↓  + profiling data          │ de-optimize if
   TurboFan (Optimizing Compiler)   │ assumptions wrong
       ↓                            │
Optimized Machine Code ─────────────┘
Stage 1 — Parsing
V8 reads JS source and builds an Abstract Syntax Tree (AST):
const x = a + b;

// AST (simplified):
// VariableDeclaration
//   └── BinaryExpression (+)
//         ├── Identifier (a)
//         └── Identifier (b)
- Scanner tokenizes the raw text
- Parser builds the AST from tokens
- Pre-parser skips function bodies not yet called (lazy parsing — speeds up startup)
Stage 2 — Ignition (Interpreter)
Ignition converts the AST into bytecode — a compact, platform-independent instruction set:
// Bytecode for: return a + b
LdaNamedProperty a
Add b
Return
- Starts executing immediately — no wait for full compilation
- Collects type feedback (e.g., “a and b are always integers”)
- Much faster to generate than machine code
Stage 3 — TurboFan (Optimizing Compiler)
When a function becomes “hot” (called many times), TurboFan kicks in:
- Uses Ignition’s profiling data to make type assumptions
- Compiles to highly optimized native machine code
- Eliminates type checks, inlines functions, unboxes numbers
function add(a, b) { return a + b; }

add(1, 2);   // interpreted by Ignition
add(3, 4);   // still Ignition, profiling
add(5, 6);   // ... "hot" → TurboFan optimizes assuming a,b are integers
add('x','y') //  assumption broken → deoptimize back to Ignition
# 3. NODE.JS SETUP
Q. How to create a simple server in Node.js that returns Hello World?
Step 01: Create a project directory
mkdir myapp
cd myapp
Step 02: Initialize project and link it to npm
npm init
This creates a package.json file in your myapp folder. The file contains references for all npm packages you have downloaded to your project. The command will prompt you to enter a number of things.
You can enter your way through all of them EXCEPT this one:
entry point: (index.js)
Rename this to:
app.js
Step 03: Install Express in the myapp directory
npm install express --save
Step 04: app.js
/**
 * Express.js
 */
const express = require('express');
const app = express();

app.get('/', function (req, res) {
  res.send('Hello World!');
});

app.listen(3000, function () {
  console.log('App listening on port 3000!');
});
Step 05: Run the app
node app.js
⚝ Try this example on CodeSandbox
Q. What is the difference between npm and npx?
npm (Node Package Manager) is used to install, share, and manage JavaScript packages. It is bundled with Node.js.
npx (Node Package Execute) is an npm package runner (available since npm v5.2) that lets you execute CLI packages without installing them globally.
| Feature | npm | npx |
|---|---|---|
| Purpose | Install and manage packages | Execute packages directly |
| Global install required | Yes, to use a CLI tool globally | No, runs temporarily |
| Version pinning | Via npm install |
Specify inline: npx pkg@version |
| Use case | npm install -g eslint |
npx eslint index.js |
Example:
// Install globally with npm, then use
npm install -g create-react-app
create-react-app my-app

// Use once without installing globally with npx (recommended)
npx create-react-app my-app
Q. What is the purpose of package.json in Node.js?
The package.json file is the manifest of a Node.js project. It holds metadata about the project and manages its dependencies, scripts, and configuration.
Example:
{
  "name": "my-app",
  "version": "1.0.0",
  "description": "A Node.js application",
  "main": "index.js",
  "type": "module",
  "scripts": {
    "start": "node index.js",
    "dev": "nodemon index.js",
    "test": "jest"
  },
  "dependencies": {
    "express": "^5.0.0"
  },
  "devDependencies": {
    "jest": "^29.0.0",
    "nodemon": "^3.0.0"
  },
  "engines": {
    "node": ">=18.0.0"
  },
  "license": "MIT"
}
Important fields:
| Field | Description |
|---|---|
name |
The name of the package |
version |
Current version (follows semver: MAJOR.MINOR.PATCH) |
main |
Entry point for CommonJS modules |
type |
"module" for ES Modules, "commonjs" (default) for CJS |
scripts |
Shorthand commands runnable via npm run <script> |
dependencies |
Packages required in production |
devDependencies |
Packages only needed during development/testing |
engines |
Declares the Node.js version compatibility |
exports |
Controls public API surface of the package |
Q. What is package-lock.json and why is it important?
package-lock.json is an automatically generated file that locks the exact version of every installed package (including transitive dependencies) to guarantee reproducible installs across all environments and team members.
package.json |
package-lock.json |
|
|---|---|---|
| Written by | Developer | npm (auto-generated) |
| Contains | Version ranges (^1.2.3) |
Exact resolved versions |
| Purpose | Declare intent | Lock the dependency tree |
| Commit to git? | Yes | Yes |
Why it matters:
// package.json — "^1.2.3" allows 1.2.3 → 1.9.9
"dependencies": {
  "express": "^4.18.0"
}

// package-lock.json — pins exactly what was installed
"node_modules/express": {
  "version": "4.18.2",
  "resolved": "https://registry.npmjs.org/express/-/express-4.18.2.tgz",
  "integrity": "sha512-..."
}
Key npm commands:
npm install          # installs using lock file if it exists (reproducible)
npm ci               # strict clean install from lock file (best for CI/CD)
npm install pkg      # adds/updates package and regenerates lock file
npm update           # updates packages within semver ranges in package.json
npm ci vs npm install:
npm cideletesnode_modulesfirst, installs exact versions frompackage-lock.json, and fails if the lock file is out of sync — ideal for CI pipelines.npm installcreates or updatespackage-lock.jsonas needed.
Always commit
package-lock.jsonto version control so every developer and CI environment installs the identical dependency tree.
Q. What is semantic versioning in Node.js?
Semantic Versioning (SemVer) is a versioning scheme MAJOR.MINOR.PATCH used by npm packages to communicate the nature of changes in a release.
| Part | When to increment | Example |
|---|---|---|
| MAJOR | Breaking (backward-incompatible) changes | 1.0.0 → 2.0.0 |
| MINOR | New backward-compatible features | 1.0.0 → 1.1.0 |
| PATCH | Backward-compatible bug fixes | 1.0.0 → 1.0.1 |
Version range specifiers in package.json:
| Specifier | Meaning | Example resolves to |
|---|---|---|
1.2.3 |
Exact version only | 1.2.3 |
^1.2.3 |
Compatible with 1.x.x (fixes + features, no breaking) |
>=1.2.3 <2.0.0 |
~1.2.3 |
Approximately (patch updates only) | >=1.2.3 <1.3.0 |
* or "" |
Any version (not recommended in production) | latest |
>=1.0.0 |
Greater than or equal | 1.0.0, 2.5.0, … |
1.2.x |
Any patch in 1.2 |
1.2.0, 1.2.9, … |
Example:
{
  "dependencies": {
    "express": "^4.18.0",   // accepts 4.18.x, 4.19.x, … but NOT 5.x
    "lodash":  "~4.17.0",   // accepts 4.17.x only
    "uuid":    "9.0.0"      // pinned to exactly 9.0.0
  }
}
Pre-release and build metadata:
1.0.0-alpha.1   pre-release (lower than 1.0.0)
1.0.0-beta.2
1.0.0+build.123 build metadata (ignored in comparisons)
# Check installed vs available versions
npm outdated

# View resolved version
npm list express
# 4. NODE.JS ENVIRONMENT & CONFIGURATION
Q. What are environment variables in Node.js and how to use them?
Environment variables are key-value pairs available to a process at runtime, stored outside the application code. In Node.js they are accessed via process.env. They are the standard way to configure application behaviour (ports, credentials, feature flags) across different environments (development, test, production) without changing code.
Example:
// Set via the terminal before running the app:
// PORT=4000 NODE_ENV=production node app.js

const port = process.env.PORT || 3000;
const env  = process.env.NODE_ENV || 'development';

console.log(`Running on port ${port} in ${env} mode`);
Common environment variables in Node.js projects:
| Variable | Purpose |
|---|---|
NODE_ENV |
Runtime environment (development, test, production) |
PORT |
HTTP server port |
DATABASE_URL |
Database connection string |
JWT_SECRET |
Secret key for signing JSON Web Tokens |
LOG_LEVEL |
Logging verbosity (debug, info, error) |
Q. How to use the dotenv package in Node.js?
The dotenv package loads environment variables from a .env file into process.env, keeping secrets out of source code and making local configuration easy.
Installation:
npm install dotenv
.env file (never commit this to version control):
PORT=3000
NODE_ENV=development
DATABASE_URL=postgres://user:password@localhost:5432/mydb
JWT_SECRET=supersecretkey
app.js:
// Load .env as early as possible — before any other require()
require('dotenv').config();

const express = require('express');
const app = express();

const port = process.env.PORT || 3000;

app.get('/', (req, res) => {
  res.send(`Environment: ${process.env.NODE_ENV}`);
});

app.listen(port, () => {
  console.log(`Server running on port ${port}`);
});
Best practices:
# .gitignore — never commit secrets
.env
.env.local
.env.production
# .env.example — commit this template with placeholder values
PORT=3000
NODE_ENV=development
DATABASE_URL=postgres://user:password@localhost:5432/mydb
JWT_SECRET=
In production, set environment variables through the hosting platform (AWS Parameter Store, Heroku Config Vars, Kubernetes Secrets) instead of deploying a
.envfile.
Q. What is the purpose of NODE_ENV in Node.js?
NODE_ENV is a convention used by Node.js frameworks and libraries to alter their behaviour based on the runtime environment. It is not set automatically — you must define it explicitly.
Common values:
| Value | Usage |
|---|---|
development |
Verbose errors, hot reload, debug logging |
test |
Isolated databases, mocked services |
production |
Minified output, cached templates, suppressed stack traces |
Example — toggling behaviour:
require('dotenv').config();

const express = require('express');
const app = express();

// Express automatically disables view cache and enables verbose errors
// when NODE_ENV !== 'production'
console.log(`NODE_ENV: ${process.env.NODE_ENV}`);

// Custom behaviour based on environment
if (process.env.NODE_ENV === 'production') {
  // Use a real database connection
  app.use(require('./middleware/errorHandler'));   // hides stack traces
} else {
  // Use an in-memory SQLite database for development
  app.use((err, req, res, next) => {
    console.error(err.stack);   // show full stack in dev
    res.status(500).json({ error: err.message, stack: err.stack });
  });
}
Setting NODE_ENV:
# Linux / macOS
NODE_ENV=production node app.js

# Windows PowerShell
$env:NODE_ENV="production"; node app.js

# Cross-platform via npm script (cross-env package)
npm install --save-dev cross-env
# package.json
"scripts": {
  "start": "cross-env NODE_ENV=production node app.js",
  "dev":   "cross-env NODE_ENV=development nodemon app.js"
}
Q. How to manage configuration for different environments in Node.js?
A common pattern is a dedicated config module that reads from environment variables and provides typed, validated configuration to the rest of the application.
Example — config module:
// config/index.js
require('dotenv').config();

const config = {
  app: {
    port: parseInt(process.env.PORT, 10) || 3000,
    env: process.env.NODE_ENV || 'development',
  },
  db: {
    url: process.env.DATABASE_URL,
  },
  jwt: {
    secret: process.env.JWT_SECRET,
    expiresIn: process.env.JWT_EXPIRES_IN || '1d',
  },
};

// Validate required variables at startup
const required = ['DATABASE_URL', 'JWT_SECRET'];
for (const key of required) {
  if (!process.env[key]) {
    throw new Error(`Missing required environment variable: ${key}`);
  }
}

module.exports = config;
// app.js
const config = require('./config');

console.log(`Starting on port ${config.app.port}`);
Failing fast on missing variables at startup prevents hard-to-diagnose runtime errors.
# 5. NODE.JS DATA TYPES
Q. What are the data types in Node.js?
Node.js uses the same data types as JavaScript, categorized into Primitive and Non-Primitive (Reference) types, but it also introduces specialized classes like Buffer to handle server-side needs.
1. Primitives:
- String: Represents textual data (e.g., “Hello”).
- Number: Represents both integers and floating-point values. Node.js numbers are 64-bit double-precision floats.
- BigInt: Used for integers larger than (2⁵³ - 1), which is the limit for the standard Number type.
- Boolean: Represents a logical entity with two values: true or false.
- Undefined: A variable that has been declared but not assigned a value.
- Null: Represents the intentional absence of any object value.
- Symbol: Unique and immutable values often used as private identifiers for object properties.
2. Non-Primitive (Reference) Data Types:
- Object: The fundamental building block for all complex structures, used to store key-value pairs (e.g., { name: “Node”, version: 20 }).
- Array: A specialized type of object used to store ordered lists.
- Function: Reusable blocks of code that are technically objects with callable capabilities.
- Others: Built-in objects like Date, RegExp, Map, and Set
3. Node.js Specific: The Buffer Class:
The Buffer class is essential for handling binary data in Node.js, such as reading from files or processing network packets
- Function: It represents a fixed-length sequence of bytes allocated outside the V8 heap.
- Usage: Unlike standard JavaScript arrays, buffers are designed specifically for performance in I/O operations
Q. Explain String data type in Node.js?
Strings in Node.js are sequences of unicode characters. Strings can be declared using single quotes, double quotes, or backticks (template literals).
Key characteristics:
- Immutable — you cannot change individual characters in place
- Zero-indexed —
str[0]gives the first character - UTF-16 encoded internally
Common String methods:
| Method | Description |
|---|---|
charAt(i) |
Returns the character at index i |
concat() |
Joins two or more strings |
indexOf() |
Returns the index of a substring (-1 if not found) |
includes() |
Returns true if substring exists |
split() |
Splits a string into an array |
slice(start, end) |
Extracts a portion of the string |
toUpperCase() / toLowerCase() |
Changes case |
trim() |
Removes whitespace from both ends |
replace() |
Replaces a substring or regex match |
Example:
const str1 = "Hello";
const str2 = 'World';
const str3 = `${str1}, ${str2}!`; // template literal

console.log(str3);                    // Hello, World!
console.log(str1.length);             // 5
console.log(str1.toUpperCase());      // HELLO
console.log(str3.includes('World'));  // true
console.log(str3.split(', '));        // ['Hello', 'World!']
console.log(str1.concat(' ', str2)); // Hello World
Q. Explain Number data type in Node.js?
The number data type in Node.js is 64 bits floating point number both positive and negative. The parseInt() and parseFloat() functions are used to convert to number, if it fails to convert into a number then it returns NaN.
The Number data type in Node.js follows the IEEE 754 double-precision 64-bit floating-point standard (same as JavaScript). It represents both integers and decimals using the same type.
Key characteristics:
- Range: $\pm5 \times 10^{-324}$ to $\pm1.8 \times 10^{308}$
- Safe integer range: $-(2^{53}-1)$ to $2^{53}-1$ (use
Number.MAX_SAFE_INTEGER) - Special values:
Infinity,-Infinity,NaN - Both integers and floats are the same type — no
intvsfloatdistinction
Common utility functions:
| Function / Property | Description |
|---|---|
parseInt(str, radix) |
Parses string to integer |
parseFloat(str) |
Parses string to float |
Number(value) |
Converts a value to number |
isNaN(value) |
Checks if value is NaN |
isFinite(value) |
Checks if value is finite |
Number.isInteger(value) |
Checks if value is an integer |
Number.MAX_SAFE_INTEGER |
9007199254740991 (2⁵³ - 1) |
.toFixed(n) |
Formats to n decimal places (returns string) |
Example:
// Basic numbers
const int = 42;
const float = 3.14;
console.log(typeof int);   // 'number'
console.log(typeof float); // 'number'

// Parsing
console.log(parseInt("32"));       // 32
console.log(parseInt("0xFF", 16)); // 255 (hex)
console.log(parseFloat("8.24"));   // 8.24
console.log(parseInt("abc"));      // NaN

// Special values
console.log(5 / 0);           // Infinity
console.log(-5 / 0);          // -Infinity
console.log(0 / 0);           // NaN
console.log(isNaN(NaN));      // true
console.log(isFinite(10 / 5)); // true
console.log(isFinite(10 / 0)); // false

// Precision
console.log((1.1 + 2.2).toFixed(2)); // "3.30" — floating point quirk
console.log(Number.MAX_SAFE_INTEGER); // 9007199254740991

// Type conversion
console.log(Number("42"));    // 42
console.log(Number(""));      // 0
console.log(Number("abc"));   // NaN
console.log(Number(true));    // 1
console.log(Number(false));   // 0
console.log(Number(null));    // 0
For integers larger than
Number.MAX_SAFE_INTEGER, useBigIntto avoid precision loss.
Q. Explain BigInt data type in Node.js?
BigInt is a primitive type for representing integers of arbitrary precision — integers larger than $2^{53} - 1$ (Number.MAX_SAFE_INTEGER) where the regular Number type loses accuracy.
Two ways to create a BigInt:
const a = 9007199254740991n;      // append 'n' to an integer literal
const b = BigInt(9007199254740991); // BigInt() function
const c = BigInt('9007199254740991'); // from string
Why it's needed:
// Regular Number loses precision beyond MAX_SAFE_INTEGER
console.log(9007199254740991 + 1);  // 9007199254740992 ✓
console.log(9007199254740991 + 2);  // 9007199254740992 ✗ (wrong!)

// BigInt stays accurate
console.log(9007199254740991n + 2n); // 9007199254740993n ✓
Example:
const x = 10n;
const y = 3n;

console.log(x + y);   // 13n
console.log(x - y);   // 7n
console.log(x * y);   // 30n
console.log(x / y);   // 3n  (integer division — no decimals)
console.log(x % y);   // 1n
console.log(x ** y);  // 1000n

typeof 42n;            // 'bigint'
Important restrictions:
//  Cannot mix BigInt and Number directly
10n + 5;              // TypeError

//  Explicit conversion required
10n + BigInt(5);      // 15n
Number(10n) + 5;      // 15

//  No decimal BigInt
1.5n;                 // SyntaxError

//  Comparison with Number works (loose equality only)
42n == 42;            // true  (loose)
42n === 42;           // false (strict — different types)

//  JSON.stringify does NOT support BigInt natively
JSON.stringify(42n);  // TypeError — use .toString() first
Common use cases in Node.js:
- Cryptographic operations with large integers
- Database IDs (e.g., PostgreSQL
bigintcolumns) - Financial calculations requiring exact integer arithmetic
- Timestamps in nanoseconds (
process.hrtime.bigint())
// Node.js built-in that returns BigInt
const start = process.hrtime.bigint();
// ... some work ...
const elapsed = process.hrtime.bigint() - start;
console.log(`Elapsed: ${elapsed} ns`);
Q. Explain Boolean data type in Node.js?
The Boolean data type has exactly two possible values: true or false. It is used for logical conditions, control flow, and flag variables. Node.js (like JavaScript) follows specific truthy/falsy rules when coercing other types to Boolean.
Falsy values — coerce to false:
| Value | Type |
|---|---|
false |
Boolean |
0, -0, 0n |
Number / BigInt |
"", '', ` `` ` |
Empty string |
null |
Null |
undefined |
Undefined |
NaN |
Number |
Everything else is truthy (including [], {}, "0", "false").
Common Boolean operators:
| Operator | Name | Example | Result |
|---|---|---|---|
&& |
Logical AND | true && false |
false |
\|\| |
Logical OR | true \|\| false |
true |
! |
Logical NOT | !true |
false |
?? |
Nullish coalescing | null ?? 'default' |
'default' |
Example:
/**
 * Boolean Data Type
 */
// Literal boolean values
const isValid = true;
const isExpired = false;
console.log(typeof isValid); // 'boolean'

// Boolean() conversion
console.log(Boolean(1));         // true
console.log(Boolean(0));         // false
console.log(Boolean("hello"));   // true
console.log(Boolean(""));        // false
console.log(Boolean(null));      // false
console.log(Boolean(undefined)); // false
console.log(Boolean(NaN));       // false
console.log(Boolean([]));        // true  (empty array is truthy!)
console.log(Boolean({}));        // true  (empty object is truthy!)

// Logical operators
console.log(true && true);   // true
console.log(true && false);  // false
console.log(true || false);  // true
console.log(false || false); // false
console.log(!true);          // false
console.log(!false);         // true

// Short-circuit evaluation
const user = null;
const name = user && user.name; // null  (short-circuits, avoids error)
const role = user || 'guest';   // 'guest'

// Double negation — convert any value to boolean
console.log(!!1);    // true
console.log(!!"");   // false
console.log(!!null); // false
Avoid
new Boolean()— it creates a Boolean object (always truthy) rather than a primitive, which leads to confusing bugs. Always useBoolean()(withoutnew) or!!for type coercion.
Q. Explain Undefined and Null data type in Node.js?
undefined and null are two distinct primitive types in Node.js that both represent the absence of a value, but with different semantics.
undefined
- A variable that has been declared but not yet assigned a value is automatically
undefined. - It is also the return value of a function that has no
returnstatement. - Accessing a non-existent object property returns
undefined. typeof undefined === 'undefined'
null
- Represents the intentional absence of any object value — you explicitly set it.
- Often used to reset or clear a variable.
typeof null === 'object'— this is a long-standing JavaScript quirk.- Use strict equality (
===) to distinguishnullfromundefined.
Key differences:
undefined |
null |
|
|---|---|---|
| Set by | JavaScript engine (automatically) | Developer (intentionally) |
| Meaning | Variable declared but not assigned | Intentional absence of value |
typeof |
'undefined' |
'object' (quirk) |
Loose equality (==) |
null == undefined → true |
null == undefined → true |
Strict equality (===) |
null === undefined → false |
null === undefined → false |
| JSON serialization | Omitted from JSON output | Serialized as null |
Example:
/**
 * Undefined and Null Data Types
 */

// --- undefined ---
let x;
console.log(x);           // undefined
console.log(typeof x);    // 'undefined'

function noReturn() {}
console.log(noReturn());  // undefined

const obj = { name: 'Node' };
console.log(obj.version); // undefined (property doesn't exist)

// Function parameter not passed
function greet(name) {
  console.log(name);
}
greet(); // undefined

// --- null ---
let y = null;
console.log(y);           // null
console.log(typeof y);    // 'object' (historical JS quirk)

// Intentionally clearing a reference
let user = { name: 'Alice' };
user = null; // release the reference

// --- Equality comparisons ---
console.log(null == undefined);   // true  (loose — both "empty")
console.log(null === undefined);  // false (strict — different types)

// --- Nullish coalescing (??) — guards against both null and undefined ---
const config = null;
const timeout = config ?? 3000;
console.log(timeout); // 3000

// --- Optional chaining (?.) — safe property access ---
const profile = null;
console.log(profile?.address?.city); // undefined (no error thrown)

// --- Checking for null or undefined ---
function isNullOrUndefined(val) {
  return val == null; // true for both null and undefined
}
console.log(isNullOrUndefined(null));      // true
console.log(isNullOrUndefined(undefined)); // true
console.log(isNullOrUndefined(0));         // false
console.log(isNullOrUndefined(''));        // false
Use
val == nullas a concise guard for bothnullandundefined. Useval === nullorval === undefinedwhen you need to distinguish between them.
Q. Explain Symbol data type in Node.js?
Symbol is a primitive data type introduced in ES6. Every Symbol() call returns a guaranteed unique value — no two symbols are ever equal, even if they share the same description. Symbols are commonly used as unique, non-colliding property keys on objects.
Key characteristics:
- Always unique —
Symbol('x') !== Symbol('x') - Immutable and primitive —
typeof Symbol() === 'symbol' - Not auto-converted to strings — explicit
.toString()or.descriptionneeded - Not enumerable by default — hidden from
for...in,Object.keys(), andJSON.stringify() - Accessible via
Object.getOwnPropertySymbols()
Creating Symbols:
const sym1 = Symbol();             // no description
const sym2 = Symbol('id');         // with description (for debugging)
const sym3 = Symbol('id');         // different symbol — NOT equal to sym2

console.log(sym2 === sym3);        // false — always unique
console.log(typeof sym2);          // 'symbol'
console.log(sym2.description);     // 'id'
console.log(sym2.toString());      // 'Symbol(id)'
Use case 1 — unique object property keys (avoid naming collisions):
/**
 * Symbol as object property key
 */
const ID = Symbol('id');
const NAME = Symbol('name');

const user = {
  [ID]: 101,
  [NAME]: 'Alice',
  role: 'admin',
};

console.log(user[ID]);    // 101
console.log(user[NAME]);  // 'Alice'

// Symbols are invisible to standard enumeration
console.log(Object.keys(user));             // ['role']
console.log(JSON.stringify(user));          // '{"role":"admin"}'

// Access symbol keys explicitly
console.log(Object.getOwnPropertySymbols(user)); // [ Symbol(id), Symbol(name) ]
Use case 2 — constants / enum-like values:
// Symbols guarantee uniqueness, unlike string constants
const Direction = {
  UP:    Symbol('UP'),
  DOWN:  Symbol('DOWN'),
  LEFT:  Symbol('LEFT'),
  RIGHT: Symbol('RIGHT'),
};

function move(dir) {
  if (dir === Direction.UP) console.log('Moving up');
}

move(Direction.UP);   // Moving up
move(Symbol('UP'));   // no output — different symbol, even with same description
Use case 3 — Symbol.for() and the global symbol registry:
// Symbol.for() creates/retrieves a shared symbol from a global registry
const s1 = Symbol.for('shared');
const s2 = Symbol.for('shared');

console.log(s1 === s2);          // true — same registry entry
console.log(Symbol.keyFor(s1));  // 'shared'

// Regular Symbol() is NOT in the registry
const local = Symbol('shared');
console.log(local === s1);       // false
Use case 4 — Well-known Symbols (customize built-in behavior):
// Symbol.iterator — make an object iterable
const range = {
  from: 1,
  to: 5,
  [Symbol.iterator]() {
    let current = this.from;
    const last = this.to;
    return {
      next() {
        return current <= last
          ? { value: current++, done: false }
          : { value: undefined, done: true };
      },
    };
  },
};

console.log([...range]); // [1, 2, 3, 4, 5]
Well-known Symbols overview:
| Symbol | Purpose |
|---|---|
Symbol.iterator |
Defines the default iterator (for...of, spread) |
Symbol.toPrimitive |
Customizes type conversion |
Symbol.hasInstance |
Customizes instanceof behavior |
Symbol.toStringTag |
Customizes Object.prototype.toString output |
Symbol.asyncIterator |
Defines the async iterator (for await...of) |
Q. Explain function in Node.js?
Functions are first-class citizens in Node.js — they can be assigned to variables, passed as arguments, returned from other functions, and stored in data structures. Node.js supports several function forms, each suited to different use cases.
Function types:
| Type | Syntax | this binding |
arguments object |
Hoisted? |
|---|---|---|---|---|
| Function declaration | function foo() {} |
Dynamic | Yes | Yes |
| Function expression | const foo = function() {} |
Dynamic | Yes | No |
| Arrow function | const foo = () => {} |
Lexical (inherited) | No | No |
| Async function | async function foo() {} |
Dynamic | Yes | Yes |
| Generator function | function* foo() {} |
Dynamic | Yes | Yes |
1. Function declaration (hoisted):
// Can be called before the declaration
greet('World'); // Hello, World!

function greet(name) {
  console.log(`Hello, ${name}!`);
}
2. Function expression:
const square = function(n) {
  return n * n;
};
console.log(square(5)); // 25
3. Arrow function (no own this):
const add = (a, b) => a + b;
console.log(add(3, 4)); // 7

// Useful in callbacks — inherits `this` from enclosing scope
const timer = {
  seconds: 0,
  start() {
    setInterval(() => {
      this.seconds++; // `this` refers to `timer`, not the interval
    }, 1000);
  },
};
4. Default parameters:
function createUser(name, role = 'user', active = true) {
  return { name, role, active };
}
console.log(createUser('Alice'));          // { name: 'Alice', role: 'user', active: true }
console.log(createUser('Bob', 'admin'));   // { name: 'Bob', role: 'admin', active: true }
5. Rest parameters and spread:
function sum(...numbers) {
  return numbers.reduce((acc, n) => acc + n, 0);
}
console.log(sum(1, 2, 3, 4)); // 10

const nums = [1, 2, 3];
console.log(sum(...nums));    // 6
6. Functions as first-class citizens (higher-order functions):
// Function passed as argument (callback pattern)
function applyOperation(a, b, operation) {
  return operation(a, b);
}

const multiply = (x, y) => x * y;
console.log(applyOperation(4, 5, multiply)); // 20

// Function returning a function (closure)
function multiplier(factor) {
  return (number) => number * factor;
}
const double = multiplier(2);
const triple = multiplier(3);
console.log(double(7));  // 14
console.log(triple(7));  // 21
7. Async function (returns a Promise):
async function fetchData(url) {
  try {
    const response = await fetch(url);
    const data = await response.json();
    return data;
  } catch (err) {
    console.error('Fetch failed:', err.message);
  }
}
8. IIFE (Immediately Invoked Function Expression):
// Creates a private scope — useful for module-like isolation
const result = (function() {
  const secret = 42;
  return { getValue: () => secret };
})();

console.log(result.getValue()); // 42
9. Generator function:
function* idGenerator() {
  let id = 1;
  while (true) {
    yield id++;
  }
}

const gen = idGenerator();
console.log(gen.next().value); // 1
console.log(gen.next().value); // 2
console.log(gen.next().value); // 3
Q. How to work with Buffers in Node.js?
A Buffer is a fixed-size chunk of memory allocated outside the V8 heap, designed to handle raw binary data — file I/O, network packets, cryptographic operations, and image processing. Unlike JavaScript strings (UTF-16), Buffers store raw bytes.
Note: The old
new Buffer()constructor was deprecated and removed in Node.js v22. Always useBuffer.alloc(),Buffer.allocUnsafe(), orBuffer.from().
Buffer creation methods:
| Method | Description |
|---|---|
Buffer.alloc(size) |
Zero-filled buffer of size bytes (safe) |
Buffer.allocUnsafe(size) |
Uninitialized buffer — faster but may contain old data |
Buffer.from(string, encoding) |
Buffer from a string |
Buffer.from(array) |
Buffer from an array of byte values |
Buffer.from(buffer) |
Copy of an existing Buffer |
Buffer.concat(list) |
Concatenate multiple Buffers into one |
1. Allocating Buffers:
// Zero-filled (safe — always use this for sensitive data)
const safe = Buffer.alloc(8);
console.log(safe); // <Buffer 00 00 00 00 00 00 00 00>

// Uninitialized (faster, but may contain garbage — never expose without filling)
const unsafe = Buffer.allocUnsafe(8);
unsafe.fill(0); // manually zero it out before use
2. Creating from strings:
const buf = Buffer.from('Hello, Node.js', 'utf8');

console.log(buf.toString());          // Hello, Node.js  (default: utf8)
console.log(buf.toString('hex'));     // 48656c6c6f2c204e6f64652e6a73
console.log(buf.toString('base64')); // SGVsbG8sIE5vZGUuanM=
console.log(buf.length);             // 14 (bytes, not characters)
Supported encodings: 'utf8', 'ascii', 'base64', 'base64url', 'hex', 'latin1', 'binary', 'ucs2'
3. Creating from byte arrays:
const buf = Buffer.from([72, 101, 108, 108, 111]); // ASCII codes
console.log(buf.toString()); // Hello
4. Reading and writing bytes:
const buf = Buffer.alloc(4);

// Write individual bytes
buf[0] = 0x4e;  // 'N'
buf[1] = 0x6f;  // 'o'
buf[2] = 0x64;  // 'd'
buf[3] = 0x65;  // 'e'

console.log(buf.toString()); // Node

// Read/write multi-byte integers (useful for binary protocols)
const numBuf = Buffer.alloc(4);
numBuf.writeUInt32BE(305419896, 0); // big-endian
console.log(numBuf.readUInt32BE(0)); // 305419896
5. Slicing and copying:
const buf = Buffer.from('Node.js is great');

// subarray() — returns a view (shares memory, does NOT copy)
const view = buf.subarray(0, 7);
console.log(view.toString()); // Node.js

// copy() — copies bytes into another buffer
const dest = Buffer.alloc(7);
buf.copy(dest, 0, 0, 7);
console.log(dest.toString()); // Node.js

// Mutating the view also mutates the original
view[0] = 0x58; // 'X'
console.log(buf.toString()); // Xode.js is great  ← shared memory!
6. Concatenating Buffers:
const part1 = Buffer.from('Hello, ');
const part2 = Buffer.from('Node.js!');

const combined = Buffer.concat([part1, part2]);
console.log(combined.toString()); // Hello, Node.js!
7. Comparing Buffers:
const a = Buffer.from('ABC');
const b = Buffer.from('ABC');
const c = Buffer.from('XYZ');

console.log(a.equals(b));    // true
console.log(a.equals(c));    // false
console.log(Buffer.compare(a, c)); // -1 (a < c lexicographically)
8. Real-world use — reading a file as a Buffer:
const fs = require('fs');

fs.readFile('image.png', (err, data) => {
  // data is a Buffer containing raw binary file contents
  console.log(`File size: ${data.length} bytes`);
  console.log(`First 4 bytes (PNG magic number): ${data.subarray(0, 4).toString('hex')}`);
  // PNG files always start with: 89504e47
});
Buffer vs string performance:
- Use Buffer for binary data (files, sockets, crypto)
- Use string for text data
- Converting between them has a cost — minimize unnecessary conversions in hot paths
Q. What is the difference between CommonJS and ES Modules in Node.js?
Node.js supports two module systems: CommonJS (CJS) — the original system — and ES Modules (ESM) — the modern JavaScript standard
Feature comparison:
| Feature | CommonJS (CJS) | ES Modules (ESM) |
|---|---|---|
| Syntax | require() / module.exports |
import / export |
| Loading | Synchronous (blocking) | Asynchronous (deferred) |
| File extension | .js or .cjs |
.mjs or .js with "type":"module" |
__dirname / __filename |
Available | Not available — use import.meta |
Top-level await |
Not supported | Supported |
| Tree shaking | Not supported | Supported by bundlers |
| Named exports | Via destructuring require |
Native export keyword |
| Default in Node.js | Yes | Opt-in ("type":"module" in package.json) |
require() inside ESM |
Not available by default | Via createRequire() |
| Dynamic import | require() (sync) |
import() (async, returns Promise) |
1. CommonJS — exporting and importing:
// math.js (CJS)
function add(a, b) { return a + b; }
function subtract(a, b) { return a - b; }

// Named exports via object
module.exports = { add, subtract };

// OR default export pattern
module.exports = add;
// app.js (CJS)
const { add, subtract } = require('./math');
console.log(add(2, 3));      // 5
console.log(subtract(5, 2)); // 3
2. ES Modules — named and default exports:
// math.mjs (ESM) — named exports
export function add(a, b) { return a + b; }
export function subtract(a, b) { return a - b; }
export const PI = 3.14159;

// Default export
export default function multiply(a, b) { return a * b; }
// app.mjs (ESM)
import multiply, { add, subtract, PI } from './math.mjs';

console.log(add(2, 3));        // 5
console.log(subtract(5, 2));   // 3
console.log(multiply(4, 5));   // 20
console.log(PI);               // 3.14159
3. Enabling ESM in a project:
// package.json — treat all .js files as ESM
{
  "type": "module"
}
Or use .mjs extension for individual files without changing package.json.
4. __dirname and __filename equivalent in ESM:
// ESM does not have __dirname — use import.meta.url instead
import { fileURLToPath } from 'url';
import { dirname, join } from 'path';

const __filename = fileURLToPath(import.meta.url);
const __dirname  = dirname(__filename);

console.log(__dirname);                   // current directory
console.log(join(__dirname, 'data.json')); // absolute path to a file
5. Top-level await — ESM only:
// app.mjs — await at the top level (no async wrapper needed)
const data = await fetch('https://api.example.com/config').then(r => r.json());
console.log(data);
// app.js (CJS) — must wrap in async function
(async () => {
  const data = await fetch('https://api.example.com/config').then(r => r.json());
  console.log(data);
})();
6. Using require() inside ESM (interop):
// ESM file that needs to require() a CJS module
import { createRequire } from 'module';
const require = createRequire(import.meta.url);

const lodash = require('lodash'); // works in ESM via createRequire
7. Dynamic import — works in both CJS and ESM:
// Lazy-load a module only when needed (returns a Promise)
async function loadModule() {
  const { add } = await import('./math.mjs');
  console.log(add(1, 2)); // 3
}
loadModule();
Recommendation: Use ESM (
import/export) for new projects — it supports top-levelawait, tree shaking, and is the official JavaScript standard. Use CommonJS only when working with legacy codebases or packages that don’t yet support ESM.
Q. How does module caching work in Node.js?
When require() loads a module for the first time, Node.js executes the module file and caches the exported object in require.cache. Every subsequent require() call for the same file path returns the cached exports directly, without re-executing the file.
This means:
- Module-level code (e.g., a database connection) runs only once.
- Mutating an exported object in one module is visible to all other modules that required it.
Example — cache in action:
// counter.js
let count = 0;
module.exports = {
  increment() { count++; },
  get()       { return count; },
};
// app.js
const a = require('./counter');
const b = require('./counter'); // same cached reference

a.increment();
a.increment();

console.log(a === b);   // true  — exact same object
console.log(b.get());   // 2     — b sees mutations made via a
Inspecting the cache:
// Print all cached module paths
console.log(Object.keys(require.cache));

// Delete a module from cache (forces re-execution on next require)
delete require.cache[require.resolve('./counter')];
When is caching NOT used?
require()with different resolved paths (e.g., case sensitivity on Linux, symlinks) creates separate cache entries.- ES Modules (
import) also cache, but their cache is separate from the CommonJS cache. - Explicitly deleting from
require.cachebypasses it (useful in tests to get a fresh module).
Practical use — singleton pattern:
// db.js — connection is created only once, shared across the app
const { Pool } = require('pg');
const pool = new Pool({ connectionString: process.env.DATABASE_URL });
module.exports = pool; // cached: every require('./db') returns the same Pool
# 6. NODE.JS EVENTS
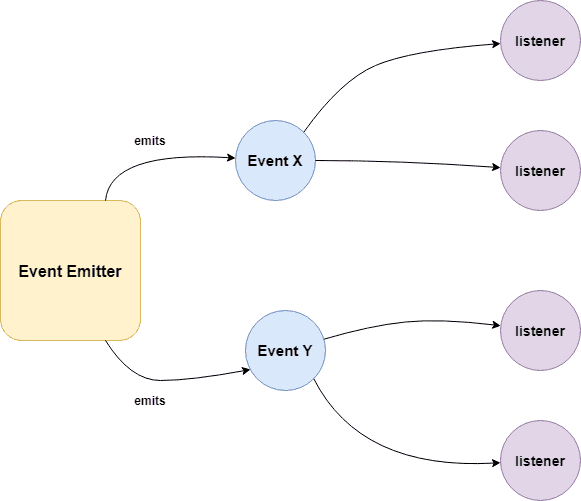
Q. What is EventEmitter in Node.js?
EventEmitter is a class from Node.js's built-in events module that implements the Observer (Pub/Sub) pattern — objects can emit named events, and listeners registered for those events are called when they fire.
EventEmitter is at the core of Node asynchronous event-driven architecture. Many of Node's built-in modules inherit from EventEmitter including prominent frameworks like Express.js. An emitter object basically has two main features:
- Emitting name events.
- Registering and unregistering listener functions.
Example:
/**
 * Callback Events with Parameters
 */
const events = require('events');
const eventEmitter = new events.EventEmitter();

function listener(code, msg) {
   console.log(`status ${code} and ${msg}`);
}

eventEmitter.on('status', listener); // Register listener
eventEmitter.emit('status', 200, 'ok');

// Output
status 200 and ok
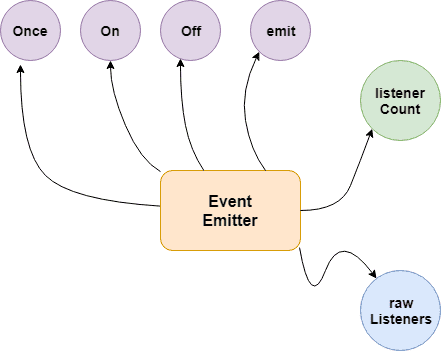
Key Methods
| Method | Description |
|---|---|
.on(event, listener) |
Register a listener (fires every time) |
.once(event, listener) |
Register a listener that fires only once |
.emit(event, ...args) |
Trigger all listeners for an event |
.off(event, listener) |
Remove a specific listener |
.removeAllListeners(event) |
Remove all listeners for an event |
.listeners(event) |
Returns array of listeners for an event |
.listenerCount(event) |
Returns number of listeners |
.setMaxListeners(n) |
Change the limit (default: 10) |
Node.js prints a warning when more than 10 listeners are registered for a single event — use
emitter.setMaxListeners(0)to disable the limit, or increase it as needed.
Q. How does the EventEmitter works in Node.js?
EventEmitter maintains an internal registry (a plain object) mapping event names to arrays of listener functions. When you emit an event, it looks up that array and calls each function synchronously in registration order.
- Event Emitter emits the data in an event called message
- A Listened is registered on the event message
- when the message event emits some data, the listener will get the data
Building Blocks:
- .emit() - this method in event emitter is to emit an event in module
- .on() - this method is to listen to data on a registered event in node.js
- .once() - it listen to data on a registered event only once.
- .addListener() - it checks if the listener is registered for an event.
- .removeListener() - it removes the listener for an event.
Example 01:
/**
 * Callbacks Events
 */
const events = require('events');
const eventEmitter = new events.EventEmitter();

function listenerOne() {
   console.log('First Listener Executed');
}

function listenerTwo() {
   console.log('Second Listener Executed');
}

eventEmitter.on('listenerOne', listenerOne); // Register for listenerOne
eventEmitter.on('listenerOne', listenerTwo); // Register for listenerOne

// When the event "listenerOne" is emitted, both the above callbacks should be invoked.
eventEmitter.emit('listenerOne');

// Output
First Listener Executed
Second Listener Executed
Example 02:
/**
 * Emit Events Once
 */
const events = require('events');
const eventEmitter = new events.EventEmitter();

function listenerOnce() {
   console.log('listenerOnce fired once');
}

eventEmitter.once('listenerOne', listenerOnce); // Register listenerOnce
eventEmitter.emit('listenerOne');

// Output
listenerOnce fired once
Q. What are the EventEmitter methods available in Node.js?
Listener Registration
| Method | Description |
|---|---|
.on(event, listener) |
Add a listener — fires every time the event is emitted |
.addListener(event, listener) |
Alias for .on() |
.once(event, listener) |
Add a listener that fires only once, then auto-removes |
.prependListener(event, listener) |
Add listener to the beginning of the array (fires first) |
.prependOnceListener(event, listener) |
Same as .prependListener() but fires only once |
Listener Removal
| Method | Description |
|---|---|
.off(event, listener) |
Remove a specific listener |
.removeListener(event, listener) |
Alias for .off() |
.removeAllListeners([event]) |
Remove all listeners for an event (or all events if omitted) |
Emitting Events
| Method | Description |
|---|---|
.emit(event, ...args) |
Trigger all listeners for the event synchronously. Returns true if listeners exist |
Inspection
| Method | Description |
|---|---|
.listeners(event) |
Returns a copy of the listeners array for the event |
.rawListeners(event) |
Returns raw listeners including .once() wrappers |
.listenerCount(event) |
Returns the number of listeners registered for an event |
.eventNames() |
Returns an array of all event names with registered listeners |
Configuration
| Method | Description |
|---|---|
.setMaxListeners(n) |
Set the max listener limit (default: 10). Use 0 for unlimited |
.getMaxListeners() |
Returns the current max listener limit |
Code Examples
const EventEmitter = require('events');
const emitter = new EventEmitter();

// --- Registration ---
emitter.on('data', (msg) => console.log('on:', msg));
emitter.once('data', (msg) => console.log('once:', msg));
emitter.prependListener('data', (msg) => console.log('prepend:', msg));

emitter.emit('data', 'hello');
// prepend: hello   ← fired first
// on: hello
// once: hello

emitter.emit('data', 'world');
// prepend: world
// on: world        ← once() is already removed

// --- Inspection ---
console.log(emitter.listenerCount('data'));  // 2
console.log(emitter.eventNames());           // ['data']

// --- Removal ---
const handler = (x) => console.log(x);
emitter.on('click', handler);
emitter.off('click', handler);              // removes specific listener
emitter.removeAllListeners('data');         // removes all 'data' listeners
emitter.removeAllListeners();              // removes everything

// --- Max listeners ---
emitter.setMaxListeners(20);
console.log(emitter.getMaxListeners());     // 20

// --- rawListeners (includes once wrapper) ---
emitter.once('ping', () => {});
console.log(emitter.rawListeners('ping')); // [Function: bound onceWrapper]
console.log(emitter.listeners('ping'));    // [Function (anonymous)] ← unwrapped
Always call
.off()or.removeAllListeners()when a listener is no longer needed — especially inside long-lived objects — to prevent memory leaks.
Q. How the Event Loop Works in Node.js?
The Event Loop is the mechanism that allows Node.js to perform non-blocking I/O on a single thread by delegating operations to the OS kernel or libuv thread pool, then executing callbacks when they complete.
Node.js is a single-threaded application, but it can support concurrency via the concept of event and callbacks. Every API of Node.js is asynchronous and being single-threaded, they use async function calls to maintain concurrency. Node uses observer pattern. Node thread keeps an event loop and whenever a task gets completed, it fires the corresponding event which signals the event-listener function to execute.
Features of Event Loop:
- Event loop is an endless loop, which waits for tasks, executes them and then sleeps until it receives more tasks.
- The event loop executes tasks from the event queue only when the call stack is empty i.e. there is no ongoing task.
- The event loop allows us to use callbacks and promises.
- The event loop executes the tasks starting from the oldest first.

The Six Main Phases
| Phase | Description |
|---|---|
| Timers | Executes callbacks from setTimeout() and setInterval() once their minimum threshold has passed. |
| Pending Callbacks | Handles certain system-level error callbacks, such as TCP errors (e.g., ECONNREFUSED). |
| Idle, Prepare | Used only internally by Node.js for housekeeping. |
| Poll | The heart of the loop. It retrieves new I/O events (network, disk) and executes their callbacks immediately. |
| Check | Executes setImmediate() callbacks, which are specifically designed to run right after the Poll phase. |
| Close Callbacks | Handles the closing of resources, like socket.on(‘close’), stream.on(‘close’) |
Between every phase, Node.js drains microtasks in this order:
process.nextTickqueue- Promise
.then/.catchqueue
Example:
console.log('1. sync');

setTimeout(() => console.log('2. setTimeout'), 0);
setImmediate(() => console.log('3. setImmediate'));
Promise.resolve().then(() => console.log('4. Promise'));
process.nextTick(() => console.log('5. nextTick'));

console.log('6. sync end');

// Output:
// 1. sync
// 6. sync end
// 5. nextTick       ← microtask (highest priority)
// 4. Promise        ← microtask
// 2. setTimeout     ← timers phase
// 3. setImmediate   ← check phase
Q. How are event listeners created in Node.JS?
An array containing all eventListeners is maintained by Node.js. Each time .on(), .once(), or .addListener() function is executed, a new event listener is added to that array. When the concerned event is emitted, each eventListener that is present in the array is called in a sequential or synchronous manner.
The event listeners are called in a synchronous manner to avoid logical errors, race conditions etc. The total number of listeners that can be registered for a particular event, is controlled by .setMaxListeners(n). The default number of listeners is 10.
emitter.setMaxListeners(12);
Example: .on() — persistent listener
const EventEmitter = require('events');
const emitter = new EventEmitter();

// Fires every time the event is emitted
emitter.on('message', (data) => {
  console.log('Received:', data);
});

emitter.emit('message', 'hello');  // Received: hello
emitter.emit('message', 'world');  // Received: world
Example: .once() — single-fire listener
// Auto-removes itself after first call
emitter.once('connect', () => {
  console.log('Connected!');
});

emitter.emit('connect'); // Connected!
emitter.emit('connect'); // (nothing — listener is gone)
As an event Listener once registered, exists throughout the life cycle of the program. It is important to detach an event Listener once its no longer needed to avoid memory leaks. Functions like .removeListener(), .removeAllListeners() enable the removal of listeners from the listeners Array.
Example: removeAllListeners()
// In long-lived objects, clean up to prevent memory leaks
class Connection extends EventEmitter {
  destroy() {
    this.removeAllListeners(); // clean up everything
  }
}
Q. What is the difference between process.nextTick() and setImmediate()?
1. process.nextTick():
The process.nextTick() method adds the callback function to the start of the next event queue. It is to be noted that, at the start of the program process.nextTick() method is called for the first time before the event loop is processed.
2. setImmediate():
The setImmediate() method is used to execute a function right after the current event loop finishes. It is callback function is placed in the check phase of the next event queue.
Example: Execution Order
/**
 * setImmediate() and process.nextTick()
 */
setImmediate(() => console.log('1. setImmediate'));

process.nextTick(() => console.log('2. nextTick'));

Promise.resolve().then(() => console.log('3. Promise'));

console.log('4. sync');

// Output:
// 4. sync
// 2. nextTick       ← microtask, runs before event loop phases
// 3. Promise        ← microtask, runs after nextTick queue
// 1. setImmediate   ← check phase
Example: Inside an I/O Callback
const fs = require('fs');

fs.readFile(__filename, () => {
  setTimeout(() => console.log('1. setTimeout'), 0);
  setImmediate(() => console.log('2. setImmediate'));
  process.nextTick(() => console.log('3. nextTick'));
});

// Output:
// 3. nextTick      ← always first (microtask)
// 2. setImmediate  ← always before setTimeout inside I/O
// 1. setTimeout
When to Use Each
- process.nextTick() — when you need a callback to fire before any I/O in the current operation completes (e.g., emitting errors after constructor returns)
- setImmediate() — when you want to execute after I/O events in the current loop iteration, without blocking I/O
Q. What are the phases of the Node.js Event Loop?
The Node.js event loop processes asynchronous callbacks in a specific order across six phases. Each phase has a FIFO queue of callbacks to execute.
   ┌───────────────────────────┐
┌─>│           timers          │  ← setTimeout / setInterval callbacks
│  └─────────────┬─────────────┘
│  ┌─────────────┴─────────────┐
│  │     pending callbacks     │  ← I/O errors deferred to next loop
│  └─────────────┬─────────────┘
│  ┌─────────────┴─────────────┐
│  │       idle, prepare       │  ← internal use only
│  └─────────────┬─────────────┘
│  ┌─────────────┴─────────────┐
│  │           poll            │  ← retrieve new I/O events; execute I/O callbacks
│  └─────────────┬─────────────┘
│  ┌─────────────┴─────────────┐
│  │           check           │  ← setImmediate callbacks
│  └─────────────┬─────────────┘
│  ┌─────────────┴─────────────┐
└──┤      close callbacks      │  ← e.g., socket.on('close', ...)
   └───────────────────────────┘
| Phase | What runs here |
|---|---|
| timers | setTimeout and setInterval callbacks whose delay has expired |
| pending callbacks | I/O callbacks deferred from the previous iteration |
| idle / prepare | Internal Node.js use only |
| poll | Retrieves new I/O events; executes I/O-related callbacks (file, network) |
| check | setImmediate callbacks |
| close callbacks | socket.destroy(), stream.on('close') handlers |
Between every phase (and between every individual callback in some phases), Node.js drains the microtask queues:
process.nextTickqueue (highest priority)- Promise
.then/.catch/.finallyqueue
Example — phase execution order:
const fs = require('fs');

// Phase: timers
setTimeout(() => console.log('1. setTimeout'), 0);

// Phase: check
setImmediate(() => console.log('2. setImmediate'));

// Phase: poll (I/O callback)
fs.readFile(__filename, () => {
  console.log('3. fs.readFile callback');

  // Inside I/O callback: setImmediate always before setTimeout
  setTimeout(() => console.log('4. setTimeout inside I/O'), 0);
  setImmediate(() => console.log('5. setImmediate inside I/O'));
});

// Microtask: nextTick (runs before any phase)
process.nextTick(() => console.log('6. process.nextTick'));

// Microtask: Promise (runs after nextTick queue empties)
Promise.resolve().then(() => console.log('7. Promise.then'));

console.log('8. Synchronous code');

// Output order:
// 8. Synchronous code
// 6. process.nextTick
// 7. Promise.then
// 1. setTimeout          (order of 1 & 2 may vary outside I/O)
// 2. setImmediate
// 3. fs.readFile callback
// 5. setImmediate inside I/O   (always before setTimeout inside I/O)
// 4. setTimeout inside I/O
Key rules to remember:
process.nextTickfires before Promises, before any event loop phase.- Inside an I/O callback,
setImmediatealways executes beforesetTimeout(fn, 0). - Outside I/O, the order of
setTimeout(fn, 0)vssetImmediateis non-deterministic.
Q. What is the difference between microtasks and macrotasks in Node.js?
The JavaScript/Node.js execution model separates asynchronous work into microtasks (high-priority, run after every task) and macrotasks (lower-priority, run in event loop phases).
| Microtasks | Macrotasks (Tasks) | |
|---|---|---|
| Examples | process.nextTick, Promise.then/catch/finally, queueMicrotask |
setTimeout, setInterval, setImmediate, I/O callbacks |
| When executed | After every macrotask / synchronous block, before the next event loop phase | One per event loop phase tick |
| Queue draining | Entire microtask queue drains before the next macrotask | One callback dequeued per iteration |
| Priority | process.nextTick > Promises |
Depends on event loop phase |
Example — execution order:
console.log('1. Start');

setTimeout(() => console.log('2. setTimeout'), 0);       // macrotask
setImmediate(() => console.log('3. setImmediate'));       // macrotask

Promise.resolve()
  .then(() => console.log('4. Promise.then'));            // microtask

process.nextTick(() => console.log('5. nextTick'));       // microtask (highest)

queueMicrotask(() => console.log('6. queueMicrotask'));  // microtask

console.log('7. End');

// Output:
// 1. Start
// 7. End
// 5. nextTick          ← nextTick queue drained first
// 4. Promise.then      ← Promise microtask queue
// 6. queueMicrotask
// 2. setTimeout        ← macrotask (timers phase)
// 3. setImmediate      ← macrotask (check phase)
Why it matters — starvation risk:
Recursively calling process.nextTick or resolving promises in a loop can starve the event loop, preventing I/O callbacks from ever running:
//  Dangerous: starves the event loop
function recursive() {
  process.nextTick(recursive);
}
recursive();

//  Safe: use setImmediate to yield to I/O
function recursive() {
  setImmediate(recursive);
}
Q. What is callback function in Node.js?
A callback is a function which is called when a task is completed, thus helps in preventing any kind of blocking and a callback function allows other code to run in the meantime.
Callback is called when task get completed and is asynchronous equivalent for a function. Using Callback concept, Node.js can process a large number of requests without waiting for any function to return the result which makes Node.js highly scalable.
Example:
/**
 * Callback Function
 */
function message(name, callback) {
  console.log("Hi" + " " + name);
  callback();
}

// Callback function
function callMe() {
  console.log("I am callback function");
}

// Passing function as an argument
message("Node.JS", callMe);
Output:
Hi Node.JS
I am callback function
Q. What are the difference between Events and Callbacks?
1. Events:
Node.js events module which emits named events that can cause corresponding functions or callbacks to be called. Functions ( callbacks ) listen or subscribe to a particular event to occur and when that event triggers, all the callbacks subscribed to that event are fired one by one in order to which they were registered.
All objects that emit events are instances of the EventEmitter class. The event can be emitted or listen to an event with the help of EventEmitter
Example:
/**
 * Events Module
 */
const event = require('events');
const eventEmitter = new event.EventEmitter();

// add listener function for Sum event
eventEmitter.on('Sum', function(num1, num2) {
    console.log('Total: ' + (num1 + num2));
});

// call event
eventEmitter.emit('Sum', 10, 20);

// Output
Total: 30
2. Callbacks:
A callback function is a function passed into another function as an argument, which is then invoked inside the outer function to complete some kind of routine or action.
Example:
/**
 * Callbacks
 */
function sum(number) {
  console.log('Total: ' + number);
}

function calculator(num1, num2, callback) {
  let total = num1 + num2;
  callback(total);
}

calculator(10, 20, sum);

// Output
Total: 30
Callback functions are called when an asynchronous function returns its result, whereas event handling works on the observer pattern. The functions that listen to events act as Observers. Whenever an event gets fired, its listener function starts executing. Node.js has multiple in-built events available through events module and EventEmitter class which are used to bind events and event-listeners
In practice, modern Node.js prefers Promises/async-await over raw callbacks, while EventEmitter remains the standard for streaming data, servers, and pub/sub patterns.
Q. What is an error-first callback?
The error-first callback is a Node.js convention where the first argument of every callback is reserved for an error object, and subsequent arguments carry the success result.
The Pattern
function(err, result1, result2, ...) {
  if (err) {
    // handle error — always check first
    return;
  }
  // use result
}
- If the operation failed →
erris anErrorobject, results areundefined - If the operation succeeded →
errisnull, results contain the data
Why It Exists
Async exceptions cannot be caught with try/catch because the callback fires after the call stack has moved on:
Example:
//  This does NOT work for async errors
try {
  fs.readFile('file.txt', (err, data) => {
    throw new Error('oops'); // uncaught!
  });
} catch (e) {
  // never reaches here
}

//  Error-first callback handles it correctly
fs.readFile('file.txt', (err, data) => {
  if (err) {
    console.error('Failed:', err.message); // caught here
    return;
  }
  console.log(data);
});
Q. What is callback hell in Node.js?
Callback hell (also called the “Pyramid of Doom”) is a situation where multiple nested callbacks make the code deeply indented, hard to read, and difficult to maintain.
The Problem
When async operations depend on each other’s results, callbacks get nested inside callbacks:
Example:
// Real-world example: read file → parse → query DB → send email
fs.readFile('config.json', (err, config) => {
  if (err) return handleError(err);

  db.connect(config.dbUrl, (err, connection) => {
    if (err) return handleError(err);

    connection.query('SELECT * FROM users', (err, users) => {
      if (err) return handleError(err);

      emailService.send(users[0].email, (err, result) => {
        if (err) return handleError(err);

        // actual logic buried 4 levels deep
        console.log('Done!');
      });
    });
  });
});
Why It’s a Problem
| Issue | Description |
|---|---|
| Readability | Code grows rightward in a pyramid shape |
| Maintainability | Hard to follow the flow of data |
| Error handling | Must handle errors at every level separately |
| Debugging | Stack traces are misleading; hard to pinpoint errors |
| Reusability | Logic is tightly coupled inside nested functions |
How to Avoid It
1. Named functions — extract callbacks into named functions:
fs.readFile('config.json', onFileRead);

function onFileRead(err, config) {
  if (err) return handleError(err);
  db.connect(config.dbUrl, onDbConnect);
}

function onDbConnect(err, connection) {
  if (err) return handleError(err);
  // ...
}
2. Promises — chain .then() instead of nesting:
readFile('config.json')
  .then(config => db.connect(config.dbUrl))
  .then(connection => connection.query('SELECT * FROM users'))
  .then(users => emailService.send(users[0].email))
  .then(() => console.log('Done!'))
  .catch(handleError); // single error handler for all
3. Async/Await — the modern, cleanest solution:
async function run() {
  try {
    const config = await readFile('config.json');
    const connection = await db.connect(config.dbUrl);
    const users = await connection.query('SELECT * FROM users');
    await emailService.send(users[0].email);
    console.log('Done!');
  } catch (err) {
    handleError(err);
  }
}
4. Async.js library — utility functions for common async patterns:
const async = require('async');

async.waterfall([
  (cb) => fs.readFile('config.json', cb),
  (config, cb) => db.connect(config.dbUrl, cb),
  (connection, cb) => connection.query('SELECT * FROM users', cb),
], (err, result) => {
  if (err) return handleError(err);
  console.log('Done!');
});
Modern Node.js strongly prefers async/await — it reads like synchronous code, has a single
try/catchfor all errors, and completely eliminates the pyramid structure.
Q. What is typically the first argument passed to a callback handler?
The first argument passed to a callback handler in Node.js is always the error object (err). This is the error-first (or “Node-style”) callback convention.
Example:
/**
 * Callback Handler
 */
const Division = (numerator, denominator, callback) => {
    if (denominator === 0) {
      callback(new Error('Divide by zero error!'));
    } else {
      callback(null, numerator / denominator);
    }
};

// Function Call
Division(5, 0, (err, result) => {
  if (err) {
    return console.log(err.message);
  }
  console.log(`Result: ${result}`);
});
Q. What are the timing features of Node.js?
The Timers module in Node.js contains functions that execute code after a set period of time. Timers do not need to be imported via require(), since all the methods are available globally to emulate the browser JavaScript API.
Some of the functions provided in this module are
1. setTimeout(callback, delay, …args)
Executes the callback once after at least delay milliseconds. Returns a Timeout object usable with clearTimeout().
Syntax:
setTimeout(callback, delay, args )
Example:
const timer = setTimeout((msg) => {
  console.log(msg); // prints after ~1 second
}, 1000, 'Hello after 1 second');

// Cancel before it fires:
clearTimeout(timer);
2. setImmediate(callback, …args)
Executes the callback once, at the end of the current event loop iteration — after I/O events but before timers.
Syntax:
setImmediate(callback, args)
Example:
setImmediate(() => console.log('setImmediate'));
setTimeout(() => console.log('setTimeout'), 0);
console.log('sync');

// Output:
// sync
// setImmediate  ← (inside I/O: always before setTimeout)
// setTimeout
3. setInterval(callback, delay, …args)
Executes the callback repeatedly every delay milliseconds until stopped with clearInterval().
Syntax:
setInterval(callback, delay, args)
Example:
let count = 0;
const id = setInterval(() => {
  count++;
  console.log(`Tick ${count}`);
  if (count === 3) clearInterval(id); // stop after 3 ticks
}, 1000);
4. process.nextTick(callback)
Fires before the event loop moves to the next phase — even before setImmediate. It’s a microtask, not technically a “timer” but closely related.
process.nextTick(() => console.log('nextTick'));
setImmediate(() => console.log('setImmediate'));
console.log('sync');

// Output:
// sync
// nextTick      ← microtask, runs first
// setImmediate
Execution Order Summary
Synchronous code
     ↓
process.nextTick()     ← microtask (highest priority)
     ↓
Promise.then()         ← microtask
     ↓
setTimeout / setInterval  ← timers phase
     ↓
setImmediate           ← check phase
Q. How to implement a sleep function in Node.js?
Node.js has no built-in sleep() — but you can implement one using a Promise + setTimeout combination with async/await.
Example:
function sleep(time) {
  return new Promise((resolve) => setTimeout(resolve, time));
}

// Usage
async function run() {
  await sleep(1000); // pause for 1 second
  console.log("This printed after about 1 second");
}

run();
The function returns a Promise that resolves after ms milliseconds. await-ing it pauses execution without blocking the event loop.
In Node.js v16+,
timers/promisesprovides a built-in alternative:import { setTimeout as sleep } from 'timers/promises'; await sleep(1000);
# 7. NODE.JS FILE SYSTEM
Q. How Node.js read the content of a file?
Node.js provides several ways to read file content using the built-in fs (File System) module. The choice depends on whether you want the operation to be blocking (synchronous) or non-blocking (asynchronous).
1. Asynchronous (Non-Blocking) – Recommended
This is the standard approach for most Node.js applications as it allows the event loop to continue working while the file is being read.
- Promises (fs.promises): Modern standard using async/await for clean, readable code.
Example:
const fs = require('fs').promises;

async function readFile() {
  try {
    const data = await fs.readFile('file.txt', 'utf8');
    console.log(data);
  } catch (err) {
    console.error(err);
  }
}
- Callbacks: The traditional method using an error-first callback function.
Example:
const fs = require('fs');
fs.readFile('file.txt', 'utf8', (err, data) => {
  if (err) throw err;
  console.log(data);
});
2. Synchronous (Blocking)
The fs.readFileSync() method stops all other code execution until the file is fully read. It returns the content directly rather than using a callback.
- Best for: Simple scripts or loading configuration files during application startup.
- Avoid in: Production web servers, as it can severely impact performance by blocking concurrent requests.
Example:
const fs = require('fs');

try {
  const data = fs.readFileSync('file.txt', 'utf8');
  console.log(data);
} catch (err) {
  console.error('Error reading file:', err.message);
}
3. Streams – For Large Files
For very large files (e.g., GBs of data), loading the entire content into memory at once can crash your app. Instead, use fs.createReadStream() to read the file in smaller chunks.
- Usage: Emits a data event for every chunk received and an end event when finished.
Example:
const fs = require('fs');

const stream = fs.createReadStream('large-file.txt', { encoding: 'utf8' });

stream.on('data', (chunk) => {
  console.log(`Received chunk: ${chunk.length} characters`);
});

stream.on('end', () => {
  console.log('Finished reading file.');
});

stream.on('error', (err) => {
  console.error('Error reading file:', err.message);
});
Note
- Encoding: Always specify ‘utf8’ if you want the data as a string. If omitted, Node.js returns a Buffer (raw binary data).
- Error Handling: Always wrap file operations in try/catch (for promises/sync) or check the err argument (for callbacks) to prevent crashes.
Q. How to write a file in Node.js?
Node.js provides fs.writeFile() (async) and fs.writeFileSync() (sync) to write data to a file. If the file does not exist, it is created. If it exists, its content is replaced.
1. Asynchronous with Callback:
const fs = require('fs');

fs.writeFile('output.txt', 'Hello, Node.js!', 'utf8', (err) => {
  if (err) {
    console.error('Error writing file:', err.message);
    return;
  }
  console.log('File written successfully.');
});
2. Asynchronous with Promises (async/await):
const fs = require('fs').promises;

async function writeFile() {
  try {
    await fs.writeFile('output.txt', 'Hello, Node.js!', 'utf8');
    console.log('File written successfully.');
  } catch (err) {
    console.error('Error writing file:', err.message);
  }
}

writeFile();
3. Synchronous:
const fs = require('fs');

try {
  fs.writeFileSync('output.txt', 'Hello, Node.js!', 'utf8');
  console.log('File written successfully.');
} catch (err) {
  console.error('Error writing file:', err.message);
}
Use the
flagoption to control write behavior:'w'(default, overwrite),'a'(append),'wx'(fail if file exists).
Q. How to append content to a file in Node.js?
Use fs.appendFile() to add content to the end of an existing file. If the file does not exist, it is created automatically.
1. Asynchronous with Callback:
const fs = require('fs');

fs.appendFile('log.txt', 'New log entry\n', 'utf8', (err) => {
  if (err) {
    console.error('Error appending to file:', err.message);
    return;
  }
  console.log('Content appended successfully.');
});
2. Asynchronous with Promises:
const fs = require('fs').promises;

async function appendToFile() {
  try {
    await fs.appendFile('log.txt', `[${new Date().toISOString()}] App started\n`, 'utf8');
    console.log('Log entry added.');
  } catch (err) {
    console.error('Error:', err.message);
  }
}

appendToFile();
3. Synchronous:
const fs = require('fs');

try {
  fs.appendFileSync('log.txt', 'Sync log entry\n', 'utf8');
  console.log('Content appended.');
} catch (err) {
  console.error('Error:', err.message);
}
Q. How to delete a file in Node.js?
Use fs.unlink() (async) or fs.unlinkSync() (sync) to delete a file.
1. Asynchronous with Callback:
const fs = require('fs');

fs.unlink('output.txt', (err) => {
  if (err) {
    console.error('Error deleting file:', err.message);
    return;
  }
  console.log('File deleted successfully.');
});
2. Asynchronous with Promises:
const fs = require('fs').promises;

async function deleteFile(filePath) {
  try {
    await fs.unlink(filePath);
    console.log(`${filePath} deleted.`);
  } catch (err) {
    if (err.code === 'ENOENT') {
      console.log('File does not exist.');
    } else {
      console.error('Error:', err.message);
    }
  }
}

deleteFile('output.txt');
3. Synchronous:
const fs = require('fs');

try {
  fs.unlinkSync('output.txt');
  console.log('File deleted.');
} catch (err) {
  console.error('Error:', err.message);
}
In Node.js v14.14+, you can also use
fs.rm(path, { force: true })which does not throw if the file is missing.
Q. How to rename or move a file in Node.js?
Use fs.rename() to rename a file or move it to a different path.
Example — Rename:
const fs = require('fs');

fs.rename('old-name.txt', 'new-name.txt', (err) => {
  if (err) {
    console.error('Error renaming file:', err.message);
    return;
  }
  console.log('File renamed successfully.');
});
Example — Move (rename across directories):
const fs = require('fs').promises;
const path = require('path');

async function moveFile(src, dest) {
  try {
    // Ensure destination directory exists
    await fs.mkdir(path.dirname(dest), { recursive: true });
    await fs.rename(src, dest);
    console.log(`Moved: ${src} → ${dest}`);
  } catch (err) {
    console.error('Error moving file:', err.message);
  }
}

moveFile('uploads/temp.txt', 'archive/2026/temp.txt');
fs.rename()only works within the same filesystem/volume. To move across volumes, copy the file then delete the source usingfs.copyFile()+fs.unlink().
Q. How to check if a file or directory exists in Node.js?
1. Using fs.existsSync() (synchronous):
const fs = require('fs');

if (fs.existsSync('config.json')) {
  console.log('File exists.');
} else {
  console.log('File not found.');
}
2. Using fs.access() (asynchronous, preferred):
const fs = require('fs');

fs.access('config.json', fs.constants.F_OK, (err) => {
  if (err) {
    console.log('File does not exist.');
  } else {
    console.log('File exists.');
  }
});
3. Check read/write permissions:
const fs = require('fs');

// Check if file is readable AND writable
fs.access('data.txt', fs.constants.R_OK | fs.constants.W_OK, (err) => {
  if (err) {
    console.error('No read/write access:', err.message);
  } else {
    console.log('File is readable and writable.');
  }
});
| Constant | Meaning |
|---|---|
fs.constants.F_OK |
File exists |
fs.constants.R_OK |
File is readable |
fs.constants.W_OK |
File is writable |
fs.constants.X_OK |
File is executable |
Avoid the pattern “check if exists, then act” — the file could be deleted between the check and the action. Instead, attempt the operation directly and handle the
ENOENTerror.
Q. How to get file information (stats) in Node.js?
Use fs.stat() or fs.statSync() to retrieve metadata about a file or directory.
const fs = require('fs');

fs.stat('file.txt', (err, stats) => {
  if (err) {
    console.error('Error:', err.message);
    return;
  }

  console.log('Is file:', stats.isFile());           // true
  console.log('Is directory:', stats.isDirectory()); // false
  console.log('Size (bytes):', stats.size);
  console.log('Created:', stats.birthtime);
  console.log('Modified:', stats.mtime);
  console.log('Permissions (octal):', (stats.mode & 0o777).toString(8));
});
Using async/await:
const fs = require('fs').promises;

async function getFileInfo(filePath) {
  try {
    const stats = await fs.stat(filePath);
    return {
      size: stats.size,
      isFile: stats.isFile(),
      isDirectory: stats.isDirectory(),
      modified: stats.mtime,
    };
  } catch (err) {
    if (err.code === 'ENOENT') return null; // file not found
    throw err;
  }
}

getFileInfo('file.txt').then(console.log);
Q. How to work with directories in Node.js?
1. Create a directory:
const fs = require('fs').promises;

// Create a single directory
await fs.mkdir('logs');

// Create nested directories (recursive)
await fs.mkdir('logs/2026/april', { recursive: true });
2. Read directory contents:
const fs = require('fs');

fs.readdir('./src', (err, files) => {
  if (err) {
    console.error('Error reading directory:', err.message);
    return;
  }
  files.forEach((file) => console.log(file));
});
3. Read directory with file types:
const fs = require('fs').promises;

async function listDirectory(dirPath) {
  const entries = await fs.readdir(dirPath, { withFileTypes: true });

  entries.forEach((entry) => {
    if (entry.isDirectory()) {
      console.log(`[DIR]  ${entry.name}`);
    } else {
      console.log(`[FILE] ${entry.name}`);
    }
  });
}

listDirectory('./src');
4. Remove a directory:
const fs = require('fs').promises;

// Remove empty directory
await fs.rmdir('logs');

// Remove directory and all contents (Node.js v14.14+)
await fs.rm('logs', { recursive: true, force: true });
Q. How to watch a file for changes in Node.js?
Use fs.watch() to monitor a file or directory for changes. It fires a callback whenever the file is modified, renamed, or deleted.
Example — watch a single file:
const fs = require('fs');

const watcher = fs.watch('config.json', (eventType, filename) => {
  console.log(`Event: ${eventType}`);   // 'change' or 'rename'
  console.log(`File: ${filename}`);
});

// Stop watching after 10 seconds
setTimeout(() => {
  watcher.close();
  console.log('Stopped watching.');
}, 10000);
Example — watch a directory:
const fs = require('fs');

fs.watch('./src', { recursive: true }, (eventType, filename) => {
  if (filename) {
    console.log(`[${eventType}] ${filename}`);
  }
});
Example — using fs.watchFile() for polling (more reliable across platforms):
const fs = require('fs');

fs.watchFile('data.txt', { interval: 1000 }, (curr, prev) => {
  if (curr.mtime > prev.mtime) {
    console.log('File was modified at:', curr.mtime);
  }
});
| Method | Mechanism | Reliability | CPU Usage |
|---|---|---|---|
fs.watch() |
OS events | Fast, but inconsistent across platforms | Low |
fs.watchFile() |
Polling | Consistent across all platforms | Higher |
For production file watching, consider the chokidar library — it normalizes behavior across all OS platforms.
# 8. NODE.JS STREAMS
Q. How many types of streams are present in Node.js?
Streams are objects that let you read data from a source or write data to a destination in continuous fashion. There are four types of streams
Node.js has 4 types of streams:
| Type | Description | Example |
|---|---|---|
| Readable | Data can be read from it | fs.createReadStream(), http.IncomingMessage |
| Writable | Data can be written to it | fs.createWriteStream(), http.ServerResponse |
| Duplex | Both readable and writable | net.Socket, TCP socket |
| Transform | Duplex that modifies data as it passes through | zlib.createGzip(), crypto.createCipher() |
Additional stream utilities:
PassThrough— a Transform that passes data through unchanged (useful for testing/piping)stream.pipeline()— connects streams and handles backpressure + error propagation automatically (preferred over.pipe())
Each type of Stream is an EventEmitter instance and throws several events at different instance of times.
Methods:
- data − This event is fired when there is data is available to read.
- end − This event is fired when there is no more data to read.
- error − This event is fired when there is any error receiving or writing data.
- finish − This event is fired when all the data has been flushed to underlying system.
1. Reading from a Stream:
const fs = require("fs");
let data = "";

// Create a readable stream
const readerStream = fs.createReadStream("file.txt");

// Set the encoding to be utf8.
readerStream.setEncoding("UTF8");

// Handle stream events --> data, end, and error
readerStream.on("data", function (chunk) {
  data += chunk;
});

readerStream.on("end", function () {
  console.log(data);
});

readerStream.on("error", function (err) {
  console.log(err.stack);
});
2. Writing to a Stream:
const fs = require("fs");
const data = "File writing to a stream example";

// Create a writable stream
const writerStream = fs.createWriteStream("file.txt");

// Write the data to stream with encoding to be utf8
writerStream.write(data, "UTF8");

// Mark the end of file
writerStream.end();

// Handle stream events --> finish, and error
writerStream.on("finish", function () {
  console.log("Write completed.");
});

writerStream.on("error", function (err) {
  console.log(err.stack);
});
3. Piping the Streams:
Piping is a mechanism where we provide the output of one stream as the input to another stream. It is normally used to get data from one stream and to pass the output of that stream to another stream. There is no limit on piping operations.
const fs = require("fs");

// Create a readable stream
const readerStream = fs.createReadStream('input.txt');

// Create a writable stream
const writerStream = fs.createWriteStream('output.txt');

// Pipe the read and write operations
// read input.txt and write data to output.txt
readerStream.pipe(writerStream);
4. Chaining the Streams:
Chaining is a mechanism to connect the output of one stream to another stream and create a chain of multiple stream operations. It is normally used with piping operations.
const fs = require("fs");
const zlib = require('zlib');

// Compress the file input.txt to input.txt.gz
fs.createReadStream('input.txt')
   .pipe(zlib.createGzip())
   .pipe(fs.createWriteStream('input.txt.gz'));

console.log("File Compressed.");
Q. How to handle large data in Node.js?
The Node.js stream feature makes it possible to process large data continuously in smaller chunks without keeping it all in memory. One benefit of using streams is that it saves time, since you don't have to wait for all the data to load before you start processing. This also makes the process less memory-intensive.
1. Use Streams (most important)
Never load large files/datasets into memory at once — process them chunk by chunk:
import { createReadStream, createWriteStream } from "node:fs";
import { pipeline } from "node:stream/promises";
import { createGzip } from "node:zlib";

// Process a large file without loading it all into memory
await pipeline(
  createReadStream("large-file.csv"),
  createGzip(),
  createWriteStream("large-file.csv.gz")
);
2. Async Iteration over Streams
const stream = createReadStream("data.json", { encoding: "utf8" });
for await (const chunk of stream) {
  process(chunk); // handles one chunk at a time
}
3. Database Pagination / Cursor
// Cursor-based: fetch in batches, not all at once
async function* iterateUsers(db) {
  let cursor = null;
  do {
    const rows = await db.query(
      "SELECT * FROM users WHERE id > $1 ORDER BY id LIMIT 1000",
      [cursor ?? 0]
    );
    if (!rows.length) break;
    yield rows;
    cursor = rows.at(-1).id;
  } while (true);
}

for await (const batch of iterateUsers(db)) {
  await processBatch(batch);
}
4. Worker Threads for CPU-heavy Processing
import { Worker } from "node:worker_threads";

// Offload heavy computation (parsing, aggregation) to a worker
const worker = new Worker("./data-processor.js", { workerData: { filePath } });
worker.on("message", (result) => console.log(result));
5. Node.js --max-old-space-size (last resort)
node --max-old-space-size=4096 app.js # increase heap to 4 GB
6. Limit Concurrency to Avoid Memory Spikes
async function processBatchWithLimit(items, concurrency = 5) {
  for (let i = 0; i < items.length; i += concurrency) {
    await Promise.all(items.slice(i, i + concurrency).map(processItem));
  }
}
Summary
| Strategy | Best For |
|---|---|
| Streams + pipeline | Large files, logs, CSV, JSON lines |
| Async generators | Database rows, API pagination |
| Worker Threads | CPU-intensive transformations |
| Batched processing | Rate-limited APIs, bulk DB inserts |
| LRU/TTL Cache | Repeated reads of hot data |
--max-old-space-size |
Temporary fix only — not a solution |
Golden rule: If data doesn't fit comfortably in RAM, stream it. Never use
fs.readFileSyncor load entire collections into arrays for large datasets.
Q. What is backpressure in Node.js streams?
Backpressure is a flow-control mechanism that prevents a fast-producing readable stream from overwhelming a slow-consuming writable stream. When the writable's internal buffer fills up (exceeds highWaterMark), writable.write() returns false and the readable should pause until the drain event fires.
How it works
When writable.write(chunk) returns false, the internal buffer has exceeded its highWaterMark (default 16 KB). The readable should pause until the writable emits a drain event.
Example:
const readable = fs.createReadStream("huge.file");
const writable = fs.createWriteStream("output.file");

readable.on('data', (chunk) => {
  // Returns false when the buffer exceeds highWaterMark
  const canContinue = writable.write(chunk);
  if (!canContinue) {
    readable.pause(); // apply backpressure
  }
});

writable.on('drain', () => {
  readable.resume(); // buffer drained — resume reading
});

readable.on('end', () => writable.end());
Recommended: use pipeline() which handles backpressure automatically
import { pipeline } from "node:stream/promises";
import { createReadStream, createWriteStream } from "node:fs";

// pipeline pauses/resumes automatically + propagates errors + cleans up streams
await pipeline(
  createReadStream("huge.file"),
  createWriteStream("output.file")
);
Q. What is the difference between pipe() and pipeline() in Node.js streams?
Both connect a readable stream to a writable stream, but they differ significantly in error handling and cleanup.
.pipe() |
stream.pipeline() |
|
|---|---|---|
| Error propagation | Does NOT forward errors | Propagates errors to all streams |
| Stream cleanup | Destination not destroyed on source error | All streams destroyed on any error |
| Return value | Returns the destination stream | Returns void (or Promise with stream/promises) |
| Async/await | No | Yes (via node:stream/promises) |
| Available since | Node.js 0.9 | Node.js 10 (callback), Node.js 15 (promises) |
Example — .pipe() leaks on error:
const fs = require('fs');

const readable = fs.createReadStream('nonexistent.txt');
const writable = fs.createWriteStream('output.txt');

readable.on('error', (err) => console.error('Read error:', err.message));
// writable is NOT closed — resource leak!
readable.pipe(writable);
Example — pipeline() cleans up automatically:
const { pipeline } = require('node:stream/promises');
const { createReadStream, createWriteStream } = require('node:fs');
const { createGzip } = require('node:zlib');

async function compress(input, output) {
  try {
    await pipeline(
      createReadStream(input),
      createGzip(),
      createWriteStream(output)
    );
    console.log('Compression complete');
  } catch (err) {
    // All streams are automatically destroyed on error
    console.error('Pipeline failed:', err.message);
  }
}

compress('data.txt', 'data.txt.gz');
Rule: Always use
stream.pipeline()over.pipe()in production code..pipe()is only safe for simple, error-free scenarios.
Q. What is the difference between flowing mode and paused mode in Node.js streams?
A Readable stream operates in one of two modes:
| Paused Mode | Flowing Mode | |
|---|---|---|
| Default | Yes | No |
| Data delivery | On demand via .read() |
Auto-pushed via 'data' events |
| Switch to flowing | Add 'data' listener / .resume() / .pipe() |
— |
| Switch to paused | .pause() / remove 'data' listeners / .unpipe() |
— |
| Backpressure | Easy to control | Requires .pause() / .resume() |
const { createReadStream } = require('node:fs');
const stream = createReadStream('file.txt');

// ── Paused mode — pull data manually ─────────────────────────────────────────
stream.on('readable', () => {
  let chunk;
  while ((chunk = stream.read(64)) !== null) { // pull 64 bytes at a time
    console.log('Read:', chunk.toString());
  }
});

stream.on('end', () => console.log('Done'));

// ── Flowing mode — data pushed automatically ──────────────────────────────────
const stream2 = createReadStream('file.txt');

// Adding a 'data' listener switches to flowing mode
stream2.on('data', (chunk) => {
  console.log('Chunk:', chunk.length, 'bytes');
});

stream2.on('end', () => console.log('Done'));

// ── Async iteration (recommended — handles both modes internally) ─────────────
const stream3 = createReadStream('file.txt', { encoding: 'utf8' });

for await (const chunk of stream3) {
  console.log(chunk);
}
Switching modes:
const stream = createReadStream('file.txt');
// starts in paused mode

stream.resume();   // switch to flowing — discards data (use only to drain)
stream.pause();    // switch back to paused

stream.on('data', handler); // switches to flowing
stream.off('data', handler); // does NOT automatically switch back to paused
stream.pause();              // must explicitly pause
Best practice: Use
for await...oforstream.pipeline()instead of manually managing modes — both handle backpressure and mode switching automatically.
Q. What is highWaterMark in Node.js streams and how does it affect performance?
highWaterMark is the threshold (in bytes for binary streams, or number of objects for object-mode streams) at which a stream’s internal buffer is considered “full”. It controls the balance between memory usage and throughput.
const { createReadStream, createWriteStream } = require('node:fs');

// Default highWaterMark is 16 KB (16384 bytes)
const defaultStream = createReadStream('file.txt');
console.log(defaultStream.readableHighWaterMark); // 16384

// Increase for high-throughput scenarios (fewer I/O calls)
const highThroughput = createReadStream('large.bin', {
  highWaterMark: 64 * 1024  // 64 KB chunks
});

// Decrease for low-memory or real-time scenarios
const lowMemory = createReadStream('stream.txt', {
  highWaterMark: 1024  // 1 KB chunks
});

// Object mode — highWaterMark is a COUNT (not bytes)
const { Transform } = require('node:stream');
const objectTransform = new Transform({
  objectMode: true,
  highWaterMark: 16,     // buffer up to 16 objects
  transform(obj, enc, cb) {
    this.push(process(obj));
    cb();
  }
});
How highWaterMark affects backpressure:
const writable = createWriteStream('output.txt', {
  highWaterMark: 4096  // 4 KB — writable.write() returns false when buffer > 4 KB
});

const readable = createReadStream('input.txt', {
  highWaterMark: 65536  // 64 KB read chunks
});

// With pipeline(), the mismatch is handled automatically:
// readable produces 64 KB → writable buffers → backpressure → readable pauses
const { pipeline } = require('node:stream/promises');
await pipeline(readable, writable);
Tuning guidelines:
| Scenario | highWaterMark |
Effect |
|---|---|---|
| Default | 16 KB | Good balance for most cases |
| High throughput (disk copy) | 64–256 KB | Fewer syscalls, more memory |
| Real-time / streaming | 1–4 KB | Lower latency, more syscalls |
| Object mode | 16 objects | Adjust based on object size |
Increasing
highWaterMarkimproves throughput at the cost of memory. Decreasing it saves memory but increases I/O overhead. Profile withnode --profbefore tuning.
Q. How to implement a Duplex stream in Node.js?
A Duplex stream is both Readable and Writable, but the two sides are independent — data written to the writable side does not automatically appear on the readable side (unlike Transform).
const { Duplex } = require('node:stream');

// ── Simple Duplex — echo server simulation ────────────────────────────────────
class EchoStream extends Duplex {
  constructor(options) {
    super(options);
    this._buffer = [];
  }

  // Writable side — receives incoming data
  _write(chunk, encoding, callback) {
    this._buffer.push(chunk); // store for reading
    callback();
  }

  // Readable side — produces data when consumer pulls
  _read(size) {
    if (this._buffer.length > 0) {
      this.push(this._buffer.shift());
    } else {
      this.push(null); // signal end
    }
  }
}

const echo = new EchoStream();
echo.write('Hello');
echo.write('World');
echo.end();

echo.on('data', (chunk) => console.log(chunk.toString())); // Hello, World
Duplex vs Transform:
| Duplex | Transform | |
|---|---|---|
| Readable ↔ Writable relationship | Independent | Input is transformed into output |
| Use case | TCP sockets, bidirectional channels | Compression, encryption, parsing |
_read + _write |
Both required | _transform + optional _flush |
</details>
Q. How to handle stream errors properly in Node.js?
const { createReadStream, createWriteStream } = require('node:fs');
const { createGzip } = require('node:zlib');
const { pipeline } = require('node:stream/promises');

// ── always listen for 'error' on every stream when using .pipe() ─
readable.on('error', (err) => {
  console.error('Read error:', err.message);
  writable.destroy(err); // manually destroy writable
});
writable.on('error', (err) => {
  console.error('Write error:', err.message);
});

// ── use pipeline() which handles ALL of this automatically ───────────
try {
  await pipeline(
    createReadStream('input.txt'),
    createGzip(),
    createWriteStream('output.txt.gz')
  );
} catch (err) {
  // All streams are destroyed automatically on any error
  console.error('Pipeline failed:', err.message);
  // err.code e.g. 'ENOENT', 'EACCES', 'ERR_STREAM_DESTROYED'
}

// ── Error types in streams ────────────────────────────────────────────────────
const stream = createReadStream('file.txt');

stream.on('error', (err) => {
  switch (err.code) {
    case 'ENOENT':   console.error('File not found');      break;
    case 'EACCES':   console.error('Permission denied');   break;
    case 'EISDIR':   console.error('Path is a directory'); break;
    default:         console.error('Stream error:', err);
  }
});

// ── Checking if a stream is destroyed ────────────────────────────────────────
if (!stream.destroyed) {
  stream.destroy(); // forcefully close a stream
}

stream.on('close', () => console.log('Stream closed and resources released'));
Error handling checklist:
- Use
stream.pipeline()— handles cleanup automatically - Wrap
await pipeline()intry/catch - In custom streams, always call
callback(err)on failure - Listen for
'close'event to confirm resources are released
# 9. NODE.JS MULTITHREADING
Q. Is Node.js entirely based on a single-thread?
No, Node.js is not entirely single-threaded. Here’s the full picture:
What runs on a single thread
- JavaScript execution — your JS code, the event loop, and all callbacks run on one thread
What runs on multiple threads (behind the scenes)
- libuv thread pool (default: 4 threads) handles:
- File system I/O (
fs.readFile, etc.) - DNS lookups (
dns.lookup) - CPU-heavy crypto (
pbkdf2,scrypt,randomBytes) zlibcompression
- File system I/O (
- OS-level async I/O — network I/O (TCP/HTTP) is handled by the OS kernel directly, not the thread pool
- Worker Threads (
worker_threadsmodule) — explicitly run JS on separate threads for CPU-intensive tasks - Child Processes (
child_processmodule) — spawn separate OS processes
Summary
Your JavaScript code         → single thread (event loop)
File I/O, DNS, crypto, zlib  → libuv thread pool (4 threads by default)
Network I/O (TCP, HTTP)      → OS kernel async (no threads)
Worker Threads               → separate JS threads (explicit, opt-in)
Child Processes              → separate OS processes (separate memory)
The design goal: keep the JS thread free from blocking by offloading slow work to libuv or OS — giving the illusion of concurrency without the complexity of multi-threaded programming. Use
worker_threadsexplicitly when you need true JS parallelism for CPU-heavy tasks.
Q. How does Node.js handle child threads?
While Node.js is primarily a single-threaded runtime that uses an event loop for asynchronous tasks, it handles “child threads” and parallel execution through two main built-in modules: worker_threads and child_process.
Node.js handles “child threads” through three distinct mechanisms:
1. libuv Thread Pool (automatic, transparent)
Node.js internally uses a pool of C++ threads via libuv to offload blocking operations:
const fs = require('fs');
const crypto = require('crypto');

// These silently run on libuv thread pool — JS thread never blocks
fs.readFile('large.txt', (err, data) => console.log('done'));
crypto.pbkdf2('password', 'salt', 100000, 64, 'sha512', (err, key) => console.log('hashed'));

console.log('main thread continues immediately');
Default pool size is 4 threads — increase via env var before any require():
process.env.UV_THREADPOOL_SIZE = '16'; // max 1024
2. Worker Threads (worker_threads — JS parallelism)
For CPU-intensive JavaScript tasks (stable since Node.js v12):
// main.js
const { Worker, isMainThread, parentPort, workerData } = require('worker_threads');

if (isMainThread) {
  const worker = new Worker(__filename, { workerData: { n: 40 } });
  worker.on('message', (result) => console.log('Result:', result));
  worker.on('error', (err) => console.error(err));
} else {
  // runs in a separate thread, shares memory via SharedArrayBuffer
  const fib = (n) => n <= 1 ? n : fib(n-1) + fib(n-2);
  parentPort.postMessage(fib(workerData.n));
}
3. Child Processes (child_process — separate OS processes)
For running external programs or isolating work in a separate Node.js process:
const { fork, spawn, exec } = require('child_process');

// fork — separate Node.js process with IPC channel
const child = fork('./worker.js');
child.send({ task: 'compute' });
child.on('message', (result) => console.log(result));

// spawn — stream output from any executable
const ls = spawn('ls', ['-la']);
ls.stdout.on('data', (data) => console.log(data.toString()));
Q. How does Node.js support multi-processor platforms, and does it fully utilize all processor resources?
By default, a single Node.js instance runs on one CPU core and does not fully utilize multi-core systems. Node.js provides three ways to leverage all processors:
1. Cluster Module (built-in — most common)
Forks one worker process per CPU core, all sharing the same port:
const cluster = require('cluster');
const os = require('os');
const express = require('express');

if (cluster.isPrimary) {
  const numCPUs = os.cpus().length; // e.g., 8 on an 8-core machine

  for (let i = 0; i < numCPUs; i++) {
    cluster.fork(); // each worker is a full Node.js process
  }

  cluster.on('exit', (worker) => {
    console.log(`Worker ${worker.process.pid} died — restarting`);
    cluster.fork(); // auto-restart crashed workers
  });
} else {
  const app = express();
  app.get('/', (req, res) => res.send(`Handled by PID ${process.pid}`));
  app.listen(3000);
}
2. PM2 Process Manager (production standard)
pm2 start app.js -i max        # fork one process per CPU core
pm2 start app.js -i 4          # fork exactly 4 processes
pm2 reload app.js              # zero-downtime reload across all workers
3. Worker Threads (CPU-bound JS tasks)
const { Worker, isMainThread } = require('worker_threads');
const os = require('os');

// Spread CPU-intensive work across all cores
if (isMainThread) {
  const tasks = largeDataset.chunk(os.cpus().length);
  tasks.forEach((chunk, i) => {
    new Worker('./process-chunk.js', { workerData: chunk });
  });
}
Does it fully utilize all processors?
| Mechanism | Uses all cores? | Notes |
|---|---|---|
| Single Node.js process | 1 core only | Default behavior |
| Cluster module | Yes | Separate processes, shared port |
| PM2 cluster mode | Yes | Managed, zero-downtime restarts |
| Worker Threads | Yes | Shared memory, same process |
Key limitations
- No shared state between cluster workers — use Redis or a DB for shared data
- IPC overhead — inter-process communication between primary and workers has a cost
os.availableParallelism()(Node.js 19+) is preferred overos.cpus().lengthas it respects container CPU limits (cgroups)
const { availableParallelism } = require('os'); // Node.js 19+
const numCPUs = availableParallelism(); // respects Docker/K8s CPU limits
Q. How does the cluster module work in Node.js?
The cluster module provides a way of creating child processes that runs simultaneously and share the same server port.
Node.js runs single threaded programming, which is very memory efficient, but to take advantage of computers multi-core systems, the Cluster module allows you to easily create child processes that each runs on their own single thread, to handle the load.

Example:
/**
 * Cluster Module
 */
const cluster = require("cluster");

if (cluster.isPrimary) {
  console.log(`Primary process is running...`);
  cluster.fork();
  cluster.fork();
} else {
  console.log(`Worker process started running`);
}
Output:
Master process is running...
Worker process started running
Worker process started running
Q. Explain cluster methods supported by Node.js?
| Method | Description |
|---|---|
| fork() | Creates a new worker, from a primary |
| isPrimary | Returns true if the current process is primary, otherwise false |
| isWorker | Returns true if the current process is worker, otherwise false |
| id | A unique id for a worker |
| process | Returns the global Child Process |
| send() | sends a message to a master or a worker |
| kill() | Kills the current worker |
| isDead | Returns true if the worker's process is dead, otherwise false |
| settings | Returns an object containing the cluster's settings |
| worker | Returns the current worker object |
| workers | Returns all workers of a master |
| exitedAfterDisconnect | Returns true if a worker was exited after disconnect, or the kill method |
| isConnected | Returns true if the worker is connected to its master, otherwise false |
| disconnect() | Disconnects all workers |
Q. How to make use of all CPUs in Node.js?
A single instance of Node.js runs in a single thread. To take advantage of multi-core systems, the user will sometimes want to launch a cluster of Node.js processes to handle the load. The cluster module allows easy creation of child processes that all share server ports.
The cluster module supports two methods of distributing incoming connections.
-
The first one (and the default one on all platforms except Windows), is the round-robin approach, where the primary process listens on a port, accepts new connections and distributes them across the workers in a round-robin fashion, with some built-in smarts to avoid overloading a worker process.
-
The second approach is where the primary process creates the listen socket and sends it to interested workers. The workers then accept incoming connections directly.
Example:
/**
 * Server Load Balancing in Node.js
 */
const cluster = require("cluster");
const express = require("express");
const os = require("os");

if (cluster.isPrimary) {
  console.log(`Primary PID ${process.pid} is running`);

  // Get the number of available cpu cores
  const nCPUs = os.cpus().length;
  // Fork worker processes for each available CPU core
  for (let i = 0; i < nCPUs; i++) {
    cluster.fork();
  }

  cluster.on("exit", (worker, code, signal) => {
    console.log(`Worker PID ${worker.process.pid} died`);
  });
} else {
  // Workers can share any TCP connection
  // In this case it is an Express server
  const app = express();
  app.get("/", (req, res) => {
    res.send("Node is Running...");
  });

  app.listen(3000, () => {
    console.log(`App listening at http://localhost:3000/`);
  });

  console.log(`Worker PID ${process.pid} started`);
}
Running Node.js will now share port 3000 between the workers:
Output:
Master PID 13972 is running
Worker PID 5680 started
App listening at http://localhost:3000/
Worker PID 14796 started
...
Q. If Node.js is single threaded then how it handles concurrency?
Node js despite being single-threaded is the asynchronous nature that makes it possible to handle concurrency and perform multiple I/O operations at the same time. Node js uses an event loop to maintain concurrency and perform non-blocking I/O operations.
As soon as Node js starts, it initializes an event loop. The event loop works on a queue (which is called an event queue) and performs tasks in FIFO (First In First Out) order. It executes a task only when there is no ongoing task in the call stack. The call stack works in LIFO(Last In First Out) order. The event loop continuously checks the call stack to check if there is any task that needs to be run. Now whenever the event loop finds any function, it adds it to the stack and runs in order.
Example:
/**
 * Concurrency
 */
function add(a, b) {
  return a + b;
}

function print(n) {
  console.log(`Two times the number ${n} is ` + add(n, n));
}

print(5);
Here, the function print(5) will be invoked and will push into the call stack. When the function is called, it starts consoling the statement inside it but before consoling the whole statement it encounters another function add(n,n) and suspends its current execution, and pushes the add function into the top of the call stack.
Now the function will return the addition a+b and then popped out from the stack and now the previously suspended function will start running and will log the output to console and then this function too will get pop from the stack and now the stack is empty. So this is how a call stack works.
Q. How to kill child processes that spawn their own child processes in Node.js?
If a child process in Node.js spawn their own child processes, kill() method will not kill the child process's own child processes. For example, if I start a process that starts it's own child processes via child_process module, killing that child process will not make my program to quit.
const spawn = require('child_process').spawn;
const child = spawn('my-command');

child.kill();
The program above will not quit if my-command spins up some more processes.
PID range hack:
We can start child processes with {detached: true} option so those processes will not be attached to main process but they will go to a new group of processes. Then using process.kill(-pid) method on main process we can kill all processes that are in the same group of a child process with the same pid group. In my case, I only have one processes in this group.
const spawn = require('child_process').spawn;
const child = spawn('my-command', {detached: true});

process.kill(-child.pid);
Please note - before pid. This converts a pid to a group of pids for process kill() method.
Q. What is load balancer and how it works?
A load balancer is a process that takes in HTTP requests and forwards these HTTP requests to one of a collection of servers. Load balancers are usually used for performance purposes: if a server needs to do a lot of work for each request, one server might not be enough, but 2 servers alternating handling incoming requests might.
1. Using cluster module:
NodeJS has a built-in module called Cluster Module to take the advantage of a multi-core system. Using this module you can launch NodeJS instances to each core of your system. Master process listening on a port to accept client requests and distribute across the worker using some intelligent fashion. So, using this module you can utilize the working ability of your system.
2. Using PM2:
PM2 is a production process manager for Node.js applications with a built-in load balancer. It allows you to keep applications alive forever, to reload them without the downtime and to facilitate common system admin tasks.
$ pm2 start app.js -i max --name "Balancer"
This command will run the app.js file on the cluster mode to the total no of core available on your server.
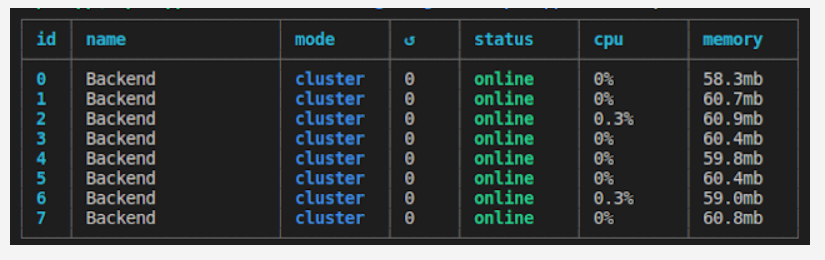
3. Using Express module:
The below code basically creates two Express Servers to handle the request
const body = require('body-parser');
const express = require('express');

const app1 = express();
const app2 = express();

// Parse the request body as JSON
app1.use(body.json());
app2.use(body.json());

const handler = serverNum => (req, res) => {
  console.log(`server ${serverNum}`, req.method, req.url, req.body);
  res.send(`Hello from server ${serverNum}!`);
};

// Only handle GET and POST requests
app1.get('*', handler(1)).post('*', handler(1));
app2.get('*', handler(2)).post('*', handler(2));

app1.listen(3000);
app2.listen(3001);
Q. What is difference between spawn() and fork() methods in Node.js?
1. spawn():
In Node.js, spawn() launches a new process with the available set of commands. This doesn't generate a new V8 instance only a single copy of the node module is active on the processor. It is used when we want the child process to return a large amount of data back to the parent process.
When spawn is called, it creates a streaming interface between the parent and child process. Streaming Interface — one-time buffering of data in a binary format.
Example:
/**
 * The spawn() method
 */
const { spawn } = require("child_process");
const child = spawn("dir", ["D:\\empty"], { shell: true });

child.stdout.on("data", (data) => {
  console.log(`stdout ${data}`);
});
Output
stdout  Volume in drive D is Windows
 Volume Serial Number is 76EA-3749

stdout
 Directory of D:\
2. fork():
The fork() is a particular case of spawn() which generates a new V8 engines instance. Through this method, multiple workers run on a single node code base for multiple tasks. It is used to separate computation-intensive tasks from the main event loop.
When fork is called, it creates a communication channel between the parent and child process Communication Channel — messaging
Example:
/**
 * The fork() method
 */
const { fork } = require("child_process");

const forked = fork("child.js");

forked.on("message", (msg) => {
  console.log("Message from child", msg);
});

forked.send({ message: "fork() method" });
/**
 * child.js
 */
process.on("message", (msg) => {
  console.log("Message from parent:", msg);
});

let counter = 0;

setInterval(() => {
  process.send({ counter: counter++ });
}, 1000);
Output:
Message from parent: { message: 'fork() method' }
Message from child { counter: 0 }
Message from child { counter: 1 }
Message from child { counter: 2 }
...
...
Message from child { counter: n }
Q. What is daemon process?
A daemon is a program that runs in background and has no controlling terminal. They are often used to provide background services. For example, a web-server or a database server can run as a daemon.
When a daemon process is initialized:
- It creates a child of itself and proceeds to shut down all standard descriptors (error, input, and output) from this particular copy.
- It closes the parent process when the user closes the session/terminal window.
- Leaves the child process running as a daemon.
Daemonize Node.js process:
Example: Using an instance of Forever from Node.js
const forever = require("forever");

const child = new forever.Forever("your-filename.js", {
  max: 3,
  silent: true,
  args: [],
});

child.on("exit", this.callback);
child.start();
Q. What are Worker Threads in Node.js?
Worker Threads (the worker_threads module, stable since Node.js v12 LTS) run JavaScript in parallel on separate threads. Unlike child_process.fork(), workers share memory via SharedArrayBuffer and are best suited for CPU-intensive JavaScript tasks (e.g., image processing, cryptography, data parsing) without blocking the main event loop.
Key APIs:
| API | Description |
|---|---|
Worker |
Represents a worker thread |
isMainThread |
true if running in the main thread |
parentPort |
MessagePort for communicating with the parent |
workerData |
Data passed to the worker on creation |
SharedArrayBuffer |
Shared memory between threads |
Example:
// worker-example.js (works as both main and worker)
const { Worker, isMainThread, parentPort, workerData } = require('worker_threads');

if (isMainThread) {
  // Main thread: spawn a worker
  const worker = new Worker(__filename, { workerData: { n: 40 } });

  worker.on('message', (result) => {
    console.log(`fibonacci(40) = ${result}`);
  });
  worker.on('error', (err) => console.error(err));
  worker.on('exit', (code) => console.log(`Worker exited with code ${code}`));
} else {
  // Worker thread: perform the CPU-intensive task
  function fibonacci(n) {
    if (n <= 1) return n;
    return fibonacci(n - 1) + fibonacci(n - 2);
  }
  parentPort.postMessage(fibonacci(workerData.n));
}
Worker Threads vs Child Processes:
| Worker Threads | Child Process | |
|---|---|---|
| Memory | Shared (via SharedArrayBuffer) |
Separate |
| Communication | postMessage / SharedArrayBuffer |
IPC / stdin/stdout |
| Best for | CPU-intensive JS tasks | External programs, separate Node processes |
| Overhead | Low | Higher |
# 10. NODE.JS WEB MODULE
Q. How to use JSON Web Token (JWT) for authentication in Node.js?
JSON Web Token (JWT) is an open standard that defines a compact and self-contained way of securely transmitting information between parties as a JSON object. This information can be verified and trusted because it is digitally signed.
There are some advantages of using JWT for authorization:
- Purely stateless. No additional server or infra required to store session information.
- It can be easily shared among services.
Syntax:
jwt.sign(payload, secretOrPrivateKey, [options, callback])
- Header - Consists of two parts: the type of token (i.e., JWT) and the signing algorithm (i.e., HS512)
- Payload - Contains the claims that provide information about a user who has been authenticated along with other information such as token expiration time.
- Signature - Final part of a token that wraps in the encoded header and payload, along with the algorithm and a secret
Installation:
npm install jsonwebtoken bcryptjs --save
Example:
/**
 * AuthController.js
 */
const express = require('express');
const router = express.Router();
const bodyParser = require('body-parser');
const User = require('../user/User');

const jwt = require('jsonwebtoken');
const bcrypt = require('bcryptjs');
const config = require('../config');


router.use(bodyParser.urlencoded({ extended: false }));
router.use(bodyParser.json());

router.post('/register', function(req, res) {

  let hashedPassword = bcrypt.hashSync(req.body.password, 8);

  User.create({
    name : req.body.name,
    email : req.body.email,
    password : hashedPassword
  },
  function (err, user) {
    if (err) return res.status(500).send("There was a problem registering the user.")
    // create a token
    let token = jwt.sign({ id: user._id }, config.secret, {
      expiresIn: 86400 // expires in 24 hours
    });
    res.status(200).send({ auth: true, token: token });
  });
});
config.js:
/**
 * config.js
 */
module.exports = {
  'secret': 'supersecret'
};
The jwt.sign() method takes a payload and the secret key defined in config.js as parameters. It creates a unique string of characters representing the payload. In our case, the payload is an object containing only the id of the user.
Reference:
Q. How to build a microservices architecture with Node.js?
Microservices are a style of Service Oriented Architecture (SOA) where the app is structured on an assembly of interconnected services. With microservices, the application architecture is built with lightweight protocols. The services are finely seeded in the architecture. Microservices disintegrate the app into smaller services and enable improved modularity.
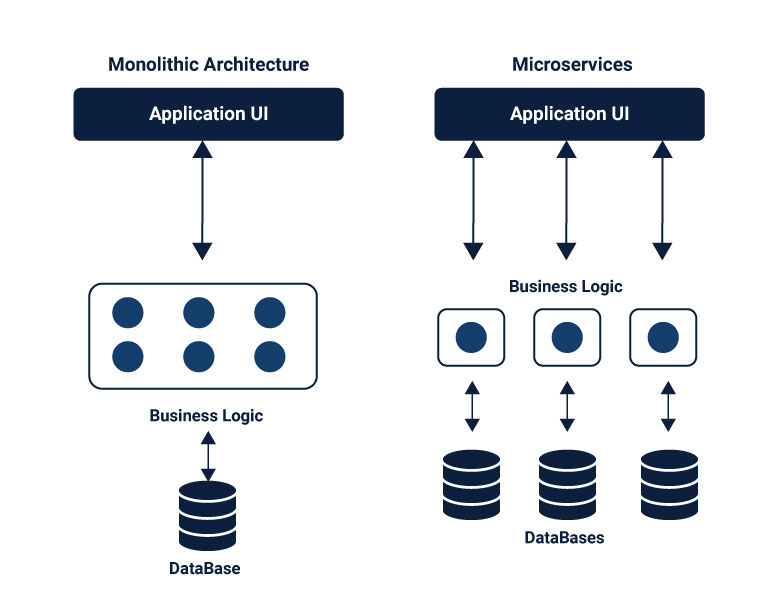
There are few things worth emphasizing about the superiority of microservices, and distributed systems generally, over monolithic architecture:
- Modularity — responsibility for specific operations is assigned to separate pieces of the application
- Uniformity — microservices interfaces (API endpoints) consist of a base URI identifying a data object and standard HTTP methods (GET, POST, PUT, PATCH and DELETE) used to manipulate the object
- Robustness — component failures cause only the absence or reduction of a specific unit of functionality
- Maintainability — system components can be modified and deployed independently
- Scalability — instances of a service can be added or removed to respond to changes in demand.
- Availability — new features can be added to the system while maintaining 100% availability.
- Testability — new solutions can be tested directly in the production environment by implementing them for restricted segments of users to see how they behave in real life.
Example: Creating Microservices with Node.js
Step 01: Creating a Server to Accept Requests
This file is creating our server and assigns routes to process all requests.
//  server.js

const express = require('express')
const app = express();
const port = process.env.PORT || 3000;

const routes = require('./api/routes');
routes(app);
app.listen(port, function() {
   console.log('Server started on port: ' + port);
});
Step 02: Defining the routes
The next step is to define the routes for the microservices and then assign each to a target in the controller. We have two endpoints. One endpoint called “about” that returns information about the application. And a “distance” endpoint that includes two path parameters, both Zip Codes of the Lego store. This endpoint returns the distance, in miles, between these two Zip Codes.
const controller = require('./controller');

module.exports = function(app) {
   app.route('/about')
       .get(controller.about);
   app.route('/distance/:zipcode1/:zipcode2')
       .get(controller.getDistance);
};
Step 03: Adding Controller Logic
Within the controller file, we are going to create a controller object with two properties. Those properties are the functions to handle the requests we defined in the routes module.
const properties = require('../package.json')
const distance = require('../service/distance');

const controllers = {
   about: function(req, res) {
       let aboutInfo = {
           name: properties.name,
           version: properties.version
       }
       res.json(aboutInfo);
   },
   getDistance: function(req, res) {
           distance.find(req, res, function(err, dist) {
               if (err)
                   res.send(err);
               res.json(dist);
           });
       },
};

module.exports = controllers;
Q. How microservices communicate with each other?
Microservices are an architectural style and comprises of small modules/elements which are independent of each other. At times they are interdependent on other microservices or even a database. Breaking down applications into smaller elements brings scalability and efficiency to the structure.
The microservices are distributed and communicate with each other by inter-service communication on network level. Each microservice has its own instance and process. Therefore, services must interact using an inter-service communication protocols like HTTP, gRPC or message brokers AMQP protocol.

Client and services communicate with each other with many different types of communication. Mainly, those types of communications can be classified in two axes.
1. Synchronous Communication:
The Synchronous communication is using HTTP or gRPC protocol for returning sync response. The client sends a request and waits for a response from the service. So that means client code block their thread, until the response reach from the server.
2. Asynchronous Communication:
In Asynchronous communication, the client sends a request but it doesn't wait for a response from the service. The most popular protocol for this Asynchronous communications is AMQP (Advanced Message Queuing Protocol). So with using AMQP protocols, the client sends the message with using message broker systems like Kafka and RabbitMQ queue. The message producer usually does not wait for a response. This message consume from the subscriber systems in async way, and no one waiting for response suddenly.
Q. How to create an HTTPS server in Node.js?
To create a secure HTTPS server, you need a TLS/SSL certificate and private key. For development, generate a self-signed certificate using OpenSSL. For production, use a certificate from a trusted CA (e.g., Let's Encrypt).
Step 01: Generate a self-signed certificate (development only)
openssl req -nodes -new -x509 -keyout server.key -out server.cert -days 365
Step 02: server.js
const https = require('https');
const fs = require('fs');
const express = require('express');

const app = express();

app.get('/', (req, res) => {
  res.send('Secure Hello from Node.js!');
});

const options = {
  key:  fs.readFileSync('server.key'),
  cert: fs.readFileSync('server.cert'),
};

https.createServer(options, app).listen(443, () => {
  console.log('HTTPS server running on https://localhost:443');
});
Redirect HTTP to HTTPS:
const http = require('http');

// Redirect all HTTP traffic to HTTPS
http.createServer((req, res) => {
  res.writeHead(301, { Location: `https://${req.headers.host}${req.url}` });
  res.end();
}).listen(80);
In production, use a reverse proxy (Nginx, Caddy, or an AWS/GCP load balancer) to handle TLS termination in front of your Node.js app — this is simpler and more performant.
# 11. NODE.JS ROUTING
Q. How does routing work in Node.js?
Routing defines the way in which the client requests are handled by the application endpoints. We define routing using methods of the Express app object that correspond to HTTP methods; for example, app.get() to handle GET requests and app.post to handle POST requests, app.all() to handle all HTTP methods and app.use() to specify middleware as the callback function.
These routing methods “listens” for requests that match the specified route(s) and method(s), and when it detects a match, it calls the specified callback function.
Syntax:
app.METHOD(PATH, HANDLER)
Where:
- app is an instance of express.
- METHOD is an
HTTP request method. - PATH is a path on the server.
- HANDLER is the function executed when the route is matched.
a) Route methods:
// GET method route
app.get('/', function (req, res) {
  res.send('GET request')
})

// POST method route
app.post('/login', function (req, res) {
  res.send('POST request')
})

// ALL method route
app.all('/secret', function (req, res, next) {
  console.log('Accessing the secret section ...')
  next() // pass control to the next handler
})
b) Route paths:
Route paths, in combination with a request method, define the endpoints at which requests can be made. Route paths can be strings, string patterns, or regular expressions.
The characters ?, +, *, and () are subsets of their regular expression counterparts. The hyphen (-) and the dot (.) are interpreted literally by string-based paths.
Example:
// This route path will match requests to /about.
app.get('/about', function (req, res) {
  res.send('about')
})


// This route path will match acd and abcd.
app.get('/ab?cd', function (req, res) {
  res.send('ab?cd')
})


// This route path will match butterfly and dragonfly
app.get(/.*fly$/, function (req, res) {
  res.send('/.*fly$/')
})
c) Route parameters:
Route parameters are named URL segments that are used to capture the values specified at their position in the URL. The captured values are populated in the req.params object, with the name of the route parameter specified in the path as their respective keys.
Example:
app.get('/users/:userId', function (req, res) {
  res.send(req.params)
})
Response methods:
| Method | Description |
|---|---|
res.download() |
Prompt a file to be downloaded. |
res.end() |
End the response process. |
res.json() |
Send a JSON response. |
res.jsonp() |
Send a JSON response with JSONP support. |
res.redirect() |
Redirect a request. |
res.render() |
Render a view template. |
res.send() |
Send a response of various types. |
res.sendFile() |
Send a file as an octet stream. |
res.sendStatus() |
Set the response status code and send its string representation as the response body. |
d) Router method:
const express = require('express')
const router = express.Router()

// middleware that is specific to this router
router.use(function timeLog (req, res, next) {
  console.log('Time: ', Date.now())
  next()
})

// define the home page route
router.get('/', function (req, res) {
  res.send('Birds home page')
})

// define the about route
router.get('/about', function (req, res) {
  res.send('About birds')
})

module.exports = router
# 12. NODE.JS MIDDLEWARE
Q. What are the middleware functions in Node.js?
Middleware functions are functions that have access to the request object (req), the response object (res), and the next function in the application's request-response cycle.
Middleware functions can perform the following tasks:
- Execute any code.
- Make changes to the request and the response objects.
- End the request-response cycle.
- Call the next middleware in the stack.
If the current middleware function does not end the request-response cycle, it must call next() to pass control to the next middleware function. Otherwise, the request will be left hanging.
The following figure shows the elements of a middleware function call:
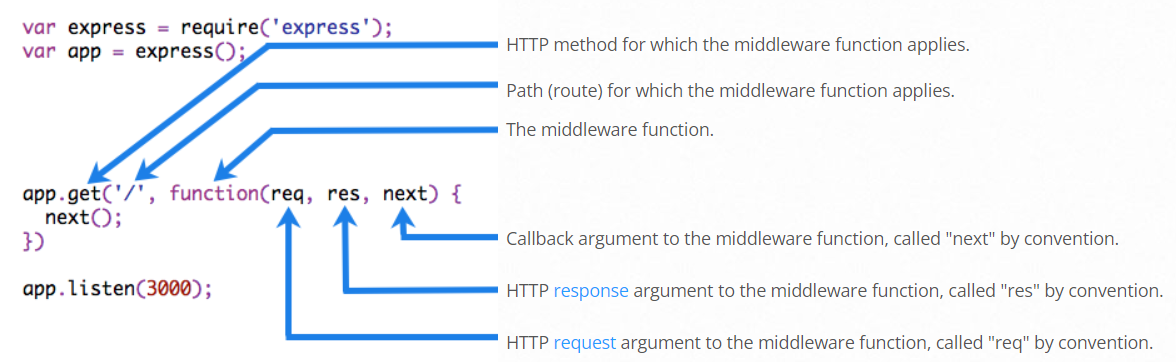
Middleware functions that return a Promise will call next(value) when they reject or throw an error. next will be called with either the rejected value or the thrown Error.
Q. Explain the use of next in Node.js?
The next is a function in the Express router which executes the middleware succeeding the current middleware.
Example:
To load the middleware function, call app.use(), specifying the middleware function. For example, the following code loads the myLogger middleware function before the route to the root path (/).
/**
 * myLogger
 */
const express = require("express");
const app = express();

const myLogger = function (req, res, next) {
  console.log("LOGGED");
  next();
};

app.use(myLogger);

app.get("/", (req, res) => {
  res.send("Hello World!");
});

app.listen(3000);
⚝ Try this example on CodeSandbox
Note: The next() function is not a part of the Node.js or Express API, but is the third argument that is passed to the middleware function. The next() function could be named anything, but by convention it is always named “next”. To avoid confusion, always use this convention.
Q. Why to use Express.js?
Express.js is a Node.js web application framework that provides broad features for building web and mobile applications. It is used to build a single page, multipage, and hybrid web application.
Features of Express.js:
- Fast Server-Side Development: The features of node js help express saving a lot of time.
- Middleware: Middleware is a request handler that has access to the application's request-response cycle.
- Routing: It refers to how an application's endpoint's URLs respond to client requests.
- Templating: It provides templating engines to build dynamic content on the web pages by creating HTML templates on the server.
- Debugging: Express makes it easier as it identifies the exact part where bugs are.
The Express.js framework makes it very easy to develop an application which can be used to handle multiple types of requests like the GET, PUT, and POST and DELETE requests.
Example:
/**
 * Simple server using Express.js
 */
const express = require("express");
const app = express();

app.get("/", function (req, res) {
  res.send("Hello World!");
});

const server = app.listen(3000, function () {});
Q. Why should you separate Express ‘app’ and ‘server’?
Keeping the API declaration separated from the network related configuration (port, protocol, etc) allows testing the API in-process, without performing network calls, with all the benefits that it brings to the table: fast testing execution and getting coverage metrics of the code. It also allows deploying the same API under flexible and different network conditions.
API declaration, should reside in app.js:
/**
 * app.js
 */
const app = express();

app.use(bodyParser.json());
app.use("/api/events", events.API);
app.use("/api/forms", forms);
Server network declaration
/**
 * server.js
 */
const app = require('../app');
const http = require('http');


// Get port from environment and store in Express.
const port = normalizePort(process.env.PORT || '3000');
app.set('port', port);


// Create HTTP server.
const server = http.createServer(app);
Q. What are some of the most popular packages of Node.js?
| Package | Description |
|---|---|
| async | Async is a utility module which provides straight-forward, powerful functions for working with asynchronous JavaScript |
| axios | Axios is a promise-based HTTP Client for node.js and the browser. |
| autocannon | AutoCannon is a tool for performance testing and a tool for benchmarking. |
| csv | csv module has four sub modules which provides CSV generation, parsing, transformation and serialization for Node.js |
| dayjs | Day.js is a fast, 2kB alternative to Moment.js for parsing, validating, manipulating, and formatting dates |
| debug | Debug is a tiny node.js debugging utility modelled after node core's debugging technique |
| eslint | ESLint is a static analysis tool to find and fix problems in JavaScript code, covering errors, best practices and style rules |
| express | Express is a fast, un-opinionated, minimalist web framework. It provides small, robust tooling for HTTP servers, making it a great solution for single page applications, web sites, hybrids, or public HTTP APIs |
| fastify | Fastify is a fast and low overhead web framework for Node.js, focused on performance and developer experience |
| http-server | is a simple, zero-configuration command-line http server. It is powerful enough for production usage, but it's simple and hackable enough to be used for testing, local development, and learning |
| inquirer | A collection of common interactive command line user interfaces |
| koa | Koa is web app framework. It is an expressive HTTP middleware for node.js to make web applications and APIs more enjoyable to write |
| lodash | The lodash library exported as a node module. Lodash is a modern JavaScript utility library delivering modularity, performance, & extras |
| mongoose | It is a MongoDB object modeling tool designed to work in an asynchronous environment |
| mongoDB | The official MongoDB driver for Node.js. It provides a high-level API on top of mongodb-core that is meant for end users |
| nodemon | It is a simple monitor script for use during development of a node.js app, It will watch the files in the directory in which nodemon was started, and if any files change, nodemon will automatically restart your node application |
| nodemailer | This module enables e-mail sending from a Node.js applications |
| passport | A simple, unobtrusive authentication middleware for Node.js. Passport uses the strategies to authenticate requests. Strategies can range from verifying username and password credentials or authentication using OAuth or OpenID |
| pino | Pino is an extremely fast, low overhead logger for Node.js |
| socket.io | Its a node.js realtime framework server |
| undici | Undici is a fast, reliable and spec-compliant HTTP/1.1 client for Node.js, now powering the built-in fetch() |
| validator | A nodejs module for a library of string validators and sanitizers |
| vite | Vite is a next-generation build tool that offers an extremely fast dev server and optimized production builds |
| winston | A multi-transport async logging library for Node.js |
| ws | A simple to use, blazing fast and thoroughly tested websocket client, server and console for node.js |
| xml2js | A Simple XML to JavaScript object converter |
| zod | TypeScript-first schema declaration and validation library for Node.js |
Q. How can you make sure your dependencies are safe?
The only option is to automate the update / security audit of your dependencies. For that there are free and paid options:
- npm outdated
- Snyk
- npm audit
- npm audit fix
Q. What are the security mechanisms available in Node.js?
1. Helmet module:
Helmet helps to secure your Express applications by setting various HTTP headers, like:
- X-Frame-Options to mitigates clickjacking attacks,
- Strict-Transport-Security to keep your users on HTTPS,
- X-XSS-Protection to prevent reflected XSS attacks,
- X-DNS-Prefetch-Control to disable browsers DNS prefetching.
/**
 * Helmet
 */
const express = require('express')
const helmet = require('helmet')
const app = express()

app.use(helmet())
2. JOI module:
Validating user input is one of the most important things to do when it comes to the security of your application. Failing to do it correctly can open up your application and users to a wide range of attacks, including command injection, SQL injection or stored cross-site scripting.
To validate user input, one of the best libraries you can pick is joi. Joi is an object schema description language and validator for JavaScript objects.
/**
 * Joi
 */
const Joi = require('joi');

const schema = Joi.object().keys({
    username: Joi.string().alphanum().min(3).max(30).required(),
    password: Joi.string().regex(/^[a-zA-Z0-9]{3,30}$/),
    access_token: [Joi.string(), Joi.number()],
    birthyear: Joi.number().integer().min(1900).max(2013),
    email: Joi.string().email()
}).with('username', 'birthyear').without('password', 'access_token')

// Return result
const result = Joi.validate({
    username: 'abc',
    birthyear: 1994
}, schema)
// result.error === null -> valid
3. Regular Expressions:
Regular Expressions are a great way to manipulate texts and get the parts that you need from them. However, there is an attack vector called Regular Expression Denial of Service attack, which exposes the fact that most Regular Expression implementations may reach extreme situations for specially crafted input, that cause them to work extremely slowly.
The Regular Expressions that can do such a thing are commonly referred as Evil Regexes. These expressions contain: *grouping with repetition, *inside the repeated group: *repetition, or *alternation with overlapping
Examples of Evil Regular Expressions patterns:
(a+)+
([a-zA-Z]+)*
(a|aa)+
4. Security.txt:
Security.txt defines a standard to help organizations define the process for security researchers to securely disclose security vulnerabilities.
const express = require('express')
const securityTxt = require('express-security.txt')

const app = express()

app.get('/security.txt', securityTxt({
  // your security address
  contact: 'email@example.com',
  // your pgp key
  encryption: 'encryption',
  // if you have a hall of fame for securty resourcers, include the link here
  acknowledgements: 'http://acknowledgements.example.com'
}))
Q. What is npm in Node.js?
NPM stands for Node Package Manager. It provides following two main functionalities.
- It works as an Online repository for node.js packages/modules which are present at
. - It works as Command line utility to install packages, do version management and dependency management of Node.js packages. NPM comes bundled along with Node.js installable. We can verify its version using the following command-
npm --version
NPM helps to install any Node.js module using the following command.
npm install <Module Name>
For example, following is the command to install a famous Node.js web framework module called express-
npm install express
Q. How to handle file upload in Node.js?
File can be uploaded to the server using Multer module. Multer is a Node.js middleware which is used for handling multipart/form-data, which is mostly used library for uploading files.
1. Installing the dependencies:
npm install express multer --save
2. server.js:
/**
 * File Upload in Node.js
 */
const express = require("express");
const multer = require("multer");
const app = express();

// parse JSON and urlencoded bodies (built-in since Express 4.16+)
app.use(express.json());
app.use(express.urlencoded({ extended: true }));

const storage = multer.diskStorage({
  destination: function (req, file, callback) {
    callback(null, "./uploads");
  },
  filename: function (req, file, callback) {
    callback(null, file.fieldname + "-" + Date.now());
  },
});

const upload = multer({ storage: storage }).single("userPhoto");

app.get("/", function (req, res) {
  res.sendFile(__dirname + "/index.html");
});

// POST: upload for single file upload
app.post("/api/photo", function (req, res) {
  upload(req, res, function (err) {
    if (err) {
      return res.end("Error uploading file.");
    }
    res.end("File is uploaded");
  });
});

app.listen(3000, function () {
  console.log("Listening on port 3000");
});
3. index.html:
<!DOCTYPE html>
<html lang="en">
<head>
    <title>Multer-File-Upload</title>
</head>
<body>
    <h1>MULTER File Upload | Single File Upload</h1>

    <form id = "uploadForm"
         enctype = "multipart/form-data"
         action = "/api/photo"
         method = "post"
    >
      <input type="file" name="userPhoto" />
      <input type="submit" value="Upload Image" name="submit">
    </form>
</body>
</html>
Q. Explain the terms body-parser, cookie-parser, morgan, nodemon, pm2, serve-favicon, cors, dotenv, fs-extra, dayjs in Express.js?
1. body-parser:
Since Express 4.16+, body parsing is built in. Use express.json() and express.urlencoded() directly — no separate package needed.
/**
 * Built-in body parsing (Express 4.16+)
 */
const express = require("express");

const app = express();

// Parse JSON bodies
app.use(express.json());

// Parse URL-encoded bodies
app.use(express.urlencoded({ extended: false }));

// POST /login gets urlencoded bodies
app.post("/login", function (req, res) {
  res.send("welcome, " + req.body.username);
});

// POST /api/users gets JSON bodies
app.post("/api/users", function (req, res) {
  // create user in req.body
});
2. cookie-parser:
A cookie is a piece of data that is sent to the client-side with a request and is stored on the client-side itself by the Web Browser the user is currently using.
The cookie-parser middleware's cookieParser function takes a secret string or array of strings as the first argument and an options object as the second argument.
Installation:
npm install cookie-parser
Example:
/**
 * cookie-parser
 */
const express = require('express')
const cookieParser = require('cookie-parser')

const app = express()
app.use(cookieParser())

app.get('/', function (req, res) {
  // Cookies that have not been signed
  console.log('Cookies: ', req.cookies)

  // Cookies that have been signed
  console.log('Signed Cookies: ', req.signedCookies)
})

app.listen(3000)
3. morgan:
HTTP request logger middleware for node.js.
Installation:
npm install morgan
Example:
/**
 * Writing logs to a file
 */
const express = require('express')
const fs = require('fs')
const morgan = require('morgan')
const path = require('path')

const app = express()

// create a write stream (in append mode)
const accessLogStream = fs.createWriteStream(path.join(__dirname, 'access.log'), { flags: 'a' })

// setup the logger
app.use(morgan('combined', { stream: accessLogStream }))

app.get('/', function (req, res) {
  res.send('hello, world!')
})
4. nodemon:
Nodemon is a utility that will monitor for any changes in source and automatically restart your server.
Installation:
npm install -g nodemon
Example:
{
  // ...
  "scripts": {
    "start": "nodemon server.js"
  },
  // ...
}
5. pm2:
P(rocess) M(anager) 2 (pm2) is a production process manager for Node.js applications with a built-in load balancer. It allows to keep applications alive forever, to reload them without downtime and to facilitate common system admin tasks.
Installation:
npm install pm2 -g
Start an application:
pm2 start app.js
Reference:
6. serve-favicon:
Node.js middleware for serving a favicon. It create new middleware to serve a favicon from the given path to a favicon file. path may also be a Buffer of the icon to serve.
Installation:
npm install serve-favicon
Example:
/**
 * serve-favicon
 */
const express = require('express')
const favicon = require('serve-favicon')
const path = require('path')

const app = express()
app.use(favicon(path.join(__dirname, 'public', 'favicon.ico')))

// Add your routes here, etc.

app.listen(3000)
7. cors:
Cross-Origin Resource Sharing (CORS) headers allow apps running in the browser to make requests to servers on different domains (also known as origins). CORS headers are set on the server side - the HTTP server is responsible for indicating that a given HTTP request can be cross-origin.
Installation:
npm install cors
Example:
/**
 * Enable CORS for a Single Route
 */
const express = require('express')
const cors = require('cors')
const app = express()

app.get('/products/:id', cors(), function (req, res, next) {
  res.json({msg: 'This is CORS-enabled for a Single Route'})
})

app.listen(8080, function () {
  console.log('CORS-enabled web server listening on port 80')
})
8. dotenv:
When a NodeJs application runs, it injects a global variable called process.env which contains information about the state of environment in which the application is running. The dotenv loads environment variables stored in the .env file into process.env.
Installation:
npm install dotenv
Usage:
// .env

DB_HOST=localhost
DB_USER=admin
DB_PASS=root
/**
* config.js
*/
const db = require('db')
db.connect({
host: process.env.DB_HOST,
username: process.env.DB_USER,
password: process.env.DB_PASS
})
9. fs-extra:
fs-extra contains methods that aren't included in the vanilla Node.js fs package. Such as recursive mkdir, copy, and remove. It also uses graceful-fs to prevent EMFILE errors.
Installation:
npm install fs-extra
Usage:
/**
* fs-extra
*/
const fs = require('fs-extra')
// Async with callbacks:
fs.copy('/tmp/myfile', '/tmp/mynewfile', err => {
if (err) return console.error(err)
console.log('success!')
})
10. dayjs:
Day.js is a fast, lightweight (2kB) alternative to the deprecated Moment.js for parsing, validating, manipulating, and formatting dates. It has a compatible API with Moment.js.
Installation:
npm install dayjs
Usage:
- Format Dates
const dayjs = require('dayjs');
dayjs().format('MMMM DD YYYY, h:mm:ss a'); // April 16 2026, 10:30:00 am
dayjs().format('dddd'); // Thursday
dayjs().format("MMM DD YY"); // Apr 16 26
- Relative Time
const dayjs = require('dayjs');
const relativeTime = require('dayjs/plugin/relativeTime');
dayjs.extend(relativeTime);
dayjs('2011-10-31').fromNow(); // 14 years ago
dayjs().startOf('day').fromNow(); // 10 hours ago
- Date Manipulation
const dayjs = require('dayjs');
dayjs().subtract(10, 'day').format('YYYY-MM-DD'); // 2026-04-06
dayjs().add(1, 'month').format('YYYY-MM-DD'); // 2026-05-16
Q. How to implement rate limiting in Express.js?
Rate limiting restricts the number of requests a client can make within a time window. It protects APIs from abuse, brute-force attacks, and DDoS.
Installation:
npm install express-rate-limit
Example:
const express = require('express');
const rateLimit = require('express-rate-limit');
const app = express();
// Global limiter: 100 requests per 15 minutes per IP
const globalLimiter = rateLimit({
windowMs: 15 * 60 * 1000, // 15 minutes
max: 100,
standardHeaders: 'draft-7', // Return rate limit info in RateLimit headers
legacyHeaders: false,
message: { error: 'Too many requests, please try again later.' },
});
app.use(globalLimiter);
// Stricter limiter for auth endpoints: 5 attempts per minute
const authLimiter = rateLimit({
windowMs: 60 * 1000,
max: 5,
message: { error: 'Too many login attempts. Please wait before trying again.' },
});
app.post('/api/auth/login', authLimiter, (req, res) => {
res.json({ message: 'Login successful' });
});
app.listen(3000, () => console.log('Server running on port 3000'));
For distributed systems (multiple Node.js instances), store rate limit counters in Redis using rate-limit-redis:
const RedisStore = require('rate-limit-redis');
const limiter = rateLimit({
windowMs: 15 * 60 * 1000,
max: 100,
store: new RedisStore({ sendCommand: (...args) => redisClient.sendCommand(args) }),
});
# 13. NODE.JS RESTFUL API
Q. Explain RESTful Web Services in Node.js?
REST stands for REpresentational State Transfer. REST is web standards based architecture and uses HTTP Protocol. It is an architectural style as well as an approach for communications purposes that is often used in various web services development. A REST Server simply provides access to resources and REST client accesses and modifies the resources using HTTP protocol.
HTTP methods:
GET− Provides read-only access to a resource.PUT− Updates an existing resource or creates a new resource.DELETE− Removes a resource.POST− Creates a new resource.PATCH− Update/modify a resource
Example: users.json
{
"user1" : {
"id": 1,
"name" : "Ehsan Philip",
"age" : 24
},
"user2" : {
"id": 2,
"name" : "Karim Jimenez",
"age" : 22
},
"user3" : {
"id": 3,
"name" : "Giacomo Weir",
"age" : 18
}
}
List Users ( GET method)
Let's implement our first RESTful API listUsers using the following code in a server.js file −
const express = require('express');
const app = express();
const fs = require("fs");
app.get('/listUsers', function (req, res) {
fs.readFile( __dirname + "/" + "users.json", 'utf8', function (err, data) {
console.log( data );
res.end( data );
});
})
const server = app.listen(3000, function () {
const host = server.address().address
const port = server.address().port
console.log("App listening at http://%s:%s", host, port)
});
Add User ( POST method )
Following API will show you how to add new user in the list.
const express = require('express');
const app = express();
const fs = require("fs");
const user = {
"user4" : {
"id": 4,
"name" : "Spencer Amos",
"age" : 28
}
}
app.post('/addUser', function (req, res) {
// First read existing users.
fs.readFile( __dirname + "/" + "users.json", 'utf8', function (err, data) {
data = JSON.parse( data );
data["user4"] = user["user4"];
console.log( data );
res.end( JSON.stringify(data));
});
})
const server = app.listen(3000, function () {
const host = server.address().address
const port = server.address().port
console.log("App listening at http://%s:%s", host, port)
})
Delete User:
const express = require('express');
const app = express();
const fs = require("fs");
const id = 2;
app.delete('/deleteUser', function (req, res) {
// First read existing users.
fs.readFile( __dirname + "/" + "users.json", 'utf8', function (err, data) {
data = JSON.parse( data );
delete data["user" + 2];
console.log( data );
res.end( JSON.stringify(data));
});
})
const server = app.listen(3000, function () {
const host = server.address().address
const port = server.address().port
console.log("App listening at http://%s:%s", host, port)
})
Q. What is the difference between req.params and req.query?
The req.params are a part of a path in URL and they're also known as URL variables. for example, if you have the route /books/:id, then the id property will be available as req.params.id. req.params default value is an empty object {}.
A req.query is a part of a URL that assigns values to specified parameters. A query string commonly includes fields added to a base URL by a Web browser or other client application, for example as part of an HTML form. A query is the last part of URL
Example 01: req.params
/**
* req.params
*/
// GET http://localhost:3000/employees/10
app.get('/employees/:id', (req, res, next) => {
console.log(req.params.id); // 10
})
Example 02: req.query
/**
* req.query
*/
// GET http://localhost:3000/employees?page=20
app.get('/employees', (req, res, next) => {
console.log(req.query.page) // 20
})
Q. What are Promises in Node.js?
It allows to associate handlers to an asynchronous action's eventual success value or failure reason. This lets asynchronous methods return values like synchronous methods: instead of the final value, the asynchronous method returns a promise for the value at some point in the future.
Promises in node.js promised to do some work and then had separate callbacks that would be executed for success and failure as well as handling timeouts. Another way to think of promises in node.js was that they were emitters that could emit only two events: success and error.The cool thing about promises is you can combine them into dependency chains (do Promise C only when Promise A and Promise B complete).
The core idea behind promises is that a promise represents the result of an asynchronous operation. A promise is in one of three different states:
- pending - The initial state of a promise.
- fulfilled - The state of a promise representing a successful operation.
- rejected - The state of a promise representing a failed operation. Once a promise is fulfilled or rejected, it is immutable (i.e. it can never change again).
Example:
/**
* Promise
*/
function getSum(num1, num2) {
const myPromise = new Promise((resolve, reject) => {
if (!isNaN(num1) && !isNaN(num2)) {
resolve(num1 + num2);
} else {
reject(new Error("Not a valid number"));
}
});
return myPromise;
}
console.log(getSum(10, 20)); // Promise { 30 }
Q. What is the difference between Promise.all, Promise.allSettled, Promise.race, and Promise.any?
All four are static methods that operate on an iterable of promises but differ in when they resolve/reject and what they return.
| Method | Resolves when | Rejects when | Returns |
|---|---|---|---|
Promise.all |
All promises fulfill | Any promise rejects | Array of fulfilled values |
Promise.allSettled |
All promises settle (fulfill or reject) | Never rejects | Array of {status, value/reason} objects |
Promise.race |
First promise settles (either way) | First settles as rejection | Value/reason of first settled promise |
Promise.any |
First promise fulfills | All promises reject | Value of first fulfilled promise |
Promise.all — fail fast:
const p1 = Promise.resolve(1);
const p2 = Promise.resolve(2);
const p3 = Promise.reject(new Error('p3 failed'));
// Rejects immediately when p3 rejects
Promise.all([p1, p2, p3])
.then(values => console.log(values))
.catch(err => console.error(err.message)); // p3 failed
// All succeed
Promise.all([Promise.resolve('a'), Promise.resolve('b')])
.then(values => console.log(values)); // ['a', 'b']
Promise.allSettled — never short-circuits:
const promises = [
Promise.resolve('success'),
Promise.reject(new Error('failure')),
Promise.resolve('another success'),
];
Promise.allSettled(promises).then(results => {
results.forEach(result => {
if (result.status === 'fulfilled') {
console.log('Value:', result.value);
} else {
console.log('Reason:', result.reason.message);
}
});
});
// Value: success
// Reason: failure
// Value: another success
Promise.race — first to settle wins:
const slow = new Promise(resolve => setTimeout(() => resolve('slow'), 500));
const fast = new Promise(resolve => setTimeout(() => resolve('fast'), 100));
Promise.race([slow, fast])
.then(winner => console.log(winner)); // fast
// Useful for timeouts:
function withTimeout(promise, ms) {
const timeout = new Promise((_, reject) =>
setTimeout(() => reject(new Error('Timed out')), ms)
);
return Promise.race([promise, timeout]);
}
Promise.any — first to fulfill (ignores rejections):
const p1 = Promise.reject(new Error('error 1'));
const p2 = new Promise(resolve => setTimeout(() => resolve('p2 resolved'), 200));
const p3 = new Promise(resolve => setTimeout(() => resolve('p3 resolved'), 100));
Promise.any([p1, p2, p3])
.then(first => console.log(first)) // p3 resolved
.catch(err => console.error(err)); // AggregateError only if ALL reject
When to use which:
| Use case | Method |
|---|---|
| Parallel fetch where ALL must succeed | Promise.all |
| Run all and inspect every result (e.g., batch job) | Promise.allSettled |
| Race against a timeout | Promise.race |
| Try multiple sources, use the first that works | Promise.any |
Q. How can you secure your HTTP cookies against XSS attacks?
1. When the web server sets cookies, it can provide some additional attributes to make sure the cookies won't be accessible by using malicious JavaScript. One such attribute is HttpOnly.
Set-Cookie: [name]=[value]; HttpOnly
HttpOnly makes sure the cookies will be submitted only to the domain they originated from.
2. The “Secure” attribute can make sure the cookies are sent over secured channel only.
Set-Cookie: [name]=[value]; Secure
3. The web server can use X-XSS-Protection response header to make sure pages do not load when they detect reflected cross-site scripting (XSS) attacks.
X-XSS-Protection: 1; mode=block
4. The web server can use HTTP Content-Security-Policy response header to control what resources a user agent is allowed to load for a certain page. It can help to prevent various types of attacks like Cross Site Scripting (XSS) and data injection attacks.
Content-Security-Policy: default-src 'self' *.http://sometrustedwebsite.com
Q. How to make an HTTP POST request using axios in Node.js?
/**
* POST Request using Axios
*/
const express = require("express");
const app = express();
const axios = require("axios");
app.post("/user", async (req, res) => {
try {
const payload = { name: "Aashita Iyer", email: "aashita.iyer@email.com" };
const response = await axios.post("http://httpbin.org/post", payload);
console.log(response.data);
res.status(200).json(response.data);
} catch (err) {
res.status(500).json({ message: err });
}
});
app.listen(3000, function () {
console.log(`App listening at http://localhost:3000/`);
});
Output:
{
args: {},
data: '{"name":"Aashita Iyer","email":"aashita.iyer@email.com"}',
files: {},
form: {},
headers: {
Accept: 'application/json, text/plain, */*',
'Accept-Encoding': 'gzip, deflate, br',
'Content-Length': '56',
'Content-Type': 'application/json',
Host: 'httpbin.org',
'User-Agent': 'axios/1.1.3',
'X-Amzn-Trace-Id': 'Root=1-635cd3d3-1f13ea981467e6371ce3a740'
},
json: { email: 'aashita.iyer@email.com', name: 'Aashita Iyer' },
origin: 'xx.xx.xx.xx',
url: 'http://httpbin.org/post'
}
Q. What is asynchronous programming in Node.js?
Asynchronous programming is a form of parallel programming that allows a unit of work to run separately from the primary application thread. When the work is complete, it notifies the main thread (as well as whether the work was completed or failed). There are numerous benefits to using it, such as improved application performance and enhanced responsiveness.
Q. What is the difference between Asynchronous and Non-blocking?
1. Asynchronous:
The architecture of asynchronous explains that the message sent will not give the reply on immediate basis just like we send the mail but do not get the reply on an immediate basis. It does not have any dependency or order. Hence improving the system efficiency and performance. The server stores the information and when the action is done it will be notified.
2. Non-Blocking:
Nonblocking immediately responses with whatever data available. Moreover, it does not block any execution and keeps on running as per the requests. If an answer could not be retrieved then in those cases API returns immediately with an error. Nonblocking is mostly used with I/O(input/output). Node.js is itself based on nonblocking I/O model. There are few ways of communication that a nonblocking I/O has completed. The callback function is to be called when the operation is completed. Nonblocking call uses the help of javascript which provides a callback function.
Q. How node.js prevents blocking code?
Blocking vs Non-blocking:
Blocking is when the execution of additional JavaScript in the Node.js process must wait until a non-JavaScript operation completes. This happens because the event loop is unable to continue running JavaScript while a blocking operation is occurring.
Synchronous methods in the Node.js standard library that use libuv are the most commonly used blocking operations. Native modules may also have blocking methods. Blocking methods execute synchronously and non-blocking methods execute asynchronously.
Example:
// Blocking
const fs = require('fs');
const data = fs.readFileSync('/file.md'); // blocks here until file is read
console.log(data);
moreWork(); // will run after console.log
// Non-blocking
const fs = require('fs');
fs.readFile('/file.md', (err, data) => {
if (err) throw err;
console.log(data);
});
moreWork(); // will run before console.log
Q. Name the types of API functions in Node.js?
There are two types of API functions in Node.js:
- Asynchronous, Non-blocking functions
- Synchronous, Blocking functions
1. Blocking functions:
In a blocking operation, all other code is blocked from executing until an I/O event that is being waited on occurs. Blocking functions execute synchronously.
Example:
const fs = require('fs');
const data = fs.readFileSync('/file.md'); // blocks here until file is read
console.log(data);
// moreWork(); will run after console.log
The second line of code blocks the execution of additional JavaScript until the entire file is read. moreWork () will only be called after Console.log
2. Non-blocking functions:
In a non-blocking operation, multiple I/O calls can be performed without the execution of the program being halted. Non-blocking functions execute asynchronously.
Example:
const fs = require('fs');
fs.readFile('/file.md', (err, data) => {
if (err) throw err;
console.log(data);
});
// moreWork(); will run before console.log
Since fs.readFile() is non-blocking, moreWork() does not have to wait for the file read to complete before being called. This allows for higher throughput.
Q. What is difference between put and patch?
PUT and PATCH are HTTP verbs and they both relate to updating a resource. The main difference between PUT and PATCH requests are in the way the server processes the enclosed entity to modify the resource identified by the Request-URI.
In a PUT request, the enclosed entity is considered to be a modified version of the resource stored on the origin server, and the client is requesting that the stored version be replaced.
With PATCH, however, the enclosed entity contains a set of instructions describing how a resource currently residing on the origin server should be modified to produce a new version.
Also, another difference is that when you want to update a resource with PUT request, you have to send the full payload as the request whereas with PATCH, you only send the parameters which you want to update.
The most commonly used HTTP verbs POST, GET, PUT, DELETE are similar to CRUD (Create, Read, Update and Delete) operations in database. We specify these HTTP verbs in the capital case. So, the below is the comparison between them.
POST- createGET- readPUT- updateDELETE- delete
PATCH: Submits a partial modification to a resource. If you only need to update one field for the resource, you may want to use the PATCH method.
Q. List types of Http requests supported by Node.js?
The HTTP core module is a key module to Node.js networking.
const http = require('http')
http.METHODS
require('http').METHODS
[ 'ACL',
'BIND',
'CHECKOUT',
'CONNECT',
'COPY',
'DELETE',
'GET',
'HEAD',
'LINK',
'LOCK',
'M-SEARCH',
'MERGE',
'MKACTIVITY',
'MKCALENDAR',
'MKCOL',
'MOVE',
'NOTIFY',
'OPTIONS',
'PATCH',
'POST',
'PROPFIND',
'PROPPATCH',
'PURGE',
'PUT',
'REBIND',
'REPORT',
'SEARCH',
'SUBSCRIBE',
'TRACE',
'UNBIND',
'UNLINK',
'UNLOCK',
'UNSUBSCRIBE' ]
http.STATUS_CODES
require('http').STATUS_CODES
{ '100': 'Continue',
'101': 'Switching Protocols',
'102': 'Processing',
'200': 'OK',
'201': 'Created',
'202': 'Accepted',
'203': 'Non-Authoritative Information',
'204': 'No Content',
'205': 'Reset Content',
'206': 'Partial Content',
'207': 'Multi-Status',
'208': 'Already Reported',
'226': 'IM Used',
'300': 'Multiple Choices',
'301': 'Moved Permanently',
'302': 'Found',
'303': 'See Other',
'304': 'Not Modified',
'305': 'Use Proxy',
'307': 'Temporary Redirect',
'308': 'Permanent Redirect',
'400': 'Bad Request',
'401': 'Unauthorized',
'402': 'Payment Required',
'403': 'Forbidden',
'404': 'Not Found',
'405': 'Method Not Allowed',
'406': 'Not Acceptable',
'407': 'Proxy Authentication Required',
'408': 'Request Timeout',
'409': 'Conflict',
'410': 'Gone',
'411': 'Length Required',
'412': 'Precondition Failed',
'413': 'Payload Too Large',
'414': 'URI Too Long',
'415': 'Unsupported Media Type',
'416': 'Range Not Satisfiable',
'417': 'Expectation Failed',
'418': 'I\'m a teapot',
'421': 'Misdirected Request',
'422': 'Unprocessable Entity',
'423': 'Locked',
'424': 'Failed Dependency',
'425': 'Unordered Collection',
'426': 'Upgrade Required',
'428': 'Precondition Required',
'429': 'Too Many Requests',
'431': 'Request Header Fields Too Large',
'451': 'Unavailable For Legal Reasons',
'500': 'Internal Server Error',
'501': 'Not Implemented',
'502': 'Bad Gateway',
'503': 'Service Unavailable',
'504': 'Gateway Timeout',
'505': 'HTTP Version Not Supported',
'506': 'Variant Also Negotiates',
'507': 'Insufficient Storage',
'508': 'Loop Detected',
'509': 'Bandwidth Limit Exceeded',
'510': 'Not Extended',
'511': 'Network Authentication Required' }
Making HTTP Requests
Since Node.js v18, the built-in fetch() API is available globally (stable since v21):
// GET request using built-in fetch (Node.js v18+)
const res = await fetch('https://nodejs.org/');
const body = await res.text();
console.log(body);
For more complex requests with options:
// GET request with headers using built-in fetch
const response = await fetch('https://nodejs.org/dist/index.json', {
method: 'GET',
headers: {
'Accept': 'application/json',
'Accept-Charset': 'utf-8',
'User-Agent': 'my-node-client'
}
});
const json = await response.json();
console.log(json);
Q. What is difference between promises and async-await in Node.js?
1. Promises:
A promise is used to handle the asynchronous result of an operation. JavaScript is designed to not wait for an asynchronous block of code to completely execute before other synchronous parts of the code can run. With Promises, we can defer the execution of a code block until an async request is completed. This way, other operations can keep running without interruption.
States of Promises:
Pending: Initial State, before the Promise succeeds or fails.Resolved: Completed PromiseRejected: Failed Promise, throw an error
Example:
function logFetch(url) {
return fetch(url)
.then(response => {
console.log(response);
})
.catch(err => {
console.error('fetch failed', err);
});
}
2. Async-Await:
Await is basically syntactic sugar for Promises. It makes asynchronous code look more like synchronous/procedural code, which is easier for humans to understand.
Putting the keyword async before a function tells the function to return a Promise. If the code returns something that is not a Promise, then JavaScript automatically wraps it into a resolved promise with that value. The await keyword simply makes JavaScript wait until that Promise settles and then returns its result.
Example:
async function logFetch(url) {
try {
const response = await fetch(url);
console.log(response);
}
catch (err) {
console.log('fetch failed', err);
}
}
Q. Mention the steps by which you can async in Node.js?
ES 2017 introduced Asynchronous functions. Async functions are essentially a cleaner way to work with asynchronous code in JavaScript.
1. Async/Await:
- The newest way to write asynchronous code in JavaScript.
- It is non blocking (just like promises and callbacks).
- Async/Await was created to simplify the process of working with and writing chained promises.
- Async functions return a Promise. If the function throws an error, the Promise will be rejected. If the function returns a value, the Promise will be resolved.
Syntax
// Normal Function
function add(x,y){
return x + y;
}
// Async Function
async function add(x,y){
return x + y;
}
2. Await:
Async functions can make use of the await expression. This will pause the async function and wait for the Promise to resolve prior to moving on.
Example:
function doubleAfter2Seconds(x) {
return new Promise(resolve => {
setTimeout(() => {
resolve(x * 2);
}, 2000);
});
}
async function addAsync(x) {
const a = await doubleAfter2Seconds(10);
const b = await doubleAfter2Seconds(20);
const c = await doubleAfter2Seconds(30);
return x + a + b + c;
}
addAsync(10).then((sum) => {
console.log(sum);
});
Q. How to use promise in Node.js?
A promise is an object that represents the return value or the thrown exception that the function may eventually provide. A promise can also be used as a proxy for a remote object to overcome latency.
Promise is relatively an easy implementation for asynchronous operation. The promise object returned from the function represents an operation which is not completed yet, but it guarantees to the caller of the operation that the operation will be completed in future.
Promise has the following states:
- Pending - asynchronous operation is not yet completed.
- Fulfilled - asynchronous operation is completed successfully.
- Rejected - asynchronous operation is terminated with an error.
- Settled - asynchronous operation is either fulfilled or rejected.
- Callback - function is executed if the promise is executed with value.
- Errback - function is executed if the promise is rejected.
Moving to Promises from Callback:
On the first pass, promises can mitigate the Pyramid of Doom: the situation where code marches to the right faster than it marches forward.
step1(function (value1) {
step2(value1, function(value2) {
step3(value2, function(value3) {
step4(value3, function(value4) {
// Do something with value4
});
});
});
});
With a promise library, it can flatten the pyramid.
const myPromise = new Promise((resolve, reject) => {
setTimeout(() => {
resolve("successful");
}, 100);
});
myPromise
.then(handleFulfilledA)
.then(handleFulfilledB)
.then(handleFulfilledC)
.catch(handleRejectedAny);
Q. How to perform get request using axios in nodejs?
/**
* Get Request using Axios
*/
const express = require("express");
const app = express();
const axios = require("axios");
app.get("/async", async (req, res) => {
try {
const response = await axios.get("https://jsonplaceholder.typicode.com/todos/1");
res.status(200).json(response.data);
} catch (err) {
res.status(500).json({ message: err });
}
});
app.listen(3000, function () {
console.log(`App listening at http://localhost:3000/`);
});
Q. How to implement pagination in a Node.js REST API?
Pagination limits the records returned per request to avoid large payloads. There are two common strategies:
1. Offset-based pagination (simple, good for small datasets):
// GET /api/users?page=2&limit=10
app.get('/api/users', async (req, res) => {
const page = Math.max(1, parseInt(req.query.page) || 1);
const limit = Math.min(100, parseInt(req.query.limit) || 10);
const skip = (page - 1) * limit;
const [users, total] = await Promise.all([
User.find().skip(skip).limit(limit).lean(),
User.countDocuments(),
]);
res.json({
data: users,
pagination: {
total,
page,
limit,
totalPages: Math.ceil(total / limit),
hasNext: page * limit < total,
},
});
});
2. Cursor-based pagination (recommended for large / real-time datasets):
// GET /api/users?cursor=<lastId>&limit=10
app.get('/api/users', async (req, res) => {
const limit = Math.min(100, parseInt(req.query.limit) || 10);
const cursor = req.query.cursor;
const query = cursor ? { _id: { $gt: cursor } } : {};
const users = await User.find(query).limit(limit).sort({ _id: 1 }).lean();
res.json({
data: users,
nextCursor: users.length === limit ? users[users.length - 1]._id : null,
});
});
| Offset Pagination | Cursor Pagination | |
|---|---|---|
| Implementation | Simple | Moderate |
| Performance at high offsets | Degrades | Consistent |
| Suitable for | Small datasets | Large / real-time feeds |
| Supports random page jump | Yes | No |
# 14. NODE.JS DATABASE INTEGRATION
Q. How to connect MSSQL Server database using connection pooling in Node.js?
The mssql package is the most widely used Microsoft SQL Server client for Node.js. It has a built-in connection pool that reuses TCP connections, so you pay the connection handshake cost only once rather than on every query.
Installation:
npm install mssql
.env:
DB_SERVER=localhost
DB_PORT=1433
DB_USER=sa
DB_PASSWORD=YourStrong@Passw0rd
DB_NAME=myapp
DB_ENCRYPT=false
Setting up the pool (db/mssql.js):
const sql = require('mssql');
const config = {
server: process.env.DB_SERVER || 'localhost',
port: parseInt(process.env.DB_PORT) || 1433,
user: process.env.DB_USER,
password: process.env.DB_PASSWORD,
database: process.env.DB_NAME,
options: {
encrypt: process.env.DB_ENCRYPT === 'true', // true for Azure
trustServerCertificate: true, // dev only
},
pool: {
max: 10, // maximum connections in the pool
min: 0,
idleTimeoutMillis: 30000,
},
};
// Create a single shared pool instance (module is cached by require())
const poolPromise = new sql.ConnectionPool(config)
.connect()
.then(pool => {
console.log('Connected to MSSQL');
return pool;
})
.catch(err => {
console.error('MSSQL connection failed:', err);
process.exit(1);
});
module.exports = { sql, poolPromise };
CRUD operations using the pool:
// repositories/userRepository.js
const { sql, poolPromise } = require('../db/mssql');
// CREATE
async function createUser(name, email) {
const pool = await poolPromise;
const result = await pool.request()
.input('name', sql.NVarChar(100), name) // parameterized — prevents SQL injection
.input('email', sql.NVarChar(255), email)
.query('INSERT INTO users (name, email) OUTPUT INSERTED.id VALUES (@name, @email)');
return result.recordset[0].id;
}
// READ — single user
async function getUserById(id) {
const pool = await poolPromise;
const result = await pool.request()
.input('id', sql.Int, id)
.query('SELECT id, name, email FROM users WHERE id = @id');
return result.recordset[0] || null;
}
// READ — all users
async function getUsers() {
const pool = await poolPromise;
const result = await pool.request()
.query('SELECT id, name, email FROM users');
return result.recordset;
}
// UPDATE
async function updateUser(id, name) {
const pool = await poolPromise;
const result = await pool.request()
.input('id', sql.Int, id)
.input('name', sql.NVarChar(100), name)
.query('UPDATE users SET name = @name WHERE id = @id');
return result.rowsAffected[0] > 0;
}
// DELETE
async function deleteUser(id) {
const pool = await poolPromise;
const result = await pool.request()
.input('id', sql.Int, id)
.query('DELETE FROM users WHERE id = @id');
return result.rowsAffected[0] > 0;
}
module.exports = { createUser, getUserById, getUsers, updateUser, deleteUser };
Using transactions:
async function transferFunds(fromId, toId, amount) {
const pool = await poolPromise;
const transaction = new sql.Transaction(pool);
try {
await transaction.begin();
await transaction.request()
.input('amount', sql.Decimal(18, 2), amount)
.input('id', sql.Int, fromId)
.query('UPDATE accounts SET balance = balance - @amount WHERE id = @id');
await transaction.request()
.input('amount', sql.Decimal(18, 2), amount)
.input('id', sql.Int, toId)
.query('UPDATE accounts SET balance = balance + @amount WHERE id = @id');
await transaction.commit();
} catch (err) {
await transaction.rollback();
throw err;
}
}
Express route example:
const express = require('express');
const { getUserById, createUser } = require('./repositories/userRepository');
const router = express.Router();
router.get('/users/:id', async (req, res, next) => {
try {
const user = await getUserById(Number(req.params.id));
if (!user) return res.status(404).json({ message: 'User not found' });
res.json(user);
} catch (err) { next(err); }
});
router.post('/users', async (req, res, next) => {
try {
const id = await createUser(req.body.name, req.body.email);
res.status(201).json({ id });
} catch (err) { next(err); }
});
module.exports = router;
Always use named parameters (
.input('name', sql.Type, value)) — never concatenate user values into query strings to prevent SQL injection.
mssql data type |
SQL Server type |
|---|---|
sql.Int |
INT |
sql.NVarChar(n) |
NVARCHAR(n) |
sql.Decimal(p,s) |
DECIMAL(p,s) |
sql.Bit |
BIT |
sql.DateTime2 |
DATETIME2 |
# 15. NODE.JS ERROR HANDLING
Q. What is the preferred method of resolving unhandled exceptions in Node.js?
Unhandled exceptions in Node.js can be caught at the Process level by attaching a handler for uncaughtException event.
process.on('uncaughtException', function(err) {
console.log('Caught exception: ' + err);
});
Process is a global object that provides information about the current Node.js process. Process is a listener function that is always listening to events.
Few events are :
- Exit
- disconnect
- unhandledException
- rejectionHandled
Q. What is Error Handling in Node.js?
An error is any problem given out by the program due to a number of factors such as logic, syntax, timeout, etc. An error in Node.js is any instance of the Error object. Common examples include built-in error classes, such as ReferenceError, RangeError, TypeError, URIError, EvalError, and SyntaxError.
User-defined errors can also be created by extending the base Error object, a built-in error class, or another custom error. In general, Node.js errors are divided into two distinct categories: operational errors and programmer errors.
1. Operational Errors:
Operational errors represent runtime problems. These errors are expected in the Node.js runtime and should be dealt with in a proper way. Here's a list of common operational errors:
- failed to connect to server
- failed to resolve hostname
- invalid user input
- request timeout
- server returned a 500 response
- socket hang-up
- system is out of memory
2. Programmer Errors:
Programmer errors are what we call bugs. They represent issues in the code itself. Here's a common one for Node.js, when you try reading a property of an undefined object. It's a classic case of programmer error. Here are a few more:
- called an asynchronous function without a callback
- did not resolve a promise
- did not catch a rejected promise
- passed a string where an object was expected
- passed an object where a string was expected
- passed incorrect parameters in a function
Q. How to create custom errors in Node.js?
Extending the built-in Error class lets you create domain-specific error types with extra properties (HTTP status codes, error codes, etc.) that make error handling precise and expressive.
Basic custom error:
class AppError extends Error {
constructor(message, statusCode = 500) {
super(message); // sets this.message
this.name = this.constructor.name; // 'AppError' instead of 'Error'
this.statusCode = statusCode;
Error.captureStackTrace(this, this.constructor); // clean stack trace
}
}
// Usage
throw new AppError('Something went wrong', 500);
Hierarchy of custom errors:
// Base application error
class AppError extends Error {
constructor(message, statusCode = 500, code = 'INTERNAL_ERROR') {
super(message);
this.name = this.constructor.name;
this.statusCode = statusCode;
this.code = code;
Error.captureStackTrace(this, this.constructor);
}
}
// Specific error types
class NotFoundError extends AppError {
constructor(resource = 'Resource') {
super(`${resource} not found`, 404, 'NOT_FOUND');
}
}
class ValidationError extends AppError {
constructor(message, fields = {}) {
super(message, 400, 'VALIDATION_ERROR');
this.fields = fields; // extra context
}
}
class UnauthorizedError extends AppError {
constructor(message = 'Authentication required') {
super(message, 401, 'UNAUTHORIZED');
}
}
Throwing and catching custom errors:
function findUser(id) {
const user = db.find(u => u.id === id);
if (!user) throw new NotFoundError('User');
return user;
}
try {
findUser(99);
} catch (err) {
if (err instanceof NotFoundError) {
console.log(err.statusCode); // 404
console.log(err.code); // NOT_FOUND
}
console.error(err.message); // User not found
}
Express centralized error handler using custom errors:
// middleware/errorHandler.js
function errorHandler(err, req, res, next) {
const statusCode = err.statusCode || 500;
res.status(statusCode).json({
status: 'error',
code: err.code || 'INTERNAL_ERROR',
message: err.message,
...(err.fields && { fields: err.fields }),
...(process.env.NODE_ENV === 'development' && { stack: err.stack }),
});
}
// app.js — must be registered LAST
app.use(errorHandler);
Q. Explain Error Handling approaches in Node.js?
1. Using try-catch block:
Try-catch declaration is basically used to handle runtime errors in node.js. If the code in the try block throws an exception, the code in the catch block will be executed. It can be extended using finally clause. The finally clause is statements that are executed after the try statement completes.
Example:
function square(num) {
if (typeof num !== "number") {
throw new TypeError(`Expected number but got: ${typeof num}`);
}
return num * num;
}
try {
square("10");
} catch (err) {
console.log(err.message); // Expected number but got: string
}
2. Using promises:
Promise in Node.js is a contemporary way to handle errors, and it is usually preferred compared to callbacks. In the function, we will return a promise, which is a wrapper to our primary logic. We pass two arguments while defining the Promise object:
- resolve — used to resolve promises and provide results
- reject — used to report/throw errors
Example:
function square(num) {
return new Promise((resolve, reject) => {
setTimeout(() => {
if (typeof num !== "number") {
reject(new TypeError(`Expected number but got: ${typeof num}`));
}
const result = num * num;
resolve(result);
}, 100);
});
}
square("10")
.then((result) => console.log(result))
.catch((err) => console.error(err));
Output:
TypeError: Expected number but got: string
at Timeout._onTimeout (C:\node\index.js:5:16)
at listOnTimeout (internal/timers.js:554:17)
at processTimers (internal/timers.js:497:7)
3. Error-first callbacks:
Node.js uses an error-first callback convention in most of its asynchronous methods to ensure that errors are checked properly before the results of an operation are used. This callback function is usually the last argument to the function that initiates an asynchronous operation, and it is called once when an error occurs or a result is available from the operation.
Example:
const fs = require('fs');
fs.readFile('/path/to/file.txt', (err, result) => {
if (err) {
console.error(err);
return;
}
// Log the file contents if no error
console.log(result);
});
Output
[Error: ENOENT: no such file or directory, open 'D:\path\to\file.txt'] {
errno: -4058,
code: 'ENOENT',
syscall: 'open',
path: 'D:\\path\\to\\file.txt'
}
4. Using the async/await approach:
Async/await is just syntactic sugar that is meant to augment promises. It provides a synchronous structure to asynchronous code. The return value of an async function is a Promise. The await waits for the promise to be resolved or rejected.
const fs = require('fs');
const util = require('util');
const readFile = util.promisify(fs.readFile);
const read = async () => {
try {
const result = await readFile('/path/to/file.txt');
console.log(result);
} catch (err) {
console.error(err);
}
};
read();
Output:
[Error: ENOENT: no such file or directory, open 'D:\path\to\file.txt'] {
errno: -4058,
code: 'ENOENT',
syscall: 'open',
path: 'D:\\path\\to\\file.txt'
}
5. Use Middleware:
It is usually a good idea to build a centralized error-handling component in order to avoid possible code duplications when handling errors. The error-handling component is in charge of making the caught errors understandable by, for example, sending notifications to system admins (if necessary), transferring events to a monitoring service like Sentry.io, and logging them.
It is a good decision to employ a customizable logger like winston or morgan. Here is a customized winston logger:
Example:
const winston = require("winston");
const logger = winston.createLogger({
level: "debug",
format: winston.format.json(),
transports: [new winston.transports.Console()],
});
module.exports = logger;
const express = require("express");
const logger = require("./logger");
const app = express();
app.get("/event", (req, res, next) => {
try {
throw new Error("Not User!");
} catch (error) {
logger.error("Events Error: Unauthenticated user");
res.status(500).send("Error!");
}
});
app.listen(3000, () => {
logger.info("Server Listening On Port 3000");
});
Q. How to solve “Process out of Memory Exception” in Node.js?
Process out of Memory Exception is an exception that occurs when your node.js program gets out of memory. This happens when the default memory allocated to our program gets exceeded by our program while execution.
This exception can be solved by increasing the default memory allocated to our program to the required memory by using the following command.
Syntax:
node --max-old-space-size=<NEW_SIZE_IN_MB> index.js
Example:
/**
* OutOfMemory Exception
*/
let items = [];
for (let i = 0; i < 999999999; i++) {
items.push(i);
}
console.log(items);
Output:
<--- Last few GCs --->
[11652:000001DA4373BE50] 581 ms: Scavenge 765.9 (799.0) -> 765.9 (799.0) MB, 29.6 / 0.0 ms (average mu = 1.000, current mu = 1.000) allocation failure
[11652:000001DA4373BE50] 844 ms: Scavenge 1148.4 (1181.6) -> 1148.4 (1181.6) MB, 44.7 / 0.0 ms (average mu = 1.000, current mu = 1.000) allocation failure
[11652:000001DA4373BE50] 1239 ms: Scavenge 1722.2 (1755.4) -> 1722.2 (1755.4) MB, 67.5 / 0.0 ms (average mu = 1.000, current mu = 1.000) allocation failure
<--- JS stacktrace --->
FATAL ERROR: invalid array length Allocation failed - JavaScript heap out of memory
1: 00007FF784AA052F napi_wrap+109311
2: 00007FF784A45256 v8::internal::OrderedHashTable<v8::internal::OrderedHashSet,1>::NumberOfElementsOffset+33302
3: 00007FF784A46026 node::OnFatalError+294
4: 00007FF78531163E v8::Isolate::ReportExternalAllocationLimitReached+94
5: 00007FF7852F64BD v8::SharedArrayBuffer::Externalize+781
6: 00007FF7851A094C v8::internal::Heap::EphemeronKeyWriteBarrierFromCode+1516
7: 00007FF7851C547F v8::internal::Factory::NewUninitializedFixedArray+111
8: 00007FF78508B3C0 v8::Object::GetIsolate+8128
9: 00007FF784F151F7 v8::internal::interpreter::JumpTableTargetOffsets::iterator::operator=+169671
10: 00007FF785399FED v8::internal::SetupIsolateDelegate::SetupHeap+463949
11: 000003EC8D443246
The default memory allocated to a node.js program is 512MB on 32-bit systems and 1024MB on 64-bit systems. In the below example, we have increased the memory space requirements to 2048MB or 2GB. Use the following command to run the JS file(index.js).
Example:
node --max-old-space-size=2048 index.js
Q. What are the types of memory leaks in node.js?
A memory leak is a condition that occurs when a program doesn't release the memory it allocates. For instance, the system assigns memory locations to store values for the variables that we declare inside our program.
High-level programming languages such as JavaScript utilize automatic memory management, known as garbage collection. Garbage collection allocates the memory to a variable once we declare it and reclaims the memory once it is no longer needed. Unfortunately, even though JavaScript uses a garbage collector to release the memory, sometimes determining whether to free the memory or not is undecidable.
The common causes of Memory Leaks in Node.JS are:
1. Global variables:
This is one of the most common causes of leaks in Node. Due to the nature of JavaScript as a language, it is very easy to add to global variables and resources. If these are not cleaned over time, they keep adding up and eventually crash the application.
Example:
const http = require("http");
const requestLogs = []; // causing the memory leak
const server = http.createServer((req, res) => {
requestLogs.push({ url: req.url, array: new Array(10000).join("*")
res.end(JSON.stringify(requestLogs));
});
server.listen(3000);
console.log("Server listening to port 3000. Press Ctrl+C to stop it.");
2. Closures:
Closures memorize their surrounding context. When a closure holds a reference to a large object in heap, it keeps the object in memory as long as the closure is in use.
This implies easily ending up in situations where a closure holding such a reference can be improperly used leading to a memory leak.
3. Timers & Events:
The use of setTimeout, setInterval, Observers, and event listeners can cause memory leaks when heavy object references are kept in their callbacks without proper handling.
4. Multiple references:
If you reference the same object from multiple objects, it can lead to a memory leak if one of the references is garbage collected while the other one is left dangling.
Q. How to prevent memory leaks in Node.js?
Tools to help debug memory leaks:
1. Node-heapdump:
The node-heapdump module is good for post-mortem debugging. It generates heap dumps on your SIGUSR2. To help catch bugs easily in a development environment, add node-heapdump as a dependency to your project like so:
const heapdump = require("heapdump");
heapdump.writeSnapshot(function (err, filename) {
console.log("Sample dump written to", filename);
});
2. Clinic.js:
Clinic.js is a handy toolset to diagnose and pinpoint performance bottlenecks in your Node applications. The Clinic.js HeapProfiler uses flame graphs to highlight memory allocations. You can use it with tools such as AutoCannon to simulate HTTP load when profiling.
3. The process.memoryUsage method:
The process.memoryUsage method provides a simple way of monitoring memory usage in your Node applications.
The method returns an object with the following properties:
- rss:, or resident set size, refers to the amount of space occupied in the main memory for the process, which includes code segment, heap, and stack. If your RSS is going up, there is a likelihood your application is leaking memory
- heapTotal:, the total amount of memory available for JavaScript objects
- heapUsed:, the total amount of memory occupied by JavaScript objects
- external:, the amount of memory consumed by off-heap data (buffers) used by Node; this is where objects, strings, and closures are stored
- arrayBuffers:, the amount of memory allocation for ArrayBuffers and SharedArrayBuffers (the external memory size also includes this memory value)
Example:
console.log(process.memoryUsage());
Output:
{
rss: 4935680,
heapTotal:1826816,
heapUsed:650472,
external: 49879,
arrayBuffers: 17310,
}
4. Node Inspector:
Node Inspector is a debugger interface for Node applications. Run Node with the –inspect flag to use it, and it starts listening for a debugging client. It is one of the simplest ways of capturing heap snapshots with Chrome DevTools.
5. Chrome DevTools:
Chrome offers a range of tools to help debug your memory and performance issues, including allocation timelines, sampling heap profiler, and heap snapshots etc.
Q. How Garbage collection works in Node.JS?
The V8 uses a scheme similar to the Java Virtual Machine and divides the memory into segments. The thing that wraps the scheme concept is known as Resident Set, which refers to the portion of memory occupied by a process that is held in the RAM.
-
Stack: Stores static data, method and function frames, primitive values, and pointers to stored objects. The stack is managed by the operating system.
-
Heap: Stores objects. Because everything in JavaScript is an object this means all dynamic data like arrays, closures, etc. The heap is the biggest block of memory and it's where Garbage Collection (GC) happens.
-
Code Segment: the actual code is being executed.

Garbage collection frees up memory in the Heap used by objects that are no longer referenced from the Stack, either directly or indirectly. The goal is to create free space for creating new objects. Garbage collection is generational. Objects in the Heap are grouped by age and cleared at different stages.
Mark-and-sweep algorithm:
In JavaScript, the root is the global object. The garbage collector start from these roots, find all objects that are referenced from these roots, then all objects referenced from these, etc. Starting from the roots, the garbage collector will thus find all reachable objects and collect all non-reachable objects.
Q. How to handle errors in async/await Express routes?
By default, Express does not catch errors thrown inside async route handlers. Unhandled promise rejections need to be forwarded to Express's error-handling middleware using next(err).
1. Manual try/catch (works in all Express versions):
app.get('/users/:id', async (req, res, next) => {
try {
const user = await User.findById(req.params.id);
if (!user) return res.status(404).json({ message: 'User not found' });
res.json(user);
} catch (err) {
next(err); // forward to Express error handler
}
});
2. Async wrapper utility (Express 4, avoids try/catch boilerplate):
// asyncHandler.js
const asyncHandler = (fn) => (req, res, next) =>
Promise.resolve(fn(req, res, next)).catch(next);
// routes
app.get('/users/:id', asyncHandler(async (req, res) => {
const user = await User.findById(req.params.id);
if (!user) return res.status(404).json({ message: 'User not found' });
res.json(user);
}));
3. Express 5 — async errors handled natively:
// npm install express@5
// No try/catch or wrapper needed in Express 5
app.get('/users/:id', async (req, res) => {
const user = await User.findById(req.params.id);
if (!user) return res.status(404).json({ message: 'User not found' });
res.json(user);
});
Centralized error-handling middleware (required for all approaches):
// Must be defined LAST, with exactly 4 parameters
app.use((err, req, res, next) => {
console.error(err.stack);
const status = err.status || err.statusCode || 500;
res.status(status).json({
message: err.message || 'Internal Server Error',
});
});
# 16. NODE.JS LOGGING
Q. How to debug an application in Node.js?
1. node-inspector:
npm install -g node-inspector
Run
node-debug app.js
2. Debugging:
- Debugger
- Node Inspector
- Visual Studio Code
- Cloud9
- Brackets
3. Profiling:
1. node --prof ./app.js
2. node --prof-process ./the-generated-log-file
4. Heapdumps:
- node-heapdump with Chrome Developer Tools
5. Tracing:
- Interactive Stack Traces with TraceGL
6. Logging:
Libraries that output debugging information
- Caterpillar
- Tracer
- scribbles
Libraries that enhance stack trace information
- Longjohn
# 17. NODE.JS DEBUGGING & PROFILING
Q. How to debug a Node.js application?
Node.js provides several built-in and third-party debugging tools.
1. Using Chrome DevTools (--inspect):
# Start the app in inspect mode
node --inspect app.js
# Break on the very first line
node --inspect-brk app.js
Then open chrome://inspect in Chrome, click Open dedicated DevTools for Node, and you can:
- Set breakpoints
- Inspect variables
- Step through code
- Profile CPU and memory
2. Using VS Code debugger (launch.json):
{
"version": "0.2.0",
"configurations": [
{
"type": "node",
"request": "launch",
"name": "Debug Node.js App",
"program": "${workspaceFolder}/app.js",
"console": "integratedTerminal"
}
]
}
3. Using the built-in node inspect CLI:
node inspect app.js
| Command | Action |
|---|---|
c |
Continue execution |
n |
Step over (next line) |
s |
Step into function |
o |
Step out of function |
repl |
Open interactive REPL at current scope |
4. console methods for quick debugging:
console.log('Value:', value);
console.dir(obj, { depth: null }); // deep inspect objects
console.time('label'); // start timer
console.timeEnd('label'); // log elapsed time
console.trace('Where am I?'); // print call stack
Q. How to detect and fix memory leaks in Node.js?
A memory leak occurs when objects are retained in memory that are no longer needed. Symptoms include steadily increasing memory usage that never drops.
Common causes:
| Cause | Example |
|---|---|
| Event listeners not removed | emitter.on() inside a loop without removeListener |
| Closures holding large references | Callbacks capturing big objects |
| Global variables accumulating data | Arrays/objects appended to indefinitely |
| Unresolved Promises | Pending Promises that never settle |
| Cache without eviction policy | In-memory maps that grow forever |
Example — detecting with process.memoryUsage():
function formatMB(bytes) {
return (bytes / 1024 / 1024).toFixed(2) + ' MB';
}
setInterval(() => {
const { heapUsed, heapTotal, rss } = process.memoryUsage();
console.log(`Heap Used: ${formatMB(heapUsed)} / ${formatMB(heapTotal)} | RSS: ${formatMB(rss)}`);
}, 5000);
Example — common leak: event listener accumulation:
const { EventEmitter } = require('events');
const emitter = new EventEmitter();
// Leak — new listener added on every request
function handleRequest(req) {
emitter.on('data', (data) => processData(req, data));
}
// Fix — remove listener when done, or use .once()
function handleRequest(req) {
const handler = (data) => {
processData(req, data);
emitter.removeListener('data', handler);
};
emitter.on('data', handler);
}
Heap snapshot with Chrome DevTools:
node --inspect app.js
# Take heap snapshots before and after suspected leak
# Compare to find objects accumulating in memory
clinic.js — automated performance diagnostics:
npm install -g clinic
clinic doctor -- node app.js # detects event loop blocking, memory leaks
clinic heap -- node app.js # detailed heap profiling
Q. How to profile CPU performance in Node.js?
CPU profiling identifies which functions consume the most execution time (hot paths), helping you optimise bottlenecks.
1. Using Chrome DevTools CPU profiler:
node --inspect app.js
In Chrome DevTools → Profiler tab → Click Start → Run load → Click Stop. The flame chart shows which functions consume the most CPU time.
2. Using --prof flag (V8 built-in profiler):
node --prof app.js
# Generates isolate-XXXXX-v8.log
# Process the log into human-readable output
node --prof-process isolate-*.log > profile.txt
3. Using perf_hooks module for targeted measurement:
const { performance, PerformanceObserver } = require('perf_hooks');
// Measure a specific code section
performance.mark('start-work');
// Simulate work
for (let i = 0; i < 1_000_000; i++) { Math.sqrt(i); }
performance.mark('end-work');
performance.measure('work-duration', 'start-work', 'end-work');
const obs = new PerformanceObserver((list) => {
for (const entry of list.getEntries()) {
console.log(`${entry.name}: ${entry.duration.toFixed(2)}ms`);
}
});
obs.observe({ entryTypes: ['measure'] });
Output:
work-duration: 12.34ms
4. console.time / console.timeEnd for quick measurements:
console.time('db-query');
const result = await db.query('SELECT * FROM users');
console.timeEnd('db-query'); // db-query: 45.21ms
Q. How to use the Node.js built-in util.debuglog for conditional debug logging?
util.debuglog creates a logging function that only writes output when the NODE_DEBUG environment variable includes the section name. This gives zero-overhead debug logging in production.
Example:
const util = require('util');
const debugHttp = util.debuglog('http');
const debugDb = util.debuglog('db');
function fetchUser(id) {
debugDb('Fetching user with id=%d', id);
// ... database call
}
function handleRequest(req) {
debugHttp('Received %s %s', req.method, req.url);
fetchUser(42);
}
handleRequest({ method: 'GET', url: '/users/42' });
Activate selectively:
# Show only DB debug messages
NODE_DEBUG=db node app.js
# Show both HTTP and DB messages
NODE_DEBUG=http,db node app.js
# Show nothing (production)
node app.js
# 18. NODE.JS TESTING
Q. What is a stub?
Stubbing and verification for node.js tests. Enables you to validate and override behaviour of nested pieces of code such as methods, require() and npm modules or even instances of classes. This library is inspired on node-gently, MockJS and mock-require.
Features of Stub:
- Produces simple, lightweight Objects capable of extending down their tree
- Compatible with Nodejs
- Easily extendable directly or through an ExtensionManager
- Comes with predefined, usable extensions
Stubs are functions/programs that simulate the behaviours of components/modules. Stubs provide canned answers to function calls made during test cases. Also, you can assert on with what these stubs were called.
A use-case can be a file read, when you do not want to read an actual file:
const fs = require('fs');
const readFileStub = sinon.stub(fs, 'readFile', function (path, cb) {
return cb(null, 'filecontent');
});
expect(readFileStub).to.be.called;
readFileStub.restore();
Q. What is a test pyramid?
The “Test Pyramid” is a metaphor that tells us to group software tests into buckets of different granularity. It also gives an idea of how many tests we should have in each of these groups. It shows which kinds of tests you should be looking for in the different levels of the pyramid and gives practical examples on how these can be implemented.

Mike Cohn's original test pyramid consists of three layers that your test suite should consist of (bottom to top):
- Unit Tests
- Service Tests
- User Interface Tests
Q. How to use Joi module for schema validation in Node.js?
Joi module is a popular module for data validation. This module validates the data based on schemas. There are various functions like optional(), required(), min(), max(), etc which make it easy to use and a user-friendly module for validating the data.
Example:
const Joi = require("joi");
// User-defined function to validate the user
function validateUser(user) {
const JoiSchema = Joi.object({
username: Joi.string().min(5).max(30).required(),
email: Joi.string().email().min(5).max(50).optional(),
date_of_birth: Joi.date().optional(),
account_status: Joi.string()
.valid("activated")
.valid("unactivated")
.optional(),
}).options({ abortEarly: false });
return JoiSchema.validate(user);
}
const user = {
username: "Deepak Lucky",
email: "deepak.lucky@gmail.com",
date_of_birth: "2000-07-07",
account_status: "activated",
};
let response = validateUser(user);
if (response.error) {
console.log(response.error.details);
} else {
console.log("Validated Data");
}
⚝ Try this example on CodeSandbox
Q. How to write unit tests using Jest in Node.js?
Jest is the most popular testing framework for Node.js. It includes a test runner, assertion library, and mocking utilities out of the box.
Installation:
npm install --save-dev jest
package.json:
{
"scripts": { "test": "jest", "test:coverage": "jest --coverage" }
}
Testing a utility function:
// math.js
function add(a, b) { return a + b; }
function divide(a, b) {
if (b === 0) throw new Error('Division by zero');
return a / b;
}
module.exports = { add, divide };
// math.test.js
const { add, divide } = require('./math');
describe('Math utilities', () => {
test('adds two numbers correctly', () => {
expect(add(2, 3)).toBe(5);
expect(add(-1, 1)).toBe(0);
});
test('divides two numbers correctly', () => {
expect(divide(10, 2)).toBe(5);
});
test('throws on division by zero', () => {
expect(() => divide(10, 0)).toThrow('Division by zero');
});
});
Mocking a module:
// userService.test.js
jest.mock('./db');
const db = require('./db');
test('fetches user by id', async () => {
db.findUser.mockResolvedValue({ id: 1, name: 'Alice' });
const user = await db.findUser(1);
expect(user.name).toBe('Alice');
expect(db.findUser).toHaveBeenCalledWith(1);
});
Run tests:
npx jest # run all tests
npx jest --watch # watch mode for development
npx jest --coverage # generate a coverage report
npx jest path/to/test # run a specific test file
Common Jest matchers:
| Matcher | Description |
|---|---|
toBe(value) |
Strict equality (===) |
toEqual(obj) |
Deep equality for objects/arrays |
toBeNull() / toBeUndefined() |
Check for null/undefined |
toThrow(msg) |
Assert a function throws |
toHaveBeenCalledWith(args) |
Assert mock was called with specific args |
resolves / rejects |
Assert promise outcome |
Q. How to test Express API routes using Supertest in Node.js?
Supertest allows you to make HTTP requests directly against an Express app in tests — no running server required. It integrates seamlessly with Jest or Mocha.
Installation:
npm install --save-dev supertest jest
App setup (keep app and server separate for testability):
// app.js — export app without listening
const express = require('express');
const app = express();
app.use(express.json());
const users = [{ id: 1, name: 'Alice' }]; // in-memory store for demo
app.get('/users', (req, res) => {
res.json(users);
});
app.get('/users/:id', (req, res) => {
const user = users.find(u => u.id === Number(req.params.id));
if (!user) return res.status(404).json({ message: 'User not found' });
res.json(user);
});
app.post('/users', (req, res) => {
const { name } = req.body;
if (!name) return res.status(400).json({ message: 'Name is required' });
const user = { id: users.length + 1, name };
users.push(user);
res.status(201).json(user);
});
module.exports = app; // export — do NOT call app.listen() here
// server.js — only entry point calls listen
const app = require('./app');
app.listen(3000, () => console.log('Server on port 3000'));
Integration tests with Supertest + Jest:
// tests/users.test.js
const request = require('supertest');
const app = require('../app');
describe('GET /users', () => {
it('returns an array of users', async () => {
const res = await request(app).get('/users');
expect(res.statusCode).toBe(200);
expect(Array.isArray(res.body)).toBe(true);
expect(res.body.length).toBeGreaterThan(0);
});
});
describe('GET /users/:id', () => {
it('returns a user by id', async () => {
const res = await request(app).get('/users/1');
expect(res.statusCode).toBe(200);
expect(res.body).toMatchObject({ id: 1, name: 'Alice' });
});
it('returns 404 for missing user', async () => {
const res = await request(app).get('/users/999');
expect(res.statusCode).toBe(404);
expect(res.body.message).toBe('User not found');
});
});
describe('POST /users', () => {
it('creates a new user', async () => {
const res = await request(app)
.post('/users')
.send({ name: 'Bob' })
.set('Content-Type', 'application/json');
expect(res.statusCode).toBe(201);
expect(res.body).toMatchObject({ name: 'Bob' });
expect(res.body.id).toBeDefined();
});
it('returns 400 if name is missing', async () => {
const res = await request(app).post('/users').send({});
expect(res.statusCode).toBe(400);
expect(res.body.message).toBe('Name is required');
});
});
Testing with authentication headers:
it('returns 401 without token', async () => {
const res = await request(app).get('/protected');
expect(res.statusCode).toBe(401);
});
it('returns 200 with valid token', async () => {
const token = jwt.sign({ id: 1 }, process.env.JWT_SECRET);
const res = await request(app)
.get('/protected')
.set('Authorization', `Bearer ${token}`);
expect(res.statusCode).toBe(200);
});
Unit test vs Integration test with Supertest:
| Unit Test | Integration Test (Supertest) | |
|---|---|---|
| Tests | Individual functions/modules | Full HTTP request-response cycle |
| Database | Mocked | Real or in-memory (e.g., sqlite) |
| Speed | Fast | Slower |
| Confidence | Logic correctness | Route + middleware + logic together |
# 19. NODE.JS SECURITY
Q. How to secure a Node.js application?
Node.js application security involves protecting against the OWASP Top 10 and other common threats. Key practices include:
| Practice | Tool / Technique |
|---|---|
| Set security HTTP headers | helmet middleware |
| Rate limiting | express-rate-limit |
| Input validation | joi, zod, express-validator |
| Hash passwords | bcrypt |
| Avoid command injection | execFile() instead of exec() |
| Use parameterized queries | Avoid raw SQL string interpolation |
| Keep dependencies updated | npm audit, npm update |
| Store secrets in env vars | dotenv, secrets manager |
Example — applying essential security middleware:
const express = require('express');
const helmet = require('helmet');
const rateLimit = require('express-rate-limit');
const app = express();
// 1. Set secure HTTP headers
app.use(helmet());
// 2. Limit repeated requests
const limiter = rateLimit({
windowMs: 15 * 60 * 1000, // 15 minutes
max: 100, // max 100 requests per window per IP
standardHeaders: true,
legacyHeaders: false,
});
app.use('/api', limiter);
// 3. Parse JSON bodies with a size limit to prevent payload attacks
app.use(express.json({ limit: '10kb' }));
Q. What is Helmet.js and how to use it in Node.js?
helmet is an Express middleware that sets various HTTP response headers to protect against well-known web vulnerabilities. It is a collection of smaller middleware functions, each setting or removing a specific header.
Installation:
npm install helmet
Example:
const express = require('express');
const helmet = require('helmet');
const app = express();
// Apply all default Helmet middleware
app.use(helmet());
app.get('/', (req, res) => {
res.send('Secured with Helmet!');
});
app.listen(3000);
Headers set by Helmet (defaults):
| Header | Protection |
|---|---|
Content-Security-Policy |
Prevents XSS and data injection attacks |
X-Frame-Options |
Blocks clickjacking via iframes |
X-Content-Type-Options |
Prevents MIME sniffing |
Strict-Transport-Security |
Enforces HTTPS |
Referrer-Policy |
Controls referrer information leakage |
X-Permitted-Cross-Domain-Policies |
Restricts Adobe Flash/PDF access |
Customising individual policies:
app.use(
helmet({
contentSecurityPolicy: {
directives: {
defaultSrc: ["'self'"],
scriptSrc: ["'self'", "trusted-cdn.com"],
},
},
frameguard: { action: 'deny' },
})
);
Q. How to prevent SQL injection in Node.js?
SQL injection occurs when user-supplied input is directly concatenated into an SQL query, allowing attackers to modify the query's logic.
Vulnerable code:
// DANGEROUS — Never do this
app.get('/user', async (req, res) => {
const name = req.query.name;
// Attacker sends: ?name=' OR '1'='1
const query = `SELECT * FROM users WHERE name = '${name}'`;
const rows = await db.query(query);
res.json(rows);
});
Fix — use parameterized queries (placeholders):
// Safe — input is treated as data, not SQL code
const sql = require('mssql');
const { poolPromise } = require('../db/mssql');
app.get('/user', async (req, res) => {
const { name } = req.query;
// Validate input first
if (!name || typeof name !== 'string') {
return res.status(400).json({ error: 'Invalid input' });
}
try {
const pool = await poolPromise;
const result = await pool.request()
.input('name', sql.NVarChar(100), name) // named parameter — never concatenated
.query('SELECT id, name, email FROM users WHERE name = @name');
res.json(result.recordset);
} catch (err) {
res.status(500).json({ error: 'Database error' });
}
});
Stored procedure — also injection-safe with mssql:
app.get('/user/:id', async (req, res) => {
try {
const pool = await poolPromise;
const result = await pool.request()
.input('userId', sql.Int, parseInt(req.params.id, 10))
.execute('sp_GetUserById'); // all inputs passed as typed parameters
if (!result.recordset.length) {
return res.status(404).json({ error: 'User not found' });
}
res.json(result.recordset[0]);
} catch (err) {
res.status(500).json({ error: 'Database error' });
}
});
With an ORM (Sequelize / Prisma) — safe by default:
// Sequelize
const users = await User.findAll({ where: { name: req.query.name } });
// Prisma
const users = await prisma.user.findMany({ where: { name: req.query.name } });
Always use
.input('param', sql.Type, value)named parameters withmssql— never interpolate user values into query strings. Named parameters are typed and escaped by the driver, making SQL injection impossible.
Q. How to implement rate limiting in Node.js?
Rate limiting restricts the number of requests a client can make in a given time window, protecting against brute-force attacks, credential stuffing, and denial-of-service attempts.
Installation:
npm install express-rate-limit
Example — global and per-route rate limiting:
const express = require('express');
const rateLimit = require('express-rate-limit');
const app = express();
// Global limit: 200 requests per 15 minutes per IP
const globalLimiter = rateLimit({
windowMs: 15 * 60 * 1000,
max: 200,
message: { error: 'Too many requests, please try again later.' },
standardHeaders: true, // Return RateLimit-* headers
legacyHeaders: false,
});
// Strict limit on auth endpoints: 10 attempts per 15 minutes
const authLimiter = rateLimit({
windowMs: 15 * 60 * 1000,
max: 10,
message: { error: 'Too many login attempts, please try again after 15 minutes.' },
});
app.use(globalLimiter);
app.use('/api/auth/login', authLimiter);
app.post('/api/auth/login', (req, res) => {
res.json({ message: 'Login endpoint' });
});
app.listen(3000);
Using Redis for distributed rate limiting (multiple server instances):
npm install rate-limit-redis ioredis
const RedisStore = require('rate-limit-redis');
const Redis = require('ioredis');
const client = new Redis(process.env.REDIS_URL);
const limiter = rateLimit({
windowMs: 15 * 60 * 1000,
max: 100,
store: new RedisStore({ sendCommand: (...args) => client.call(...args) }),
});
Q. How to hash passwords securely in Node.js?
Passwords must never be stored as plain text. Use bcrypt, which applies a slow, salted hashing algorithm designed to resist brute-force attacks.
Installation:
npm install bcrypt
Example — registration and login:
const bcrypt = require('bcrypt');
const SALT_ROUNDS = 12; // higher = slower hash = more secure
// --- Registration ---
async function registerUser(plainPassword) {
const hash = await bcrypt.hash(plainPassword, SALT_ROUNDS);
// Store `hash` in the database — never store plainPassword
console.log('Stored hash:', hash);
return hash;
}
// --- Login ---
async function loginUser(plainPassword, storedHash) {
const match = await bcrypt.compare(plainPassword, storedHash);
if (!match) {
throw new Error('Invalid credentials');
}
console.log('Password verified successfully');
return true;
}
// Usage
(async () => {
const hash = await registerUser('MyP@ssw0rd!');
await loginUser('MyP@ssw0rd!', hash); // true
await loginUser('wrongpassword', hash); // throws Error
})();
Why bcrypt?
- Salted: each hash is unique even for identical passwords (prevents rainbow table attacks)
- Slow by design:
SALT_ROUNDScontrols the computational cost — increasing it by 1 doubles hashing time - One-way: a hash cannot be reversed to the original password
Never use MD5, SHA-1, or SHA-256 to hash passwords — they are too fast and vulnerable to brute-force attacks.
# 20. NODE.JS CACHING
Q. How to access cache data in Node.js?
Caching is a technique used in web development to handle performance bottlenecks related to how data is managed, stored, and retrieved. A cache layer or server acts as a secondary storage layer, usually faster and highly performant to temporarily store a subset of data. It is expected that data stored in a cache does not change often. Cache can be stored using various techniques like in-memory cache, file cache or a separate cache database.
Installation:
npm install express node-cache axios
Node-cache has following major functions:
- .set(key, val, [ ttl ]): Used to set some value corresponding to a particular key in the cache. This same key must be used to retrieve this value.
- .get(key): Used to get value set to specified key. It returns undefined, if the key is not already present.
- has(key): Used to check if the cache already has some value set for specified key. Returns true if present otherwise false.
Implement in-memory cache with following approach:
- On API request, check if the cache has key already set using has(key) function
- If the cache has the key, retrieve the cached value by get(key) function and use it instead of performing operation again. (This saves time)
- If the cache doesn't have a key, perform the operations required, and before sending the response, set the value for that key so that further requests can be responded to directly through cached data.
Example:
/**
* In-Memory Cache
*/
const express = require("express");
const NodeCache = require("node-cache");
const axios = require("axios");
const app = express();
const cache = new NodeCache({ stdTTL: 15 });
/**
* GET Cached Data
*/
const verifyCache = (req, res, next) => {
try {
const { id } = req.params;
if (cache.has(id)) {
return res.status(200).json(cache.get(id));
}
return next();
} catch (err) {
throw new Error(err);
}
};
app.get("/", (req, res) => {
return res.json({ message: "Hello World" });
});
/**
* GET ToDo Items
*/
app.get("/todos/:id", verifyCache, async (req, res) => {
try {
const { id } = req.params;
const { data } = await axios.get(`https://jsonplaceholder.typicode.com/todos/${id}`);
cache.set(id, data);
return res.status(200).json(data);
} catch ({ response }) {
return res.sendStatus(response.status);
}
});
app.listen(3000, function () {
console.log(`App listening at http://localhost:3000/`);
});
Q. How to implement caching using Redis in Node.js?
Redis is an open-source (BSD licensed), in-memory data structure store used as a database, cache, and message broker. Redis also supports disk-persistent data storage.
Its key-value data storage system is another plus because it makes storage and retrieval much simpler. Using Redis, we can store and retrieve data in the cache using the SET and GET methods, respectively.
Installation:
npm install -save redis
Example:
const express = require("express");
const axios = require("axios");
const redis = require("redis");
const app = express();
const client = redis.createClient(6379);
client.on("error", (error) => {
console.error(error);
});
app.get("/", (req, res) => {
return res.json({ message: "Hello World" });
});
const cache = (req, res, next) => {
try {
const { id } = req.params;
client.get(id, (error, result) => {
if (error) throw error;
if (result !== null) {
return res.json(JSON.parse(result));
} else {
return next();
}
});
} catch (err) {
throw new Error(err);
}
};
app.get("/todos/:id", cache, async (req, res) => {
try {
const { id } = req.params;
const data = await axios.get(`https://jsonplaceholder.typicode.com/todos/${id}`);
client.set(id, JSON.stringify(data), "ex", 15);
return res.status(200).json(data);
} catch ({ response }) {
return res.sendStatus(response.status);
}
});
app.listen(3000, function () {
console.log(`App listening at http://localhost:3000/`);
});
Q. How to implement Memcached in Node.js?
Memcached is a general-purpose distributed memory caching system. It is often used to speed up dynamic database-driven websites by caching data and objects in RAM to reduce the number of times an external data source (such as a database or API) must be read. Memcached is free and open-source software, licensed under the Revised BSD licence. Memcached runs on Unix-like operating systems (at least LINUX and OS X) and on Microsoft windows.
We can store data to memcached server in key pair format. So whenever any request come from the app can be matched with memcached server without any query from mysql/Nosql server. This increases the performance of the application.
Installation:
npm install memcached
Setting up the client:
The constructor of the memcached client take 2 different arguments server locations and options. Syntax:
const Memcached = require('memcached');
const memcached = new Memcached(Server locations, options);
Example:
/**
* Memcached
*/
const Memcached = require('memcached');
// all global configurations should be applied to the .config object of the Client.
Memcached.config.poolSize = 25;
const memcached = new Memcached('localhost:11211', { retries:10, retry:10000, remove:true, failOverServers:['192.168.0.103:11211']});
Reference:
# 21. NODE.JS PERFORMANCE & OPTIMIZATION
Q. How to improve Node.js application performance through caching?
Caching stores the result of an expensive operation so subsequent requests can be served from memory, reducing latency and database load.
1. In-memory caching (single instance):
const express = require('express');
const app = express();
// Simple in-memory cache with TTL
const cache = new Map();
const CACHE_TTL_MS = 60 * 1000; // 1 minute
function setCache(key, value) {
cache.set(key, { value, expiresAt: Date.now() + CACHE_TTL_MS });
}
function getCache(key) {
const entry = cache.get(key);
if (!entry) return null;
if (Date.now() > entry.expiresAt) {
cache.delete(key);
return null;
}
return entry.value;
}
app.get('/api/products', async (req, res) => {
const cacheKey = 'all-products';
const cached = getCache(cacheKey);
if (cached) {
return res.json({ source: 'cache', data: cached });
}
const products = await db.query('SELECT * FROM products');
setCache(cacheKey, products);
res.json({ source: 'database', data: products });
});
2. Redis caching (distributed — works across multiple instances):
npm install ioredis
const Redis = require('ioredis');
const redis = new Redis(process.env.REDIS_URL);
const CACHE_TTL_SECONDS = 60;
app.get('/api/products', async (req, res) => {
const cacheKey = 'all-products';
const cached = await redis.get(cacheKey);
if (cached) {
return res.json({ source: 'cache', data: JSON.parse(cached) });
}
const products = await db.query('SELECT * FROM products');
await redis.setex(cacheKey, CACHE_TTL_SECONDS, JSON.stringify(products));
res.json({ source: 'database', data: products });
});
Cache invalidation — clear on update:
app.post('/api/products', async (req, res) => {
await db.query('INSERT INTO products ...', [...]);
await redis.del('all-products'); // invalidate stale cache
res.status(201).json({ message: 'Product created' });
});
Q. How to use compression middleware to improve Node.js performance?
HTTP response compression (gzip/Brotli) reduces the size of response payloads, lowering bandwidth consumption and speeding up client-side page load and API consumption.
Installation:
npm install compression
Example:
const express = require('express');
const compression = require('compression');
const app = express();
// Apply compression to all responses
// Only compresses if response is > 1KB (default threshold)
app.use(compression({
level: 6, // zlib compression level (1–9); 6 is the default balance
threshold: 1024, // only compress responses larger than 1KB
filter: (req, res) => {
// Don't compress responses with this header
if (req.headers['x-no-compression']) return false;
return compression.filter(req, res); // default filter
},
}));
app.get('/api/data', (req, res) => {
const largePayload = { items: Array.from({ length: 1000 }, (_, i) => ({ id: i, name: `Item ${i}` })) };
res.json(largePayload);
});
app.listen(3000, () => console.log('Server running on port 3000'));
How it works:
- Client sends
Accept-Encoding: gzip, deflate, br - Compression middleware detects this header
- Response body is compressed before being sent
Content-Encoding: gzipheader is added to the response
For high-traffic production deployments, offload compression to a reverse proxy (Nginx, Caddy) or a CDN, which is more efficient than per-process Node.js compression.
Q. How to use connection pooling to improve database performance in Node.js?
Opening a new database connection for every request is expensive. A connection pool maintains a set of reusable connections, dramatically reducing connection overhead.
Why pooling matters:
| Approach | Connection overhead | Throughput |
|---|---|---|
| New connection per request | High (TCP handshake + auth each time) | Low |
| Connection pool | Low (connections reused) | High |
Example — Microsoft SQL Server with mssql pool:
npm install mssql
.env:
DB_SERVER=localhost
DB_PORT=1433
DB_USER=sa
DB_PASSWORD=YourStrong@Passw0rd
DB_NAME=myDatabase
DB_ENCRYPT=true
DB_TRUST_CERT=false
db/mssql.js — create pool once, share via module cache:
const sql = require('mssql');
const config = {
server: process.env.DB_SERVER,
port: parseInt(process.env.DB_PORT, 10) || 1433,
user: process.env.DB_USER,
password: process.env.DB_PASSWORD,
database: process.env.DB_NAME,
options: {
encrypt: process.env.DB_ENCRYPT === 'true', // required for Azure SQL
trustServerCertificate: process.env.DB_TRUST_CERT === 'true', // true for local dev only
},
pool: {
max: 10, // maximum number of connections in the pool
min: 2, // minimum connections kept alive
idleTimeoutMillis: 30000, // close idle connections after 30s
acquireTimeoutMillis: 5000, // fail if no connection available within 5s
},
};
// Create the pool once — module cache ensures it\'s shared across the app
const poolPromise = sql.connect(config)
.then(pool => {
console.log('Connected to MSSQL');
return pool;
})
.catch(err => {
console.error('MSSQL connection failed:', err.message);
process.exit(1);
});
module.exports = { sql, poolPromise };
routes/users.js — query using the shared pool:
const { sql, poolPromise } = require('../db/mssql');
// GET all users
async function getUsers(req, res, next) {
try {
const pool = await poolPromise;
const result = await pool.request()
.query('SELECT id, name, email FROM users');
res.json(result.recordset);
} catch (err) {
next(err);
}
}
// GET user by id — parameterized query (prevents SQL injection)
async function getUserById(req, res, next) {
try {
const pool = await poolPromise;
const result = await pool.request()
.input('id', sql.Int, parseInt(req.params.id, 10))
.query('SELECT id, name, email FROM users WHERE id = @id');
if (result.recordset.length === 0) {
return res.status(404).json({ message: 'User not found' });
}
res.json(result.recordset[0]);
} catch (err) {
next(err);
}
}
// POST create user — parameterized inputs
async function createUser(req, res, next) {
try {
const { name, email } = req.body;
const pool = await poolPromise;
const result = await pool.request()
.input('name', sql.NVarChar(100), name)
.input('email', sql.NVarChar(200), email)
.query(`
INSERT INTO users (name, email)
OUTPUT INSERTED.id, INSERTED.name, INSERTED.email
VALUES (@name, @email)
`);
res.status(201).json(result.recordset[0]);
} catch (err) {
next(err);
}
}
module.exports = { getUsers, getUserById, createUser };
app.js — wire routes:
require('dotenv').config();
const express = require('express');
const { getUsers, getUserById, createUser } = require('./routes/users');
const app = express();
app.use(express.json());
app.get('/users', getUsers);
app.get('/users/:id', getUserById);
app.post('/users', createUser);
app.use((err, req, res, next) => {
console.error(err.message);
res.status(500).json({ error: 'Internal Server Error' });
});
app.listen(3000, () => console.log('Server running on port 3000'));
MSSQL pool configuration options:
| Option | Description | Default |
|---|---|---|
pool.max |
Maximum connections in the pool | 10 |
pool.min |
Minimum idle connections | 0 |
pool.idleTimeoutMillis |
Milliseconds before closing an idle connection | 30000 |
pool.acquireTimeoutMillis |
Max wait time to acquire a connection | 5000 |
options.encrypt |
Use TLS encryption (required for Azure SQL) | false |
options.trustServerCertificate |
Skip certificate validation (dev only) | false |
Using stored procedures:
const result = await pool.request()
.input('userId', sql.Int, 1)
.output('userName', sql.NVarChar(100))
.execute('sp_GetUserById');
console.log(result.output.userName);
Q. How to use PM2 for Node.js process management in production?
PM2 is a production-grade process manager for Node.js that provides automatic restarts, clustering, log management, and monitoring.
Installation:
npm install -g pm2
Basic commands:
# Start the application
pm2 start app.js --name "my-app"
# Start in cluster mode (one process per CPU core)
pm2 start app.js --name "my-app" -i max
# List running processes
pm2 list
# Monitor CPU and memory in real time
pm2 monit
# View logs
pm2 logs my-app
# Restart / reload (zero-downtime)
pm2 reload my-app
# Stop and delete
pm2 delete my-app
# Save process list and auto-start on system reboot
pm2 save
pm2 startup
ecosystem.config.js — configuration file:
module.exports = {
apps: [
{
name: 'my-app',
script: 'app.js',
instances: 'max', // one per CPU core
exec_mode: 'cluster',
watch: false,
env: {
NODE_ENV: 'development',
PORT: 3000,
},
env_production: {
NODE_ENV: 'production',
PORT: 8080,
},
max_memory_restart: '500M', // restart if memory exceeds 500MB
error_file: 'logs/err.log',
out_file: 'logs/out.log',
},
],
};
# Start using ecosystem file
pm2 start ecosystem.config.js --env production
# 22. NODE.JS INTERNATIONALIZATION
Q. How to use locale (i18n) in Node.js?
Internationalization (i18n) in Node.js allows applications to support multiple languages and regional formats. The most common approach is the i18n npm package, which provides locale-aware string translations and formatting.
Installation:
npm install i18n
Project structure:
project/
├── locales/
│ ├── en.json
│ ├── fr.json
│ └── de.json
├── app.js
Locale files:
// locales/en.json
{
"greeting": "Hello, %s!",
"farewell": "Goodbye!",
"items_count": {
"one": "You have %d item.",
"other": "You have %d items."
}
}
// locales/fr.json
{
"greeting": "Bonjour, %s !",
"farewell": "Au revoir !",
"items_count": {
"one": "Vous avez %d article.",
"other": "Vous avez %d articles."
}
}
// locales/de.json
{
"greeting": "Hallo, %s!",
"farewell": "Auf Wiedersehen!",
"items_count": {
"one": "Sie haben %d Artikel.",
"other": "Sie haben %d Artikel."
}
}
Configuring i18n in Express:
const express = require('express');
const i18n = require('i18n');
const path = require('path');
const app = express();
// Configure i18n
i18n.configure({
locales: ['en', 'fr', 'de'],
defaultLocale: 'en',
directory: path.join(__dirname, 'locales'),
queryParameter: 'lang', // ?lang=fr switches locale
cookie: 'locale',
autoReload: true,
updateFiles: false,
});
// Bind i18n to every request
app.use(i18n.init);
// Route that responds in the requested locale
app.get('/greet/:name', (req, res) => {
res.json({
message: res.__('greeting', req.params.name),
farewell: res.__('farewell'),
items: res.__n('items_count', 3),
});
});
app.listen(3000, () => console.log('Server running on port 3000'));
Testing the endpoint:
# English (default)
GET /greet/Alice
# { "message": "Hello, Alice!", "farewell": "Goodbye!", "items": "You have 3 items." }
# French
GET /greet/Alice?lang=fr
# { "message": "Bonjour, Alice !", "farewell": "Au revoir !", "items": "Vous avez 3 articles." }
Q. How to implement internationalization using i18next in Node.js?
i18next is a feature-rich i18n framework for JavaScript (browser and Node.js). i18next-http-middleware integrates it with Express.
Installation:
npm install i18next i18next-http-middleware i18next-fs-backend
Locale files:
// locales/en/translation.json
{
"welcome": "Welcome to our application!",
"user": {
"profile": "Profile of ",
"role": "Role: "
},
"errors": {
"not_found": "Resource not found",
"unauthorized": "Access denied"
}
}
// locales/es/translation.json
{
"welcome": "¡Bienvenido a nuestra aplicación!",
"user": {
"profile": "Perfil de ",
"role": "Rol: "
},
"errors": {
"not_found": "Recurso no encontrado",
"unauthorized": "Acceso denegado"
}
}
Setup:
const express = require('express');
const i18next = require('i18next');
const Backend = require('i18next-fs-backend');
const middleware = require('i18next-http-middleware');
const path = require('path');
i18next
.use(Backend)
.use(middleware.LanguageDetector)
.init({
fallbackLng: 'en',
supportedLngs: ['en', 'es'],
backend: {
loadPath: path.join(__dirname, 'locales//.json'),
},
detection: {
order: ['querystring', 'header'],
lookupQuerystring: 'lng',
lookupHeader: 'accept-language',
},
});
const app = express();
app.use(middleware.handle(i18next));
app.get('/', (req, res) => {
res.json({ message: req.t('welcome') });
});
app.get('/user/:name', (req, res) => {
res.json({
profile: req.t('user.profile', { name: req.params.name }),
role: req.t('user.role', { role: 'admin' }),
});
});
app.listen(3000, () => console.log('Server running on port 3000'));
Output:
# English (default)
GET /user/Alice
# { "profile": "Profile of Alice", "role": "Role: admin" }
# Spanish via Accept-Language header or ?lng=es
GET /user/Alice?lng=es
# { "profile": "Perfil de Alice", "role": "Rol: admin" }
Q. How to format dates, numbers, and currencies for different locales using the Intl API in Node.js?
The built-in Intl (ECMAScript Internationalization API) object in Node.js provides locale-sensitive formatting for dates, numbers, and currencies — no external packages required.
1. Date and Time Formatting (Intl.DateTimeFormat):
const date = new Date('2026-04-18T10:30:00Z');
// US English — Month/Day/Year
const usFormatter = new Intl.DateTimeFormat('en-US', {
year: 'numeric', month: 'long', day: 'numeric',
hour: '2-digit', minute: '2-digit', timeZone: 'America/New_York',
});
console.log(usFormatter.format(date)); // April 18, 2026 at 06:30 AM
// German — Day.Month.Year
const deFormatter = new Intl.DateTimeFormat('de-DE', {
year: 'numeric', month: 'long', day: 'numeric',
timeZone: 'Europe/Berlin',
});
console.log(deFormatter.format(date)); // 18. April 2026
// Japanese
const jaFormatter = new Intl.DateTimeFormat('ja-JP', {
year: 'numeric', month: 'long', day: 'numeric',
});
console.log(jaFormatter.format(date)); // 2026年4月18日
2. Number Formatting (Intl.NumberFormat):
const number = 1234567.89;
// US — comma as thousands separator, period as decimal
console.log(new Intl.NumberFormat('en-US').format(number)); // 1,234,567.89
// German — period as thousands separator, comma as decimal
console.log(new Intl.NumberFormat('de-DE').format(number)); // 1.234.567,89
// Indian — lakh/crore grouping
console.log(new Intl.NumberFormat('en-IN').format(number)); // 12,34,567.89
3. Currency Formatting:
const amount = 9999.99;
const formatCurrency = (value, locale, currency) =>
new Intl.NumberFormat(locale, { style: 'currency', currency }).format(value);
console.log(formatCurrency(amount, 'en-US', 'USD')); // $9,999.99
console.log(formatCurrency(amount, 'en-GB', 'GBP')); // £9,999.99
console.log(formatCurrency(amount, 'de-DE', 'EUR')); // 9.999,99 €
console.log(formatCurrency(amount, 'ja-JP', 'JPY')); // ¥10,000
console.log(formatCurrency(amount, 'hi-IN', 'INR')); // ₹9,999.99
4. Relative Time Formatting (Intl.RelativeTimeFormat):
const rtf = new Intl.RelativeTimeFormat('en', { numeric: 'auto' });
console.log(rtf.format(-1, 'day')); // yesterday
console.log(rtf.format(2, 'day')); // in 2 days
console.log(rtf.format(-3, 'month')); // 3 months ago
console.log(rtf.format(1, 'year')); // next year
// French
const rtfFr = new Intl.RelativeTimeFormat('fr', { numeric: 'auto' });
console.log(rtfFr.format(-2, 'day')); // avant-hier
5. Sorting with locale awareness (Intl.Collator):
const words = ['ångström', 'apple', 'Zebra', 'banana', 'Älmhult'];
// Default JS sort (incorrect for locale-aware sorting)
console.log(words.sort());
// ['Zebra', 'apple', 'banana', 'Älmhult', 'ångström']
// Swedish locale-aware sort
console.log(words.sort(new Intl.Collator('sv').compare));
// ['apple', 'banana', 'Zebra', 'ångström', 'Älmhult']
6. Express middleware using Intl:
const express = require('express');
const app = express();
// Middleware to attach locale-aware formatters to res.locals
app.use((req, res, next) => {
const locale = req.headers['accept-language']?.split(',')[0] || 'en-US';
res.locals.formatDate = (date) =>
new Intl.DateTimeFormat(locale, { dateStyle: 'long' }).format(new Date(date));
res.locals.formatCurrency = (amount, currency = 'USD') =>
new Intl.NumberFormat(locale, { style: 'currency', currency }).format(amount);
next();
});
app.get('/product', (req, res) => {
res.json({
name: 'Laptop',
price: res.locals.formatCurrency(1299.99),
releaseDate: res.locals.formatDate('2026-01-15'),
});
});
app.listen(3000, () => console.log('Server on port 3000'));
Q. How to detect and switch languages dynamically in a Node.js Express application?
Language detection can be done from multiple sources: query string, cookies, Accept-Language header, or user profile settings.
Installation:
npm install i18n accept-language-parser
Implementation:
const express = require('express');
const i18n = require('i18n');
const parser = require('accept-language-parser');
const path = require('path');
const app = express();
app.use(express.json());
i18n.configure({
locales: ['en', 'fr', 'de', 'es'],
defaultLocale: 'en',
directory: path.join(__dirname, 'locales'),
cookie: 'app_locale',
});
app.use(i18n.init);
// Language detection middleware — priority order:
// 1. Query param 2. Cookie 3. Accept-Language header
app.use((req, res, next) => {
const queryLang = req.query.lang;
const cookieLang = req.cookies?.app_locale;
const headerLangs = parser.parse(req.headers['accept-language'] || '');
const headerLang = headerLangs[0]?.code;
const supported = ['en', 'fr', 'de', 'es'];
const detected = [queryLang, cookieLang, headerLang].find(
(l) => l && supported.includes(l)
);
if (detected) {
req.setLocale(detected);
res.setLocale(detected);
}
next();
});
// Language switch endpoint — sets a persistent cookie
app.post('/language', (req, res) => {
const { lang } = req.body;
const supported = ['en', 'fr', 'de', 'es'];
if (!supported.includes(lang)) {
return res.status(400).json({ error: 'Unsupported language' });
}
res.cookie('app_locale', lang, { maxAge: 30 * 24 * 60 * 60 * 1000, httpOnly: true });
res.json({ message: res.__('language_changed'), locale: lang });
});
app.get('/dashboard', (req, res) => {
res.json({
title: res.__('dashboard_title'),
locale: req.getLocale(),
});
});
app.listen(3000, () => console.log('Server running on port 3000'));
Locale files:
// locales/en.json
{ "dashboard_title": "Dashboard", "language_changed": "Language updated successfully." }
// locales/fr.json
{ "dashboard_title": "Tableau de bord", "language_changed": "Langue mise à jour avec succès." }
Usage:
# Switch language via query param
GET /dashboard?lang=fr
# { "title": "Tableau de bord", "locale": "fr" }
# Persist language via cookie
POST /language Body: { "lang": "de" }
# { "message": "Sprache erfolgreich aktualisiert.", "locale": "de" }
# 23. NODE.JS MISCELLANEOUS
Q. How to improve Node.js performance?
1. Asynchronous Functions:
Using asynchronous functions in an application that heavily uses I/O operations will improve it. This is because the CPU will be able to handle multiple requests simultaneously due to non-blocking I/O, while one of these requests is making an Input/Output operation.
Example:
var fs = require('fs');
// Performing a blocking I/O
var file = fs.readFileSync('/etc/file.txt');
console.log(file);
// Performing a non-blocking I/O
fs.readFile('/etc/file.txt', function(err, file) {
if (err) return err;
console.log(file);
});
2. Query Optimization:
Basic tips to improve your database performance/optimization overview
-
Indexing - Indexing is an approach to optimize the performance of a database by minimizing the number of disk accesses required when a query is processed.
-
Avoid SELECT - Use the SELECT statement to query only the data you need and avoid extra fetching loads to your database.
-- query1
SELECT * FROM Customers
-- query2 (optimized)
SELECT FirstName, LastName, Address, City, State, Zip FROM Customers
- Use LIMIT - LIMIT will return only the specified number of records.
SELECT FirstName, LastName, Address, City, State, Zip FROM Customers LIMIT 100
- Wildcard (%) - Use wildcard (%) character appropriately
-- SELECT customers whose first names start with "Avi"
-- query1
SELECT FirstName from Customers where FirstName like '%avi%'
-- query2 (optimized)
SELECT FirstName from Customers where FirstName like 'avi%'
3. Caching:
Caching is one of the common ways of improving the Node Js performance. A cache is a memory buffer where frequently accessed data is temporarily stored to be accessed quicker. Cached data is then retrieved without having to access the origin. Caching will improve your app response time and even reduce some costs such as bandwidth and data volumes.
-
Redis cache is entirely asynchronous with optimal performance to handle cached data requests in a single thread.
-
Memcached stores data across different nodes. It uses a hashing schema that provides a hash table functionality. These ensure that adding, or removing a server node does not significantly change the mapping of the keys to server nodes.
-
Node-cache works almost like Memcached with the set, get, and delete methods. It has a timeout that deletes data from the cache when the timeout expires.
-
Nginx will help maintain load balance. Nginx will help cache static files, that will drastically offload the work of the application server. It offers low memory usage and high concurrency.
4. Load Balancing:
It's a typical challenge to create performant applications that can handle a huge number of incoming connections. Load balancing is the term for this method. The cluster module to allow load balancing and distribute incoming connections across all workers in an environment's numerous CPU cores using a round-robin technique.
Using the PM2 process manager to keep applications alive indefinitely is another option. PM2 includes a cluster feature that allows you to run numerous processes over all cores without having to worry about changing the code to use the native cluster module.
5. Real-time Monitoring:
Gauging the current level of performance of an application may require running different kinds of tests, such as the following:
-
Load testing: refers to the practice of simulating the expected usage of a system and measuring its response as the workload increases.
-
Stress testing: designed to measure how a system performs beyond the limits of normal working conditions. Its goal is to determine how much the system can handle before it fails and how it attempts to recover from a failure.
-
Spike testing: helps to test the behavior of an application when it receives a drastic increase or decrease in load.
-
Scalability testing: used to find the point at which the application stops scaling and identify the reasons behind it.
-
Volume testing: determines if a system can cope with large amounts of data.
-
Endurance testing: helps evaluate the behavior of a software application under sustained load for a long period, to catch problems such as memory leaks.
6. Use HTTP/2:
The HTTP/2 in a Node.js application make web browsing faster and easier while reducing bandwidth usage. HTTP/2 is aimed at increasing performance and addressing concerns with HTTP/1.x.
HTTP/2 has the following features:
- Header Compression - This disables unnecessary headers and compels all HTTP headers to be sent compressed.
- Multiplexing - This allows multiple requests to simultaneously retrieve resources and response messages over a single TCP connection.
7. Stateless Authentication:
Stateless authentication on the client-side with the help of JSON Web Token ( JWT ) provides great speed to the application. In this Stateless Authentication procedure, a web token is created whenever the user login into the website. It contains all the required user information, which is sent back to the respective user for authenticating all API requests.
8. Module bundlers and task runners:
Module bundlers are build tools for processing groups of modules and their dependencies into a file or group of files. This especially includes images, JavaScript, and CSS files. The process that makes this possible involves module bundlers (e.g., webpack, Parcel, Rollup) and task runners (e.g., Gulp, Grunt, etc.).
This allows for complex transforms, such as shortening multicharacter variable names or using a shorter syntax that's equivalent to the original code and combining several JavaScript files into one to reduce the number of network requests.
9. Script Tracing and Logging:
Logging helps track your application activities and traffic. When an app is running, it is possible to get fatal errors (even though your app was running properly after production testing).
Commonly used methods for logging in Node.js are
-
Winston - is a multi-transport async logger, which is simple, universal, and extremely versatile. It makes logging more flexible and extensible. It is the most popular logger based on NPM stats. Winston has different transports with different default levels that indicate message priority. These levels include ( error, warn, info, http, verbose, debug, silly )
-
Morgan - Morgan is an HTTP request logger middleware for Node.js applications. Morgan gives insight on how your app is being used and alerts you on potential errors and issues that could be threats to your application.
Example:
const express = require('express')
const fs = require('fs')
const morgan = require('morgan')
const path = require('path')
const app = express()
// create a write stream (in append mode)
const accessLogStream = fs.createWriteStream(path.join(__dirname, 'access.log'), { flags: 'a' })
// setup the logger
app.use(morgan('combined', { stream: accessLogStream }))
app.get('/', function (req, res) {
res.send('hello, world!')
})
10. Gzip Compression:
Gzip compresses HTTP requests and responses. Gzip compresses responses before sending them to the browser, thus, the browser takes a shorter time to fetch them. Gzip also compresses the request to the remote server, which significantly increases web performance.
Example:
const compression = require("compression");
const express = require("express");
const app = express();
// compress all responses
app.use(compression());
// ...
Q. What is crypto in Node.js?
The Node.js Crypto module supports cryptography. It provides cryptographic functionality that includes a set of wrappers for open SSL's hash HMAC, cipher, decipher, sign and verify functions.
- Hash: A hash is a fixed-length string of bits i.e. procedurally and deterministically generated from some arbitrary block of source data.
-
HMAC: HMAC stands for Hash-based Message Authentication Code. It is a process for applying a hash algorithm to both data and a secret key that results in a single final hash.
- Encryption Example using Hash and HMAC
const crypto = require('crypto');
const secret = 'abcdefg';
const hash = crypto.createHmac('sha256', secret)
.update('Welcome to Node.js')
.digest('hex');
console.log(hash);
- Encryption example using Cipher
const crypto = require('crypto');
const key = crypto.scryptSync('a password', 'salt', 24);
const iv = crypto.randomBytes(16);
const cipher = crypto.createCipheriv('aes-192-cbc', key, iv);
let encrypted = cipher.update('Hello Node.js', 'utf8', 'hex');
encrypted += cipher.final('hex');
console.log(encrypted);
- Decryption example using Decipher
const crypto = require('crypto');
const key = crypto.scryptSync('a password', 'salt', 24);
const iv = crypto.randomBytes(16);
// encrypted value from the cipher example above
const decipher = crypto.createDecipheriv('aes-192-cbc', key, iv);
let decrypted = decipher.update(encrypted, 'hex', 'utf8');
decrypted += decipher.final('utf8');
console.log(decrypted);
Q. How to execute an external program from within Node.js?
const { exec } = require('child_process');
exec('"/path/to/test file/test.sh" arg1 arg2');
exec('echo "The \\$HOME variable is $HOME"');
Q. What is REPL?
REPL (READ, EVAL, PRINT, LOOP) is a computer environment similar to Shell (Unix/Linux) and command prompt. Node comes with the REPL environment when it is installed. System interacts with the user through outputs of commands/expressions used. It is useful in writing and debugging the codes. The work of REPL can be understood from its full form:
- Read: It reads the inputs from users and parses it into JavaScript data structure. It is then stored to memory.
- Eval: The parsed JavaScript data structure is evaluated for the results.
- Print: The result is printed after the evaluation.
- Loop: Loops the input command. To come out of NODE REPL, press ctrl+c twice
Simple Expression
$ node
> 10 + 20
30
> 10 + ( 20 * 30 ) - 40
570
>
Q. What does the runtime environment mean in Node.js?
The Node.js runtime is the software stack responsible for installing your web service's code and its dependencies and running your service.
The Node.js runtime for App Engine in the standard environment is declared in the app.yaml file:
runtime: nodejs22
The runtime environment is literally just the environment your application is running in. This can be used to describe both the hardware and the software that is running your application. How much RAM, what version of node, what operating system, how much CPU cores, can all be referenced when talking about a runtime environment.
Q. Explain usage of NODE_ENV?
NODE_ENV is an environment variable made popular by the express web server framework. When a node application is run, it can check the value of the environment variable and do different things based on the value.
For example, when we work on a project and there are production and development environments. We don't need to use caching in the development env. So we set
NODE_ENV=development
and use the code below
if (process.env.NODE_ENV === 'development')
useCaching = false;
Upon that, if the project runs on production it will use caching.
Q. How to manage environment variables using dotenv in Node.js?
The dotenv package loads environment variables from a .env file into process.env, keeping secrets and configuration out of source code.
Installation:
npm install dotenv
.env file (never commit to git):
PORT=3000
DATABASE_URL=postgres://user:password@localhost:5432/mydb
JWT_SECRET=supersecretkey123
NODE_ENV=development
Loading dotenv — load as early as possible:
// app.js
require('dotenv').config(); // must be called before any process.env usage
const express = require('express');
const app = express();
const port = process.env.PORT || 3000;
const dbUrl = process.env.DATABASE_URL;
app.listen(port, () => console.log(`Server running on port ${port}`));
ES Module syntax (Node.js v20.6+ supports --env-file natively):
// app.mjs
import 'dotenv/config'; // side-effect import — loads .env immediately
import express from 'express';
Best practices:
.env ← local secrets (gitignored)
.env.example ← committed template showing required variables (no real values)
.env.test ← overrides for test environment
.gitignore:
.env
.env.local
.env.*.local
Validating required env variables at startup (fail fast):
require('dotenv').config();
const required = ['DATABASE_URL', 'JWT_SECRET', 'PORT'];
const missing = required.filter(key => !process.env[key]);
if (missing.length > 0) {
console.error(`Missing required environment variables: ${missing.join(', ')}`);
process.exit(1);
}
Node.js v20.6+ built-in (no package needed):
node --env-file=.env app.js
Q. How assert works in Node.js?
The assert module provides a way of testing expressions. If the expression evaluates to 0, or false, an assertion failure is being caused, and the program is terminated.
This module was built to be used internally by Node.js.
// Sample usage
const assert = require('assert');
assert(50 > 70, "50 is less than 70.");
Q. What is the use of DNS module in Node.js?
DNS is a node module used to do name resolution facility which is provided by the operating system as well as used to do an actual DNS lookup. No need for memorising IP addresses – DNS servers provide a nifty solution of converting domain or subdomain names to IP addresses. This module provides an asynchronous network wrapper and can be imported using the following syntax.
const dns = require('dns');
Example: dns.lookup() function
const dns = require('dns');
dns.lookup('www.google.com', (err, addresses, family) => {
console.log('addresses:', addresses);
console.log('family:',family);
});
Example: resolve4() and reverse() functions
const dns = require('dns');
dns.resolve4('www.google.com', (err, addresses) => {
if (err) throw err;
console.log(`addresses: ${JSON.stringify(addresses)}`);
addresses.forEach((a) => {
dns.reverse(a, (err, hostnames) => {
if (err) {
throw err;
}
console.log(`reverse for ${a}: ${JSON.stringify(hostnames)}`);
});
});
});
Example: Print the localhost name using lookupService() function
const dns = require('dns');
dns.lookupService('127.0.0.1', 22, (err, hostname, service) => {
console.log(hostname, service);
// Prints: localhost
});
Q. What is JIT and how is it related to Node.js?
Node.js has depended on the V8 JavaScript engine to provide code execution in the language. The V8 is a JavaScript engine built at the google development center, in Germany. It is open source and written in C++. It is used for both client side (Google Chrome) and server side (node.js) JavaScript applications. A central piece of the V8 engine that allows it to execute JavaScript at high speed is the JIT (Just In Time) compiler. This is a dynamic compiler that can optimize code during runtime. When V8 was first built the JIT Compiler was dubbed FullCodegen. Then, the V8 team implemented Crankshaft, which included many performance optimizations that FullCodegen did not implement.
The V8 was first designed to increase the performance of the JavaScript execution inside web browsers. In order to obtain speed, V8 translates JavaScript code into more efficient machine code instead of using an interpreter. It compiles JavaScript code into machine code at execution by implementing a JIT (Just-In-Time) compiler like a lot of modern JavaScript engines such as SpiderMonkey or Rhino (Mozilla) are doing. The main difference with V8 is that it doesn't produce bytecode or any intermediate code.
Q. How to generate and verify checksum of the given string in Nodejs
The checksum (aka hash sum) calculation is a one-way process of mapping an extensive data set of variable length (e.g., message, file), to a smaller data set of a fixed length (hash). The length depends on a hashing algorithm.
For the checksum generation, we can use node crypto() module. The module uses createHash(algorithm) to create a checksum (hash) generator. The algorithm is dependent on the available algorithms supported by the version of OpenSSL on the platform.
Example:
const crypto = require('crypto');
// To get a list of all available hash algorithms
crypto.getHashes() // [ 'md5', 'sha1', 'sha3-256', ... ]
// Create hash of SHA1 type
const key = "MY_SECRET_KEY";
// 'digest' is the output of hash function containing
// only hexadecimal digits
hashPwd = crypto.createHash('sha1').update(key).digest('hex');
console.log(hashPwd); //ef5225a03e4f9cc953ab3c4dd41f5c4db7dc2e5b
Q. How to gracefully shutdown Node.js Server?
The graceful shutdown of our application indicates when all of the resources it used and all of the traffic and/or data processing what it handled are closed and released properly. It means that no database connection remains open and no ongoing request fails because we stop our application.
Possible scenarios for a graceful web server shutdown:
- Handle process kill signal
- Stop new requests from client
- Close all data process
- Exit from process
Example:
function shutdown() {
server.close(function onServerClosed(err) {
if (err) {
console.error(err);
process.exit(1);
}
closeMyResources(function onResourcesClosed(err) {
// error handling
process.exit();
});
});
}
process.on("SIGTERM", function onSigterm() {
console.info("Got SIGTERM. Graceful shutdown start", new Date().toISOString());
// start graceul shutdown here
shutdown();
});
Q. What kind of web application should never be built by using Node.js?
Node.js development has many benefits, but it won't provide the best performance for some application's needs or processes. Here are the points for which developers or businesses must avoid Node.js:
1. A CPU-Heavy Application:
Node.js uses an event-based, non-blocking I/O architecture and only has one CPU – all of that intensive CPU processing would block incoming requests. As a result of the high-end number crunching, the thread might get stuck.
2. A Relational Database-Backed Server-Side App:
You can also develop a standard web application on the server using Node.js and express.js. However, the responsiveness of Node.js will be hampered if these web applications consume a lot of CPU power. Because Node.js Relational DB tool is still in beta, it's best to use other environments to conduct relational operations.
3. Developing simple CRUD application:
You can use Node.js for such applications, but the performance and power for which Node.js is known would remain useless. Hence, it is strongly recommended to go for other frameworks or environments for developing simple HTML application instead of Node.js.
Q. What are the types of applications you can build with Node.js?
Node.js is a JavaScript runtime environment built upon event-driven programming that enables non-blocking I/O (Input/Output) capable of serving multiple concurrent events in a single thread. Non-blocking I/O makes Node.js very fast, lightweight, scalable, and efficient in handling data-heavy and I/O-heavy workloads characteristic of several types of web applications.
Types of applications you can build with Node.js
- IoT (Internet of Things)
- Real-Time Chat Application
- Single-Page Application
- Social Media Platform
- Streaming App
- Online Payment Processor
- Remote Collaboration Tool
- CRM Tool
- Advanced Fintech App
- Content Management System
- E-Learning Platform
- E-Commerce Platform
- Ridesharing App
- Project Management Tools
- Location-Based App
- Online Publishing Platforms
- ERP Tool
- Websites With Server-Side Rendering
- FastCGI Servers
- Command Line Tools
- API Servers
- Desktop Apps
- Backend for Mobile Apps
- Server Management Services
- Notification Centre
- Custom DNS Server
- Static Site Generator
- Game Servers, Game Clients
Q. What are the use cases for the Node.js “vm” core module?
The “VM” module enables compiling and running code within V8 Virtual Machine contexts. JavaScript code can be compiled and run immediately or compiled, saved, and run later. It provides a way of executing JavaScript on a virtual machine.
A common use case is to run the code in a different V8 Context. This means invoked code has a different global object than the invoking code.
Syntax:
const vm = require('vm');
VM Methods:
| Method | Description |
|---|---|
| createContext() | Prepares a virtual machine, or sandbox, where you can execute scripts |
| isContext() | Returns true if the specified sandbox has been created by the createContext() method |
| runInContext() | Executes JavaScript code in the specified context, and returns the result |
| runInDebug() | Executes JavaScript inside the debug context |
| runInNewContext() | Executes JavaScript code in a new context, and returns the result |
| runInThisContext() | Executes JavaScript code in the global context, and returns the result |
Example:
const vm = require("vm");
const x = 10;
const context = { x: 20 };
vm.createContext(context); // Contextify the object.
const code = "x += 10";
// Initially, x has the value 20 because that is the value of "context.x"
vm.runInContext(code, context);
console.log(context.x); // 30
console.log(x); // 10
Note: The vm module is not a security mechanism. Do not use it to run untrusted code.
Q. What is the path module in Node.js?
The path module provides utilities for working with file and directory paths. It handles cross-platform differences between Unix (/) and Windows (\) path separators automatically.
Example:
const path = require('path');
// Join path segments (cross-platform)
console.log(path.join('/users', 'alice', 'docs', 'file.txt'));
// /users/alice/docs/file.txt
// Resolve an absolute path from the current working directory
console.log(path.resolve('src', 'index.js'));
// /current/working/dir/src/index.js
// Directory name
console.log(path.dirname('/users/alice/file.txt')); // /users/alice
// File name with and without extension
console.log(path.basename('/users/alice/file.txt')); // file.txt
console.log(path.basename('/users/alice/file.txt', '.txt')); // file
// File extension
console.log(path.extname('index.html')); // .html
// Parse a path into its components
console.log(path.parse('/users/alice/file.txt'));
// { root: '/', dir: '/users/alice', base: 'file.txt', ext: '.txt', name: 'file' }
// Normalize a path (resolves . and ..)
console.log(path.normalize('/users/alice/../bob/./file.txt'));
// /users/bob/file.txt
__dirname and __filename (CommonJS):
console.log(__dirname); // absolute path of the directory containing the file
console.log(__filename); // absolute path of the current file
// Building safe paths relative to the current file
const configPath = path.join(__dirname, 'config', 'settings.json');
Q. What is the os module in Node.js?
The os module provides operating system-level utility functions and properties. It is commonly used to retrieve platform information, CPU count for clustering, memory stats, and system identifiers.
Example:
const os = require('os');
console.log('Platform: ', os.platform()); // win32 | linux | darwin
console.log('Architecture: ', os.arch()); // x64 | arm64
console.log('CPU cores: ', os.cpus().length); // e.g., 8
console.log('Hostname: ', os.hostname());
console.log('Home dir: ', os.homedir()); // /home/user or C:\Users\user
console.log('Temp dir: ', os.tmpdir());
console.log(
'Total memory: ',
(os.totalmem() / 1024 ** 3).toFixed(2), 'GB'
);
console.log(
'Free memory: ',
(os.freemem() / 1024 ** 3).toFixed(2), 'GB'
);
console.log('Uptime: ', os.uptime(), 'seconds');
console.log('OS type: ', os.type()); // Linux | Windows_NT | Darwin
console.log('EOL marker: ', JSON.stringify(os.EOL)); // "\n" or "\r\n"
Common use cases:
const cluster = require('cluster');
const os = require('os');
// Fork one worker per CPU core
if (cluster.isPrimary) {
const numCPUs = os.cpus().length;
for (let i = 0; i < numCPUs; i++) cluster.fork();
}
Q. How to measure function execution time in Node.js?
Use console.time() / console.timeEnd() for quick profiling, or performance.now() / process.hrtime.bigint() for high-resolution timing in production code.
1. console.time() (development / debugging):
console.time('myFunction');
for (let i = 0; i < 1_000_000; i++) {
// simulated work
}
console.timeEnd('myFunction'); // myFunction: 3.456ms
2. performance.now() (Web Performance API, available globally since Node.js v16):
const { performance } = require('perf_hooks');
const start = performance.now();
for (let i = 0; i < 1_000_000; i++) {}
const end = performance.now();
console.log(`Execution time: ${(end - start).toFixed(3)} ms`);
3. process.hrtime.bigint() (highest resolution, nanoseconds):
const start = process.hrtime.bigint();
for (let i = 0; i < 1_000_000; i++) {}
const end = process.hrtime.bigint();
console.log(`Execution time: ${(end - start) / 1_000_000n} ms`);
Q. What is Distributed Denial of Service (DDoS) attacks and how to secure NodeJS REST API from it?
A Distributed Denial of Service (DDoS) attack attempts to make a server unavailable by flooding it with a massive volume of requests from many different sources simultaneously, exhausting its CPU, memory, bandwidth, or connection limits.
Common DDoS and abuse attack vectors:
| Attack Type | Description |
|---|---|
| Volumetric | Flood with high traffic (UDP flood, ICMP flood) |
| Protocol | Exploit protocol weaknesses (SYN flood) |
| Application layer (L7) | Target specific endpoints with HTTP requests |
| Brute force | Repeated login/password guesses |
| Slowloris | Keep many connections open slowly |
Securing a Node.js REST API:
1. Rate Limiting (express-rate-limit):
const rateLimit = require('express-rate-limit');
app.use(rateLimit({
windowMs: 15 * 60 * 1000, // 15 minutes
max: 100, // max requests per window per IP
standardHeaders: 'draft-7',
legacyHeaders: false,
}));
2. Slow down repeated requests (express-slow-down):
const slowDown = require('express-slow-down');
app.use(slowDown({
windowMs: 60 * 1000,
delayAfter: 50, // start slowing after 50 requests
delayMs: (hits) => hits * 200, // each extra request adds 200ms delay
}));
3. Use Helmet to set secure HTTP headers:
const helmet = require('helmet');
app.use(helmet()); // sets X-Content-Type-Options, X-Frame-Options, HSTS, etc.
4. Limit request body size:
app.use(express.json({ limit: '10kb' }));
app.use(express.urlencoded({ limit: '10kb', extended: true }));
5. Use a reverse proxy / CDN with DDoS protection:
Place your Node.js app behind Nginx, Cloudflare, AWS Shield, or AWS WAF which can absorb and filter attack traffic before it reaches your application.
# nginx.conf — connection limiting
limit_conn_zone $binary_remote_addr zone=addr:10m;
limit_conn addr 100;
limit_req_zone $binary_remote_addr zone=api:10m rate=10r/s;
limit_req zone=api burst=20 nodelay;
6. Block suspicious IPs and implement allowlists:
const blocklist = new Set(['1.2.3.4', '5.6.7.8']);
app.use((req, res, next) => {
const ip = req.ip;
if (blocklist.has(ip)) {
return res.status(403).json({ message: 'Forbidden' });
}
next();
});
7. Monitor and alert:
Use tools like Datadog, New Relic, or Prometheus + Grafana to detect traffic spikes and trigger automated scaling or blocking rules.
Defence-in-depth summary:
| Layer | Tool |
|---|---|
| Network/CDN | Cloudflare, AWS Shield |
| Reverse proxy | Nginx, HAProxy |
| Application | express-rate-limit, Helmet |
| Monitoring | Datadog, Prometheus |
Q. What are SOLID principles?
SOLID is an acronym for five object-oriented design principles that make software more maintainable, scalable, and testable. They apply equally well to Node.js/JavaScript code.
| Letter | Principle | Short definition |
|---|---|---|
| S | Single Responsibility Principle | A class/module should have only one reason to change |
| O | Open/Closed Principle | Open for extension, closed for modification |
| L | Liskov Substitution Principle | Subtypes must be substitutable for their base types |
| I | Interface Segregation Principle | No client should depend on methods it does not use |
| D | Dependency Inversion Principle | Depend on abstractions, not concretions |
S — Single Responsibility Principle:
// Bad: one class does too many things
class UserService {
createUser(data) { /* ... */ }
sendWelcomeEmail(user) { /* ... */ } // email logic does not belong here
saveToDatabase(user) { /* ... */ } // DB logic does not belong here
}
// Good: each class has one responsibility
class UserService {
constructor(userRepository, emailService) {
this.repo = userRepository;
this.email = emailService;
}
async createUser(data) {
const user = await this.repo.save(data);
await this.email.sendWelcome(user);
return user;
}
}
O — Open/Closed Principle:
// Bad: must modify existing code to add a new discount type
function getDiscount(type, price) {
if (type === 'student') return price * 0.8;
if (type === 'senior') return price * 0.7;
// adding new type requires editing this function
}
// Good: extend via new classes without modifying existing ones
class StudentDiscount { apply(price) { return price * 0.8; } }
class SeniorDiscount { apply(price) { return price * 0.7; } }
class VIPDiscount { apply(price) { return price * 0.6; } } // new type, no edit
function getDiscount(strategy, price) {
return strategy.apply(price);
}
L — Liskov Substitution Principle:
class Shape { area() { throw new Error('Not implemented'); } }
class Circle extends Shape { constructor(r) { super(); this.r = r; } area() { return Math.PI * this.r ** 2; } }
class Square extends Shape { constructor(s) { super(); this.s = s; } area() { return this.s ** 2; } }
// Any Shape subtype can be passed here — LSP satisfied
function printArea(shape) {
console.log(`Area: ${shape.area()}`);
}
I — Interface Segregation Principle:
// Bad: one fat interface forces unused methods
class Animal {
eat() {}
fly() {} // fish don\'t fly — forced to implement or leave empty
swim() {}
}
// Good: split into focused interfaces (mixins)
const Swimmer = (Base) => class extends Base { swim() { console.log('swimming'); } };
const Flyer = (Base) => class extends Base { fly() { console.log('flying'); } };
class Animal { eat() { console.log('eating'); } }
class Fish extends Swimmer(Animal) {}
class Bird extends Flyer(Swimmer(Animal)) {}
D — Dependency Inversion Principle:
// Bad: high-level module depends on a concrete low-level module
class OrderService {
constructor() {
// tightly coupled — impossible to swap DB or unit test without a real MSSQL connection
this.db = new MSSQLDatabase();
}
}
// Good: depend on an abstraction injected from outside
// db/mssqlDatabase.js — concrete MSSQL implementation
const sql = require('mssql');
class MSSQLDatabase {
constructor(pool) {
this.pool = pool; // injected mssql pool
}
async save(order) {
const result = await this.pool.request()
.input('productId', sql.Int, order.productId)
.input('quantity', sql.Int, order.quantity)
.input('total', sql.Decimal(10,2), order.total)
.query(`
INSERT INTO orders (productId, quantity, total)
OUTPUT INSERTED.id, INSERTED.productId, INSERTED.quantity, INSERTED.total
VALUES (@productId, @quantity, @total)
`);
return result.recordset[0];
}
}
// services/orderService.js — high-level module depends only on the injected abstraction
class OrderService {
constructor(database) { // accepts any object with a .save() method
this.db = database;
}
async placeOrder(order) {
if (!order.productId || !order.quantity) {
throw new Error('Invalid order data');
}
return this.db.save(order);
}
}
// app.js — compose dependencies at the top (composition root)
const { poolPromise } = require('./db/mssql');
(async () => {
const pool = await poolPromise;
// Production: real MSSQL database
const mssqlDb = new MSSQLDatabase(pool);
const service = new OrderService(mssqlDb);
// Test: plain mock — no real DB needed
const mockDb = { save: jest.fn().mockResolvedValue({ id: 1 }) };
const testSvc = new OrderService(mockDb);
})();
Q. How to develop Node.js app using SOLID principles?
A practical Express.js REST API structured around all five SOLID principles:
Project structure:
src/
├── controllers/ userController.js (S)
├── services/ userService.js (S, D)
├── repositories/ userRepository.js (S, D)
├── middlewares/ errorHandler.js (S)
├── validators/ userValidator.js (S, I)
└── app.js
1. Repository (Data Access) — S & D:
// src/repositories/userRepository.js
class UserRepository {
constructor(db) {
this.db = db; // injected — Dependency Inversion
}
async findById(id) { return this.db.collection('users').findOne({ _id: id }); }
async save(data) { return this.db.collection('users').insertOne(data); }
}
module.exports = UserRepository;
2. Service (Business Logic) — S & O:
// src/services/userService.js
class UserService {
constructor(userRepository, emailService) {
this.repo = userRepository;
this.email = emailService;
}
async createUser(data) {
const existing = await this.repo.findByEmail(data.email);
if (existing) throw Object.assign(new Error('Email already exists'), { status: 409 });
const user = await this.repo.save({ ...data, createdAt: new Date() });
await this.email.sendWelcome(user); // Open/Closed: swap email provider without touching service
return user;
}
async getUserById(id) {
const user = await this.repo.findById(id);
if (!user) throw Object.assign(new Error('User not found'), { status: 404 });
return user;
}
}
module.exports = UserService;
3. Controller (HTTP layer) — S:
// src/controllers/userController.js
class UserController {
constructor(userService) {
this.service = userService;
}
create = async (req, res, next) => {
try {
const user = await this.service.createUser(req.body);
res.status(201).json(user);
} catch (err) { next(err); }
};
getById = async (req, res, next) => {
try {
const user = await this.service.getUserById(req.params.id);
res.json(user);
} catch (err) { next(err); }
};
}
module.exports = UserController;
4. Validator middleware — I (focused, single concern):
// src/validators/userValidator.js
const Joi = require('joi');
const createUserSchema = Joi.object({
name: Joi.string().min(2).max(50).required(),
email: Joi.string().email().required(),
age: Joi.number().integer().min(18).optional(),
});
const validateCreateUser = (req, res, next) => {
const { error } = createUserSchema.validate(req.body, { abortEarly: false });
if (error) {
return res.status(400).json({ errors: error.details.map(d => d.message) });
}
next();
};
module.exports = { validateCreateUser };
5. Centralized error handler — S:
// src/middlewares/errorHandler.js
const errorHandler = (err, req, res, next) => {
const status = err.status || err.statusCode || 500;
const message = err.message || 'Internal Server Error';
console.error(`[${status}] ${req.method} ${req.url} — ${message}`);
res.status(status).json({ message });
};
module.exports = errorHandler;
6. Wiring everything together — D (composition root):
// src/app.js
const express = require('express');
const UserRepository = require('./repositories/userRepository');
const UserService = require('./services/userService');
const UserController = require('./controllers/userController');
const EmailService = require('./services/emailService');
const errorHandler = require('./middlewares/errorHandler');
const { validateCreateUser } = require('./validators/userValidator');
function createApp(db) {
const app = express();
app.use(express.json());
// Dependency Injection — compose at the top
const repo = new UserRepository(db);
const email = new EmailService();
const service = new UserService(repo, email);
const controller = new UserController(service);
app.post('/api/users', validateCreateUser, controller.create);
app.get('/api/users/:id', controller.getById);
app.use(errorHandler);
return app;
}
module.exports = createApp;
Benefits of this structure:
| Principle | Benefit achieved |
|---|---|
| S | Each file has one job — easy to find and change logic |
| O | Swap EmailService or UserRepository without touching business logic |
| L | Any repository implementing findById/save works with UserService |
| I | Validator only exposes what routes need |
| D | All dependencies injected — fully testable with mocks |